
SpringCloud笔记
1. 版本

2. 创建父工程
- 新建maven项目
- 选好java版本,从原型创建,选择maven-archetype-site
- 名称,工件等
- 选择自己的maven,及配置
- 删掉src
- 更改pom.xml(子项目中共用的依赖或将其版本统一写到父级配置中,以便统一管理)
父工程必须
对于dependencyManagement元素,一般放在父工程pom中,子模块继承后,能锁定版本,子module不用写groupId和version
如果子模块写了,以子模块优先
注意:
pluginManagement同理
关于“Plugin 'maven-clean-plugin:3.1.0' not found”报错,是因为没写groupId
maven跳过单元测试,点击闪电标志即可
对于dependency元素,其type属性默认为jar,
代表引入依赖,因为maven默认是单继承,只能有一个parent,如果需要依赖多个,则可以这样,能够方便版本管理
比如,对于springboot和springcloud的依赖,就需要这么做
父工程pom.xml:
<?xml version="1.0" encoding="UTF-8"?>

<project xmlns="http://maven.apache.org/POM/4.0.0" xmlns:xsi="http://www.w3.org/2001/XMLSchema-instance"
  xsi:schemaLocation="http://maven.apache.org/POM/4.0.0 http://maven.apache.org/xsd/maven-4.0.0.xsd">
  <modelVersion>4.0.0</modelVersion>

  <groupId>com.xxx</groupId>
  <artifactId>cloud2023</artifactId>
  <version>1.0-SNAPSHOT</version>
  <!--父工程只做子模块整合,不需要生成jar,war包-->
  <packaging>pom</packaging>

  <!-- 统一管理jar包版本 -->
  <properties>
    <project.build.sourceEncoding>UTF-8</project.build.sourceEncoding>
    <maven.compiler.source>1.8</maven.compiler.source>
    <maven.compiler.target>1.8</maven.compiler.target>
    <junit.version>4.12</junit.version>
    <lombok.version>1.18.10</lombok.version>
    <log4j.version>1.2.17</log4j.version>
    <mysql.version>8.0.29</mysql.version>
    <druid.version>1.2.16</druid.version>
    <mybatis.spring.boot.version>2.3.0</mybatis.spring.boot.version>
  </properties>

  <!-- 子模块继承后,能锁定版本,子module不用写groupId和version -->
  <dependencyManagement>
    <dependencies>
      <dependency>
        <groupId>org.apache.maven.plugins</groupId>
        <artifactId>maven-project-info-reports-plugin</artifactId>
        <version>3.0.0</version>
      </dependency>
      <!--spring boot 2.2.2-->
      <dependency>
        <groupId>org.springframework.boot</groupId>
        <artifactId>spring-boot-dependencies</artifactId>
        <version>2.2.2.RELEASE</version>
        <type>pom</type>
        <scope>import</scope>
      </dependency>
      <!--spring cloud Hoxton.SR1-->
      <dependency>
        <groupId>org.springframework.cloud</groupId>
        <artifactId>spring-cloud-dependencies</artifactId>
        <version>Hoxton.SR1</version>
        <type>pom</type>
        <scope>import</scope>
      </dependency>
      <!--spring cloud 阿里巴巴-->
      <dependency>
        <groupId>com.alibaba.cloud</groupId>
        <artifactId>spring-cloud-alibaba-dependencies</artifactId>
        <version>2.1.0.RELEASE</version>
        <type>pom</type>
        <scope>import</scope>
      </dependency>
      <!--mysql-->
      <dependency>
        <groupId>mysql</groupId>
        <artifactId>mysql-connector-java</artifactId>
        <version>${mysql.version}</version>
        <scope>runtime</scope>
      </dependency>
      <!-- druid-->
      <dependency>
        <groupId>com.alibaba</groupId>
        <artifactId>druid</artifactId>
        <version>${druid.version}</version>
      </dependency>
      <!--mybatis-->
      <dependency>
        <groupId>org.mybatis.spring.boot</groupId>
        <artifactId>mybatis-spring-boot-starter</artifactId>
        <version>${mybatis.spring.boot.version}</version>
      </dependency>
      <!--junit-->
      <dependency>
        <groupId>junit</groupId>
        <artifactId>junit</artifactId>
        <version>${junit.version}</version>
      </dependency>
      <!--log4j-->
      <dependency>
        <groupId>log4j</groupId>
        <artifactId>log4j</artifactId>
        <version>${log4j.version}</version>
      </dependency>
    </dependencies>
  </dependencyManagement>


  <build>
    <pluginManagement><!-- lock down plugins versions to avoid using Maven defaults (may be moved to parent pom) -->
      <plugins>
        <plugin>
          <artifactId>maven-clean-plugin</artifactId>
          <version>3.1.0</version>
        </plugin>
        <plugin>
          <artifactId>maven-site-plugin</artifactId>
          <version>3.7.1</version>
        </plugin>
        <plugin>
          <artifactId>maven-project-info-reports-plugin</artifactId>
          <version>3.0.0</version>
        </plugin>
      </plugins>
    </pluginManagement>
    <plugins>
      <plugin>
        <groupId>org.apache.maven.plugins</groupId>
        <artifactId>maven-site-plugin</artifactId>
        <configuration>
          <locales>en,fr</locales>
        </configuration>
      </plugin>
    </plugins>
  </build>

</project>
3. 支付模块、订单模块
流程:
- 建module
- 改pom
- 写yml
- 主启动
- 业务类
@Resource和@Autowire注解的区别:

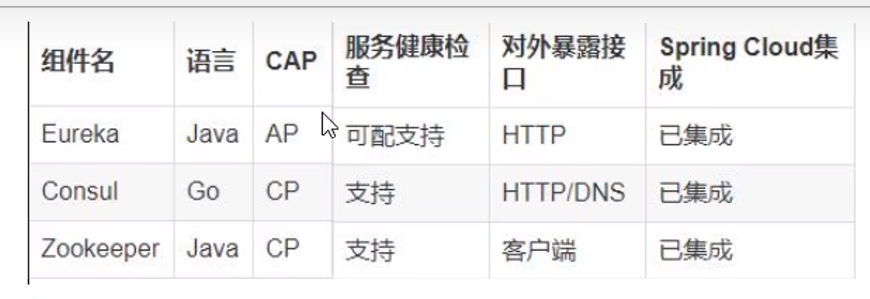
4. Eureka
4.1 基础知识
服务治理:
传统rpc远程调用中,每个服务之间依赖关系复杂,难以管理
所以可以使用Eureka实现服务治理,比如:服务调用、负载均衡、容错等,实现服务发现与注册
服务注册与发现:

Eureka包含两个组件:Eureka Server(服务注册) 和 Eureka Client(访问)
总的来说,可以监控各个微服务是否正常工作,管理每个服务与服务之间的依赖关系,存放服务地址相关信息
4.2 Eureka Server
pom文件:
<dependencies>
    <!--eureka-server--><!--这里如果不写版本会报错,无法引入2.2.1.RELEASE,还需要注意artifactId的"starter"-->
    <dependency>
        <groupId>org.springframework.cloud</groupId>
        <artifactId>spring-cloud-starter-netflix-eureka-server</artifactId>
        <version>2.2.2.RELEASE</version>
    </dependency>
    <dependency>
        <groupId>com.xxx</groupId>
        <artifactId>cloud-api-commons</artifactId>
    </dependency>
    <dependency>
        <groupId>org.springframework.boot</groupId>
        <artifactId>spring-boot-starter-web</artifactId>
    </dependency>
    <dependency>
        <groupId>org.springframework.boot</groupId>
        <artifactId>spring-boot-starter-actuator</artifactId>
    </dependency>
</dependencies>
yml文件:
server:
  port: 7001

eureka:
  instance:
    hostname: localhost #eureka服务端的实例名称
  client:
    #false表示不在注册中心注册自己
    register-with-eureka: false
    #服务发现,false表示自己端就是注册中心,维护服务实例,不需要去检索服务,不需要(从注册中心)获取信息
    fetch-registry: false
    service-url:
    #设置与Eureka Server交互的地址,查询服务和注册服务都需要依赖这个地址
      defaultZone: http://${eureka.instance.hostname}:${server.port}/eureka/
主启动类:
@SpringBootApplication
//表示是Eureka Server,注意是Server
@EnableEurekaServer
public class EurekaMain7001 {

    public static void main(String[] args) {
        SpringApplication.run(EurekaMain7001.class, args);
    }

}
无业务类,因为只需要作为Eureka Server
4.3 Eureka Client
其他每个微服务都要在pom中引入
<dependency>
    <!--注意artifactId的"starter"-->
    <groupId>org.springframework.cloud</groupId>
    <artifactId>spring-cloud-starter-netflix-eureka-client</artifactId>
    <version>2.2.10.RELEASE</version>
</dependency>
yml文件:
eureka:
  client:
    #true表示在注册中心注册自己,默认为true
    register-with-eureka: true
    #服务发现,true表示需要(从注册中心)获取注册信息,默认为true。单节点无所谓,集群必须为true,才能配合ribbon使用负载均衡
    fetch-registry: true
    service-url:
      #设置与Eureka Server交互的地址,查询服务和注册服务都需要依赖这个地址
      defaultZone: http://localhost:7001/eureka
主启动:
@SpringBootApplication
//加入这个注解,注意是Client,新版本没有作用了
@EnableEurekaClient
public class PaymentMain8001 {

    public static void main(String[] args) {
        SpringApplication.run(PaymentMain8001.class, args);
    }

}
4.4 Eureka集群
集群实现:①对于Eureka Server:互相注册,相互守望(完全有向图,每个机器上的Eureka Server都指向除自己外的每个Eureka Server)
②对于其他微服务:
4.5 支付微服务集群
除了端口,其他基本一致,多台机器端口应该是可以一样的,但不一样更好区分
//写死了,导致不能够使用支付模块的集群(只访问了固定的机器)
//public static final String PAYMENT_URL = "http://localhost:8001";
//这么写,才能访问到集群,即整个集群对外只暴露出同样的名称,名称即yml中的spring.application.name
public static final String PAYMENT_URL = "http://CLOUD-PAYMENT-SERVICE";但是只改这个名称,访问的时候识别不了
需要修改消费者的restTemplate配置
@Configuration
public class ApplicationContextConfig {

    @Bean
    @LoadBalanced   //赋予RestTemplate负载均衡的能力
    public RestTemplate getRestTemplate(){
        return new RestTemplate();
    }
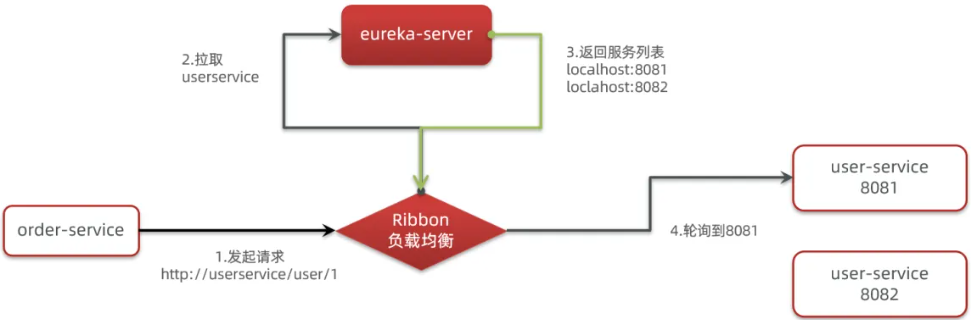
}实际上是请求被拦截后,Ribbon通过解析得到的微服务名称,从eureka拉取服务列表(集群的ip+端口),在通过负载均衡算出对应的host
4.6 actuator微服务信息完善
前提条件:pom文件引入spring-boot-starter-web和actuator
eureka:
  instance:
    instance-id: payment8001 #去掉名称前面的主机名(更加规范)
    prefer-ip-address: true #访问路径显示IP端口地址,左下角,更好的看出是那一台机器
 -------->
4.7 服务发现Discovery
功能:注册服务,与获取service信息(注册进eureka中的所有微服务的信息)
实现(主启动代码):
@SpringBootApplication
@EnableEurekaClient
//开启服务发现,配置文件默认开启,可以不注解
@EnableDiscoveryClient
public class PaymentMain8001 {

    public static void main(String[] args) {
        SpringApplication.run(PaymentMain8001.class, args);
    }

}
controller:
@Resource
private DiscoveryClient discoveryClient;

@GetMapping("/payment/discovery")
public Object discovery(){
    List<String> services = discoveryClient.getServices();
    for (String service : services) {
        log.info("******service:{}",service);
    }

    List<ServiceInstance> instances = discoveryClient.getInstances("CLOUD-PAYMENT-SERVICE");
    for (ServiceInstance instance : instances) {
        log.info("{}\t{}\t{}\t{}",instance.getInstanceId(),instance.getHost(),instance.getPort(),instance.getUri());
    }
    return discoveryClient;
}

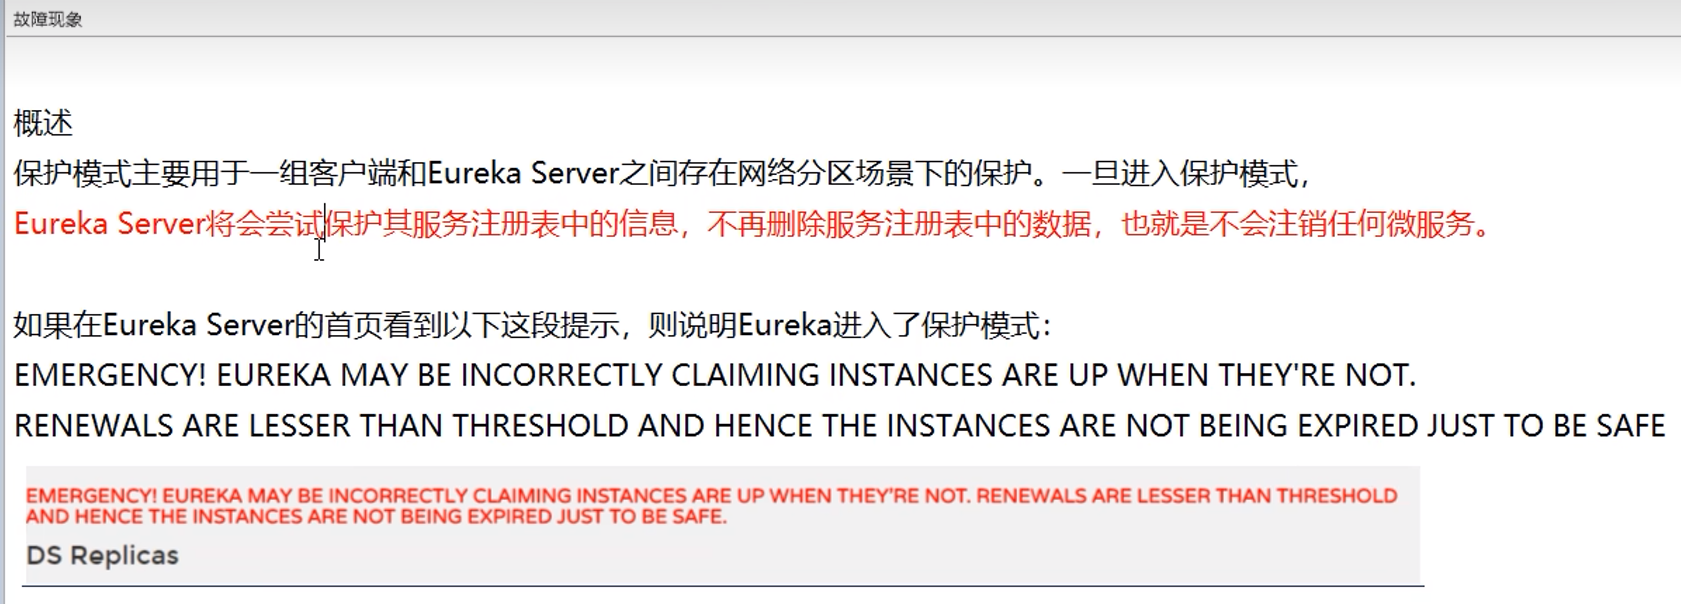
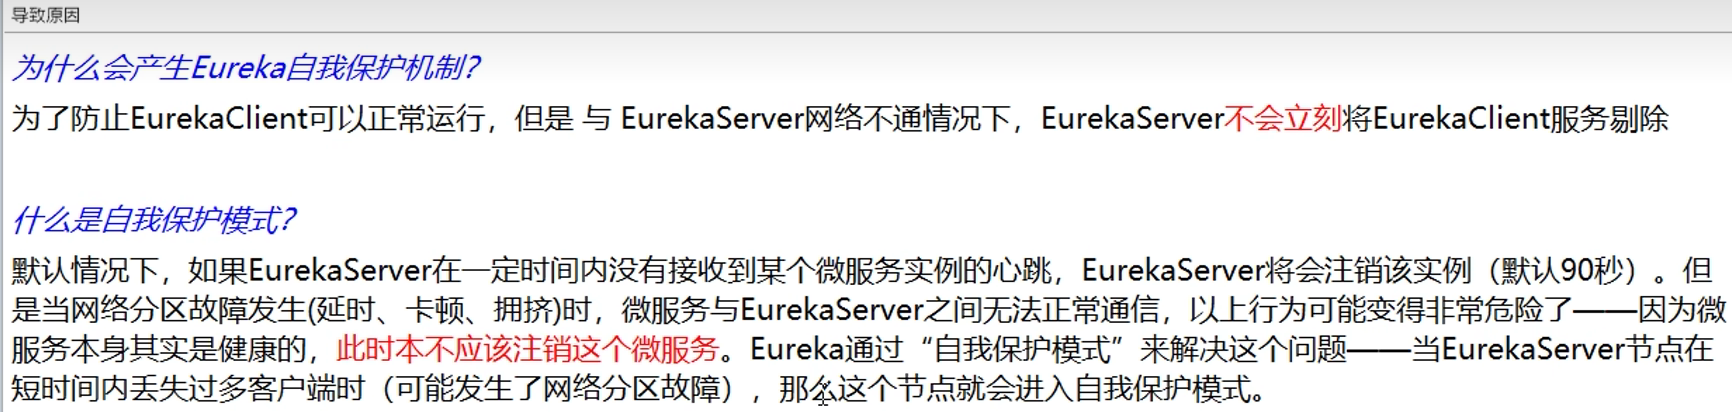
4.8 Eureka自我保护
概述:

关闭自我保护
server端:
eureka:
  server:
    #关闭自我保护,保证不可用服务被及时删除
    enable-self-preservation: false
    #逐出间隔时间,每隔一段时间踢出所有失效服务(定时任务),默认60s,单位毫秒
    eviction-interval-timer-in-ms: 2000
client端:
eureka:
  instance:
    #服务续约的间隔时间,即客户端向服务端发送心跳的间隔时间,默认30s,单位秒
    lease-renewal-interval-in-seconds: 1
    #服务端在收到最后一次心跳后的等待时间上限,超过就踢出服务,默认90s,单位秒
    lease-expiration-duration-in-seconds: 2
4.9 属于AP
5. Zookeeper
5.1 安装到linux
5.2 建立module
对于payment和order都差不多,order多一个restTemplate
pom文件:
<dependency>
    <groupId>org.springframework.cloud</groupId>
    <artifactId>spring-cloud-starter-zookeeper-discovery</artifactId>
</dependency>
yml文件:
server:
  port: 8004

spring:
  application:
    #服务别名,注册到注册中心
    name: payment8004
  cloud:
    zookeeper:
      #zookeeper地址
      connect-string: 192.168.198.107:2181
主启动类:
@SpringBootApplication
@EnableDiscoveryClient  //该注解用于,consul或zookeeper作为服务中心时注册服务,及获取服务信息,现在版本默认有该功能,不用注解
public class PaymentMain8004 {

    public static void main(String[] args) {
        SpringApplication.run(PaymentMain8004.class, args);
    }

}
启动zookeeper:
zkServer.sh start启动zookeeper客户端:
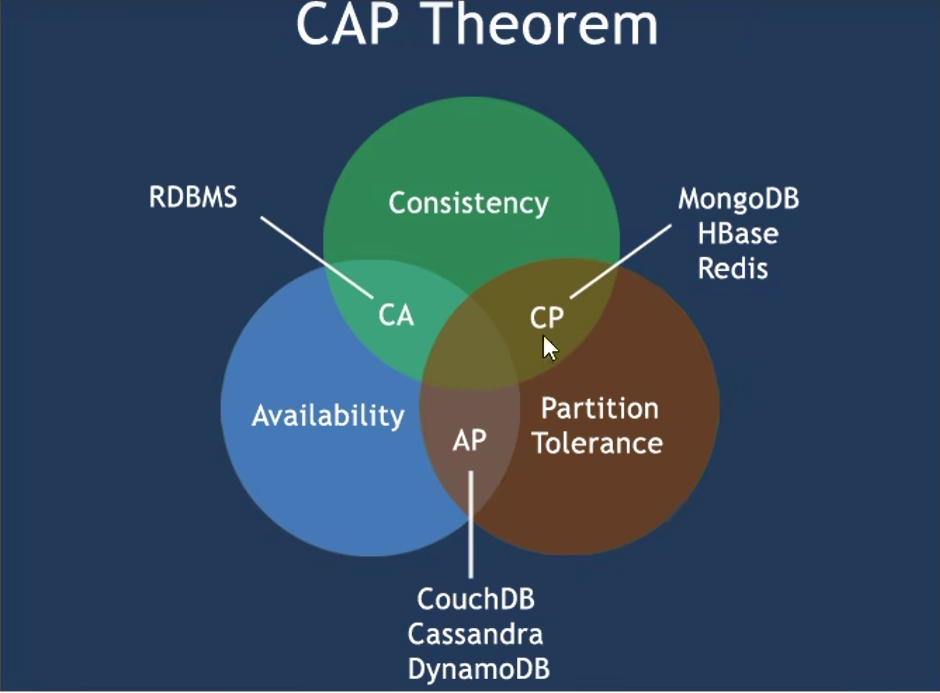
./zkCli.sh5.3 属于CP及CAP分析
属于CAP里面的CP分支
C:Consistency(一致性)
A: Availability(可用性)
P:Partition tolerance(分区容错性)
作为一个分布式系统,分区容错性是一个必须要考虑的关键点。一个分布式系统一旦丧失了分区容错性,也就表示放弃了扩展性。因为在分布式系统中,网络故障是经常出现的,一旦出现在这种问题就会导致整个系统不可用是绝对不能容忍的。所以,大部分分布式系统都会在保证分区容错性的前提下在一致性和可用性之间做权衡。
不存在CAP同时满足
Zookeeper集群是主从结构,Eureka集群是相互注册、相互守望,节点之间平等
Zookeeper集群当leader挂掉,需要时间选举,此时不能高可用(A),使用了Zab协议(Zookeeper Atomic Broadcast原子广播),向leader节点写数据时,leader会对follower节点主从数据同步,只有收到超过半数的ack信号才会发出commit进行写入,所以保证了一致性(C)
Eureka集群当某一挂掉,自动切换另一台,只要还有一台,就可用(A),虽然对于某一节点,收到的写请求会同步到其他节点,但是没有采取像一致性协议这种措施来保证同步,所以可能出现不一致(C)
5.4 默认临时节点
当一定时间没有接收到心跳包,会踢掉该节点,不论是网络还是挂掉
6. Consul
GO语言开发
安装成功,启动(consul agent -dev)后:http://localhost:8500/
6.1 建立module
对于payment和order都差不多,order多一个restTemplate
pom文件:
<dependency>
    <groupId>org.springframework.cloud</groupId>
    <artifactId>spring-cloud-starter-consul-discovery</artifactId>
</dependency>
yml文件:
server:
  port: 8006

spring:
  application:
    name: cloud-provider-payment
  cloud:
    consul:
      host: localhost
      port: 8500
      discovery:
        service-name: ${spring.application.name}
主启动:
@SpringBootApplication
@EnableDiscoveryClient
public class PaymentMain8006 {

    public static void main(String[] args) {
        SpringApplication.run(PaymentMain8006.class, args);
    }

}
6.2启动
consul agent -dev6.3 属于CP
因为使用raft协议
7. 三个注册中心总结
Eureka、Zookeeper、Consul

8. Ribbon
8.1 是什么
负载均衡和服务调用的工具

8.2 功能
LoadBlance负载均衡+ RestTemplate调用
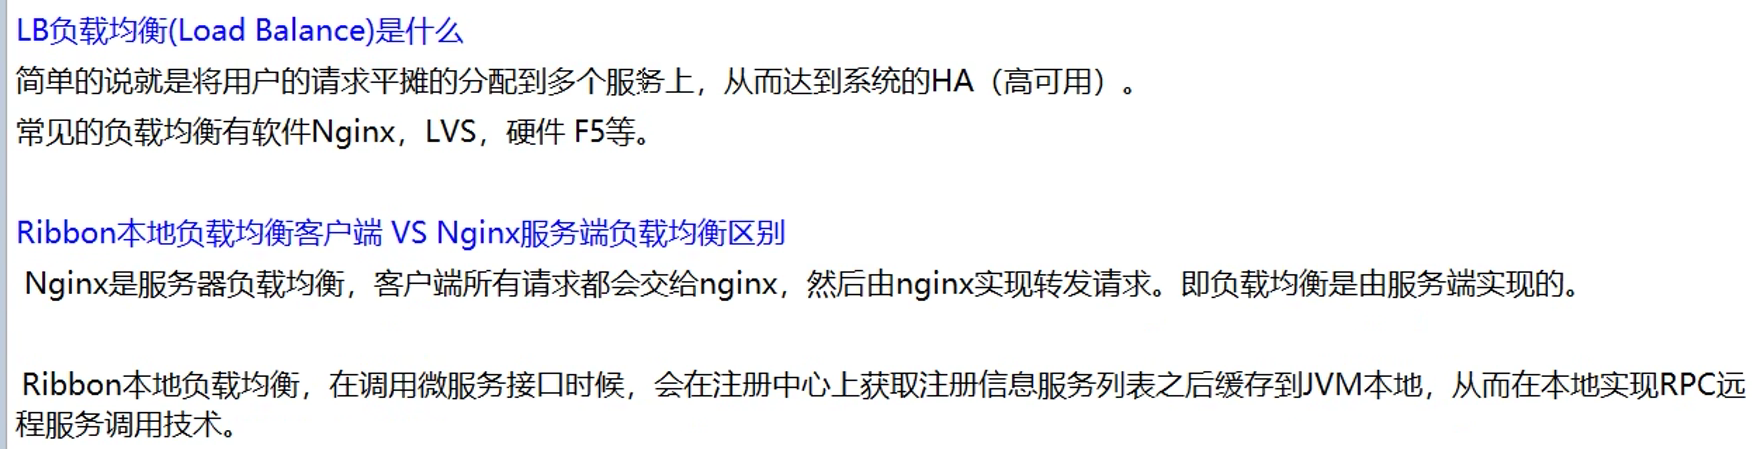
8.3 使用

以下eureka集成了ribbon,可以不用引入
<dependency>
    <groupId>org.springframework.cloud</groupId>
    <artifactId>spring-cloud-starter-netflix-ribbon</artifactId>
</dependency>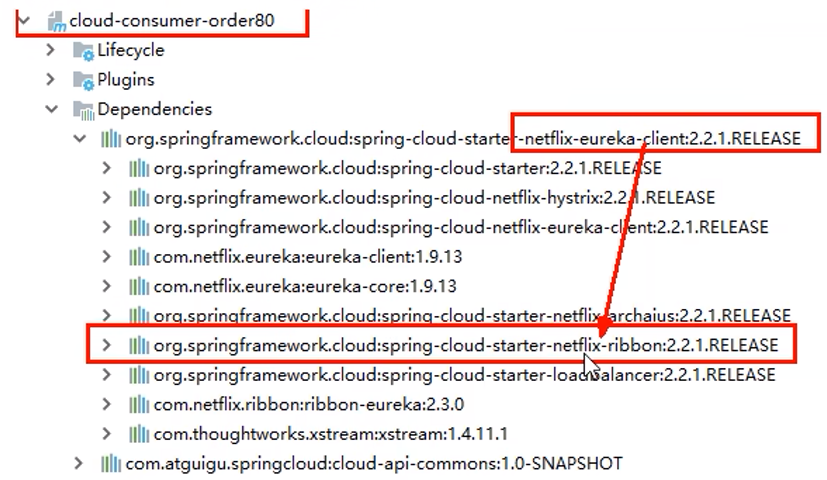
RestTemplate的使用:
getForObject/getForEntity方法
getForObject一般用于只需要json串
getForEntity返回的更加详细
8.4 自带的负载规则

8.5 负载规则替换
首先**不能被@ComponentScan所扫描到**,否则不能特殊化定制

两种方法:
- @ComponentScan排除掉该类(不适合于排除的类数量多的情况)
- 直接放在主启动所在的包的外面
排除:
@ComponentScan(excludeFilters = @ComponentScan.Filter(
        type = FilterType.ASSIGNABLE_TYPE,
        value = MySelfRule.class))
@SpringBootApplication
替换的Rule:
@Configuration
public class MySelfRule {

    @Bean
    public IRule myRule(){
        return new RandomRule();
    }

}
再主启动类替换:
configuration的值即自定义规则的配置类
注意:name的值必须和restTemplate中的url的名称保持一致(包括大小写!!!)
@RibbonClient(name = "CLOUD-PAYMENT-SERVICE",configuration = OuterMyRule.class)
@SpringBootApplication
@EnableEurekaClient
public class OrderMain80 {

    public static void main(String[] args) {
        SpringApplication.run(OrderMain80.class, args);
    }

}
8.6 负载均衡流程
轮询源码核心:
通过cas(比较并交换)实现了不加Synchronized能达到线程安全
compareAndSet就是与期望值比较,相等才能修改,返回true,不等就不能改,返回false
8.7 手写轮询算法,并替换
通过前面的替换(注意该配置不要被扫描到)
@RibbonClient(name = "CLOUD-PAYMENT-SERVICE",configuration = OuterMyRule.class)@Configuration
public class OuterMyRule {
@Bean
public IRule myRule(){
//替换成自己写的
return new MyRoundRobinRule();
}
}//通过实现IRule来自定义规则,此处为轮询
public class MyRoundRobinRule implements IRule {
private AtomicInteger atomicInteger;
//通过它获取所有sever
private ILoadBalancer lb;
public MyRoundRobinRule(){
atomicInteger = new AtomicInteger(0);
}
public MyRoundRobinRule(ILoadBalancer lb){
this();
setLoadBalancer(lb);
}
//核心,如何choose出一台server
@Override
public Server choose(Object key) {
if(lb == null){
return null;
}
List<Server> allServers = lb.getAllServers();
if(allServers == null || allServers.size() <= 0){
return null;
}
int current;
int next;
do{
current = atomicInteger.get();
next = current >= Integer.MAX_VALUE ? 0 : current+1;
}while (!atomicInteger.compareAndSet(current,next));
Server server = allServers.get(next % allServers.size());
if(server.isAlive() && server.isReadyToServe()){
return server;
}
return null;
}
@Override
public void setLoadBalancer(ILoadBalancer lb) {
this.lb = lb;
}
@Override
public ILoadBalancer getLoadBalancer() {
return lb;
}
}9.OpenFeign
9.1 是什么
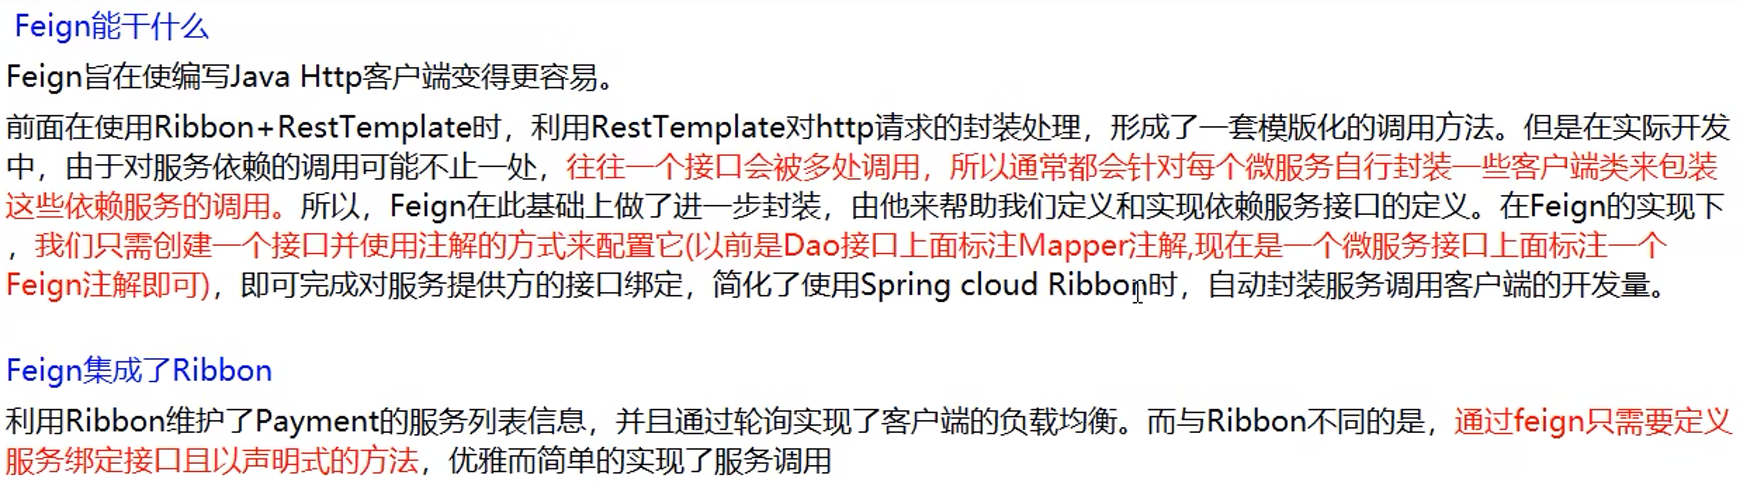
OpenFeign就是对Feign的增强
9.2 使用
pom文件:
<dependency>
    <groupId>org.springframework.cloud</groupId>
    <artifactId>spring-cloud-starter-openfeign</artifactId>
</dependency>
yml文件(没有额外配置):
server:
  port: 80

eureka:
  client:
    #true表示在注册中心注册自己,默认为true
    register-with-eureka: false
    service-url:
      #设置与Eureka Server交互的地址,查询服务和注册服务都需要依赖这个地址
      defaultZone: http://localhost:7001/eureka
主启动类:
@SpringBootApplication
//开启Feign
@EnableFeignClients
public class OrderFeignMain80 {

    public static void main(String[] args) {
        SpringApplication.run(OrderFeignMain80.class, args);
    }

}
写接口(提供该module需要调用(其他微服务)的接口):
相当于抽取出来(类似函数),不再像原来restTemplate,每个地方调用同一个接口,都要写一样的ip地址等,代码冗余
//指明调用哪个微服务(通过负载均衡)
@FeignClient("CLOUD-PAYMENT-SERVICE")
public interface PaymentFeignClient {
    //调用微服务的哪一个controller接口(即请求的路径),指明了什么方法(Get/Post...)
    @GetMapping(value = "/payment/get/{id}")
    //返回值即调用controller接口的返回值,方法参数即调用所需的参数
    CommonResult<Payment> getPaymentById(@PathVariable("id") Long id);

}
这里的接口方法只需要从要调用的其他微服务的controller哪里cv过来即可
使用该接口:
@Resource
private PaymentFeignClient paymentFeignClient;

@GetMapping("/consumer/payment/get/{id}")
public CommonResult<Payment> getPaymentById(@PathVariable("id") Long id){
    //直接调用即可
    return paymentFeignClient.getPaymentById(id);
}
9.3 超时控制
默认Feign客户端只会等待1s,如果调用其他微服务时,服务提供者处理超过了1s,Feign直接返回报错
如果有些业务确实需要一定时间,那么就应该(在yml文件中)设置Feign客户端的超时控制
yml文件2选1:
feign:
  client:
    config:
      default:
        connectTimeout: 5000
        readTimeout: 5000
ribbon:
#建立连接后,从服务器读取到可用资源的时间
ReadTimeout: 5000
#建立连接所用时间
ConnectTimeout: 50009.4 日志增强
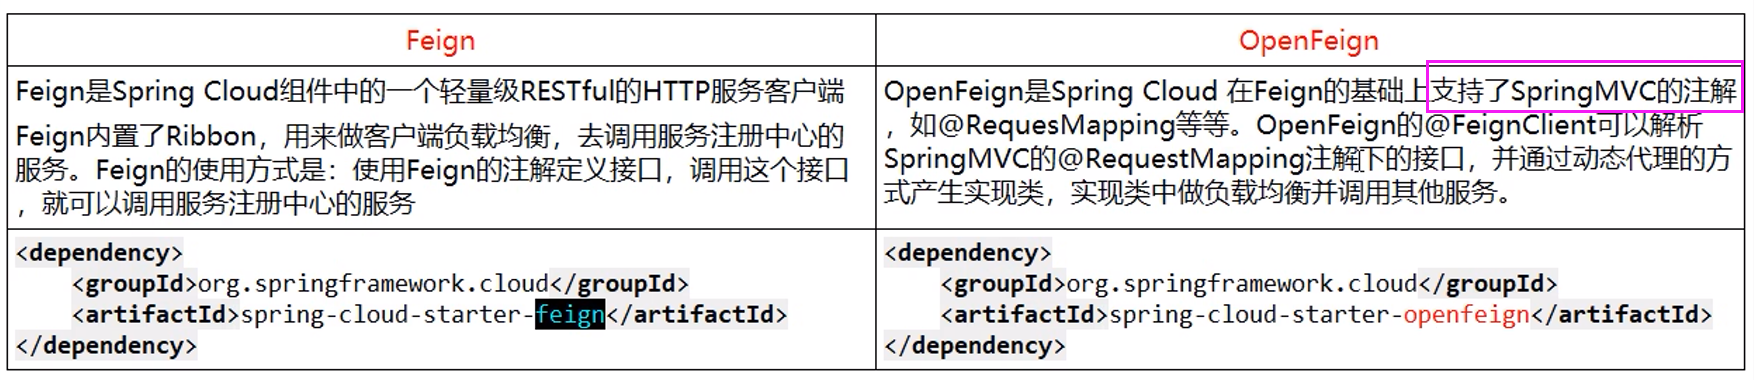
提供了日志打印,对feign接口的调用情况进行监控和输出
日志级别:
两种方式:
前提:打开springboot的debug日志,否则看不到,因为默认info
logging:
  level:
    #root表示所有没有指定的包,也可以这样指定包或者类
    com.xxx.springcloud.feignClient.*: debug
1.yml(推荐)
feign:
  client:
    config:
      default:  #这里写default就是全局配置,写服务名称,就只针对某个微服务
        loggerLevel: FULL  #日志级别
2.java代码
1.加@Configuration,如下,被扫描到则是全局生效
@Configuration
public class FeignConfig {

    @Bean
    Logger.Level feignLoggerLevel(){
        return Logger.Level.FULL;
    }

}2.1如果选择不加@Configuration,可以选择放在某个client上比如:
//对单个服务生效
@FeignClient(value = "CLOUD-PAYMENT-SERVICE", configuration = FeignConfig.class)2.2如果放在主启动类的@EnableFeignClients注解上:
//全局生效
@EnableFeignClients(defaultConfiguration = FeignConfig.class)
10. Hystrix
10.1 是什么
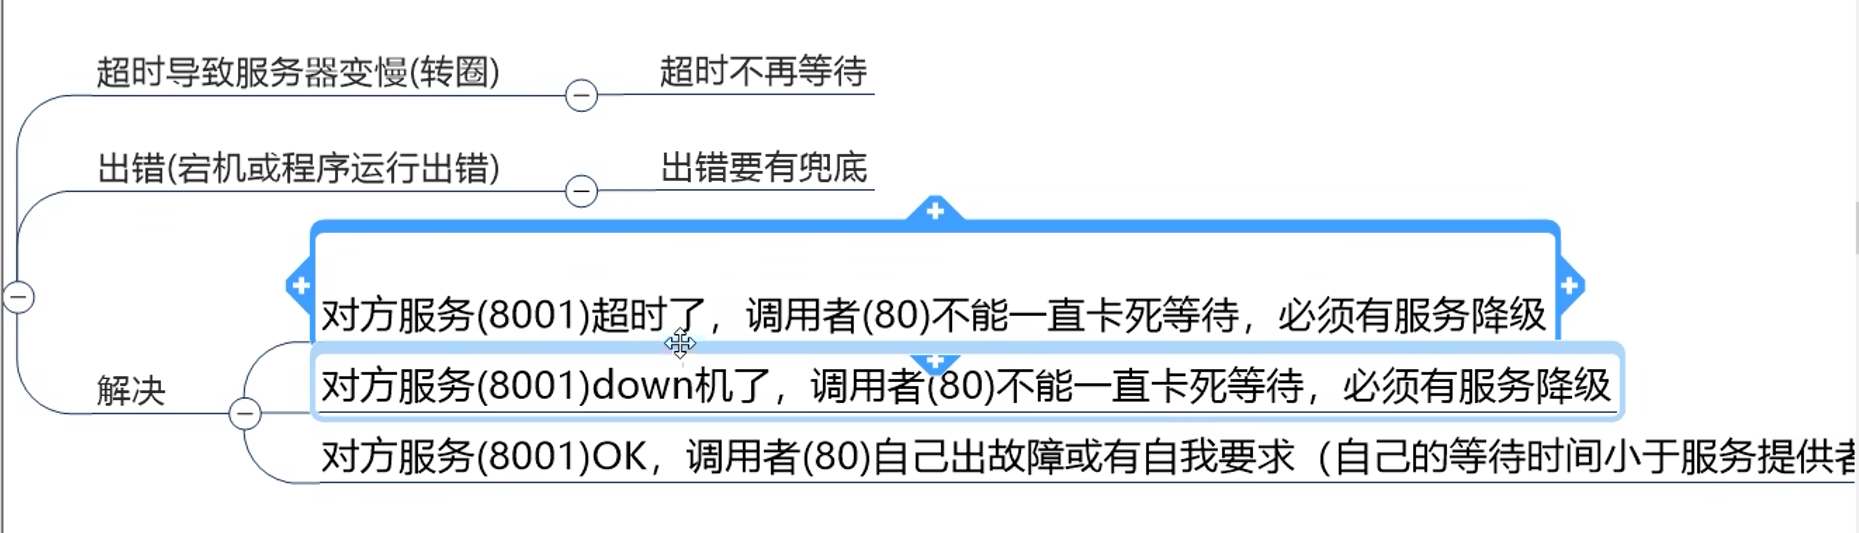
链路很长调用,可能中间某个响应时间长,或不可用,不处理的话,卡在这里,导致占用的资源越来越多,最后引起”雪崩“

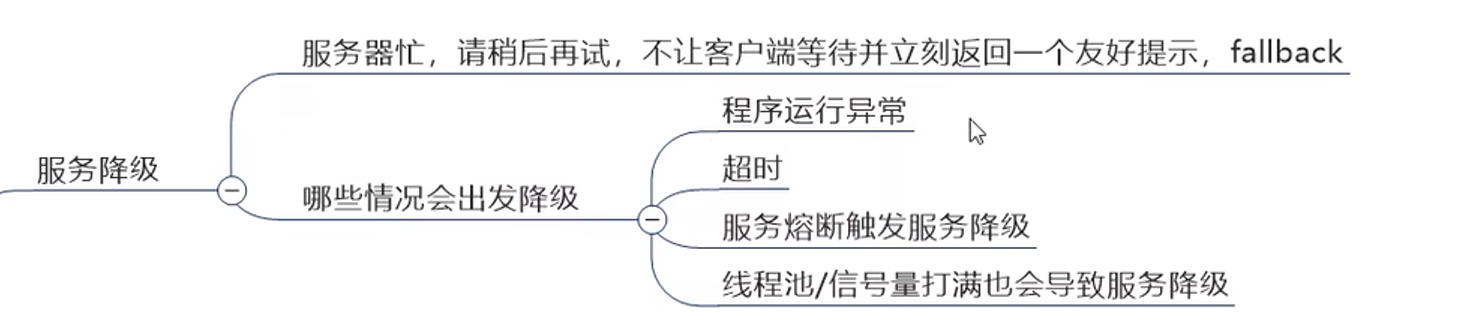
服务降级fallback,服务熔断break,服务限流flowlimit
10.2 使用
<dependency>
    <groupId>org.springframework.cloud</groupId>
    <artifactId>spring-cloud-starter-netflix-hystrix</artifactId>
</dependency>
10.3 Jmeter压测
两个请求:1.直接返回 2.sleep3秒再返回
正常情况下:只有访问请求2会转圈
200并发,循环100次后:
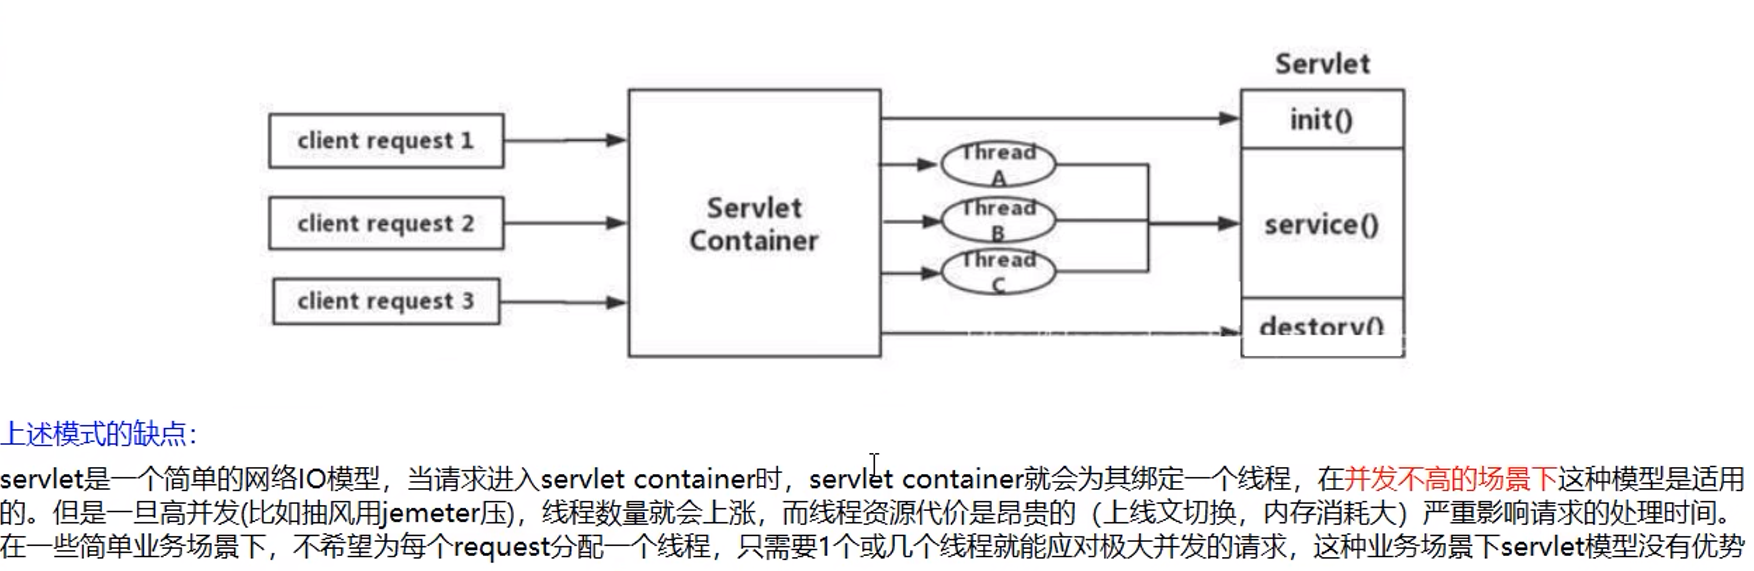
请求1也开始转圈:因为tomcat的默认工作线程被打满了,无多余线程分摊压力
10.4 服务降级的情况
10.5 服务降级
服务端:
启动类:
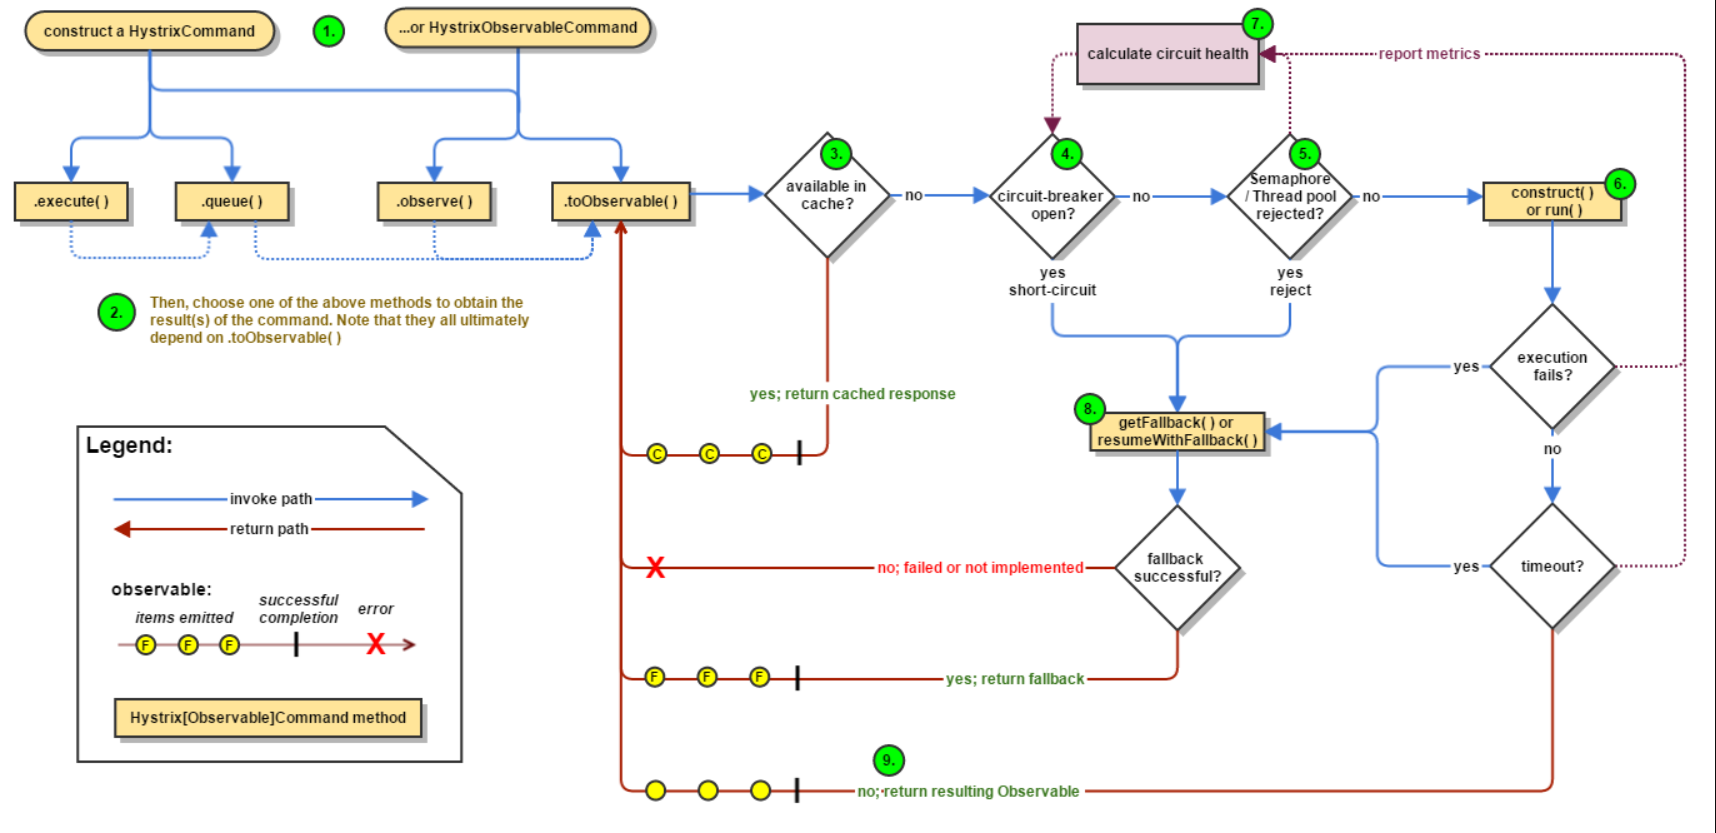
@EnableHystrix降级配置:@HystrixCommand
    @HystrixCommand(fallbackMethod = "paymentInfo_TimeoutHandler",commandProperties = {
            @HystrixProperty(name = "execution.isolation.thread.timeoutInMilliseconds", value = "3000")
    })
    public String paymentInfo_Timeout(Integer id){
        int timeNum = 5;
        try {
            TimeUnit.SECONDS.sleep(timeNum);
        } catch (InterruptedException e) {
            e.printStackTrace();
        }
        return "线程池:" + Thread.currentThread().getName() + "    paymentInfo_OK,id:  "+id + "\t 耗时:" + timeNum + "秒";
    }

    public String paymentInfo_TimeoutHandler(Integer id){
        return "线程池:" + Thread.currentThread().getName() + "    paymentInfo_TimeoutHandler,id:  "+id + "\t o(╥﹏╥)o";
    }
对于以上的paymentInfo_Timeout方法,
@HystrixCommand注解表示:
当参数commandProperties设置的调用超过3s(commandProperties
= {
@HystrixProperty(name =
"execution.isolation.thread.timeoutInMilliseconds", value =
"3000")
}),使用paymentInfo_TimeoutHandler方法(fallbackMethod
= "paymentInfo_TimeoutHandler")
对于1.计算异常(属于熔断?) 2.超时异常,都会使用paymentInfo_TimeoutHandler方法兜底
客户端:
1.yml文件
注意:这里必须同时设置hystrix和ribbon的时间,如果只有hystrix,超时时间为2s,只有ribbon,时间为1s
feign:
  hystrix:
    enabled: true

hystrix:
  command:
    default:
      execution:
        isolation:
          thread:
            #这里会与注解的超时取最小值,必须写(可能是因为默认1s,所以取最小值就可能是1s)
            timeoutInMilliseconds: 15000

ribbon:
  #建立连接后,从服务器读取到可用资源的时间
  ReadTimeout: 15000
  #建立连接所用时间
  ConnectTimeout: 15000
2.启动类
@EnableHystrix3.controller
@GetMapping("/consumer/payment/hystrix/timeout/{id}")
@HystrixCommand(fallbackMethod = "paymentInfo_TimeoutFallbackMethod", commandProperties = {
    @HystrixProperty(name = "execution.isolation.thread.timeoutInMilliseconds",value = "5500")
})
public String paymentInfo_Timeout(@PathVariable("id") Integer id){
    log.info("****时间:{}", new DateTime());
    String result = paymentHystrixFeignClient.paymentInfo_Timeout(id);
    return result;
}
//这里方法的参数必须和上面的参数一致!
public String paymentInfo_TimeoutFallbackMethod(@PathVariable("id") Integer id){
    return "80端口,对方8001支付系统繁忙,请10s后再试" + "   "+ new DateTime();
}
不可能每个都写个兜底方法,所以可以使用全局
使用:
@RestController
@Slf4j
//设置全局fallback方法,好像方法只能写在类中,可以设置commandProperties来实现超时控制
//不写超时,默认使用yml中的hystrix.command.default.execution.isolation.thread.timeoutInMilliseconds
@DefaultProperties(defaultFallback = "paymentInfo_GlobalFallbackMethod")
public class OrderHystrixController {

    @Resource
    private PaymentHystrixFeignClient paymentHystrixFeignClient;

    @GetMapping("/consumer/payment/hystrix/ok/{id}")
    public String paymentInfo_OK(@PathVariable("id") Integer id){
        String result = paymentHystrixFeignClient.paymentInfo_OK(id);
        return result;
    }

    //这里只需要@HystrixCommand,就可以使用设置的defaultFallback,不写就表示不用fallback
    //这里如果写了fallbackMethod,就优先使用这个局部的
    @GetMapping("/consumer/payment/hystrix/timeout/{id}")
//    @HystrixCommand(fallbackMethod = "paymentInfo_TimeoutFallbackMethod", commandProperties = {
//            @HystrixProperty(name = "execution.isolation.thread.timeoutInMilliseconds",value = "5500")
//    })
    @HystrixCommand
    public String paymentInfo_Timeout(@PathVariable("id") Integer id){
        log.info("****时间:{}", new DateTime());
        String result = paymentHystrixFeignClient.paymentInfo_Timeout(id);
        return result;
    }
    //这里方法的参数必须和上面的参数一致!
    public String paymentInfo_TimeoutFallbackMethod(@PathVariable("id") Integer id){
        return "80端口,对方8001支付系统繁忙,请10s后再试" + "   "+ new DateTime();
    }

    //全局,所以参数不可能与其他都一致,所以方法必须空参
    public String paymentInfo_GlobalFallbackMethod(){
        return "Global异常处理信息,请稍后再试" + "   "+ new DateTime();
    }


}以上写在类里面,逻辑混在一起,每个方法都要写@HystrixCommand,所以为了解决这个
采用下列方法:
针对服务名:cloud-provider-hystrix-payment的接口PaymentHystrixFeignClient,创建一个实现类,来统一进行处理
接口:
//fallback指明实现类
@FeignClient(value = "cloud-provider-hystrix-payment", fallback = PaymentFallback.class)
public interface PaymentHystrixFeignClient {

    @GetMapping("/payment/hystrix/ok/{id}")
    String paymentInfo_OK(@PathVariable("id") Integer id);

    @GetMapping("/payment/hystrix/timeout/{id}")
    String paymentInfo_Timeout(@PathVariable("id") Integer id);

}
实现类:
//注意这里必须要有component
@Component
public class PaymentFallback implements PaymentHystrixFeignClient {
    @Override
    public String paymentInfo_OK(Integer id) {
        return "paymentInfo_OK fallback~~~";
    }

    @Override
    public String paymentInfo_Timeout(Integer id) {
        return "paymentInfo_Timeout fallback~~~";
    }
}
yml:
feign:
  hystrix:
    enabled: true
这个可以实现:服务端down了,客户端可获得信息而不会挂起耗死服务器
注意:这个没有超时控制
服务端down了,调用的是这个实现类的处理,而不是全局的
服务端正常,客户端有异常,调用的是全局的
服务端down掉,客户端有异常(不论异常位置位于调用前还是调用后),经测试(除0异常)都显示全局异常
10.6 服务熔断
调用失败 -> 服务降级,调用fallback方法 (正常情况,会去尝试调用正常方法)
指定时间内,调用次数达到一定次数,其中的调用失败次数过多(降级次数过多,达到设置的失败率) -> 触发熔断 -> 跳过正常方法,直接调用fallback方法
当检测到该节点微服务调用响应正常后,恢复调用链路
具体:当熔断(跳闸)后,经过sleepWindowInMilliseconds这么多秒(默认5s此时间段内为open状态,直接调用fallback降级)后,开始重试(进入半开状态),尝试处理单个请求,如果该请求调用主逻辑成功,就恢复(闭合),失败则继续熔断(跳闸,然后sleep一段时间,重复这个过程)

Hystrix默认10s内20次有10次调用失败,就会启动熔断机制,注解仍然是@HystrixCommand
PaymentService文件:
//服务熔断
@HystrixCommand(fallbackMethod = "paymentCircuitBreaker_fallback",commandProperties = {
    @HystrixProperty(name = "circuitBreaker.enable", value = "true"),   //是否开启断路器
    //请求总数的阈值,默认10s(metrics.rollingStats.timeInMilliseconds,统计时间窗口)内要有这么多次数才起作用
    @HystrixProperty(name = "circuitBreaker.requestVolumeThreshold", value = "10"), //请求次数
    //open(跳闸)后,重试前,之间的时间
    @HystrixProperty(name = "circuitBreaker.sleepWindowInMilliseconds", value = "10000"),  //熔断时间窗口期
    @HystrixProperty(name = "circuitBreaker.errorThresholdPercentage", value = "60"),  //多少失败率熔断
})
public String paymentCircuitBreaker(Integer id){
    if(id < 0){
        throw new RuntimeException("********* id 不能为负数");
    }
    String serialNumber = IdUtil.simpleUUID();

    return Thread.currentThread().getName() + "\t调用成功,流水号:"+serialNumber;
}

public String paymentCircuitBreaker_fallback(Integer id){
    return "id 不能为负数,请稍后再试, id:" + id;
}
工作流程:
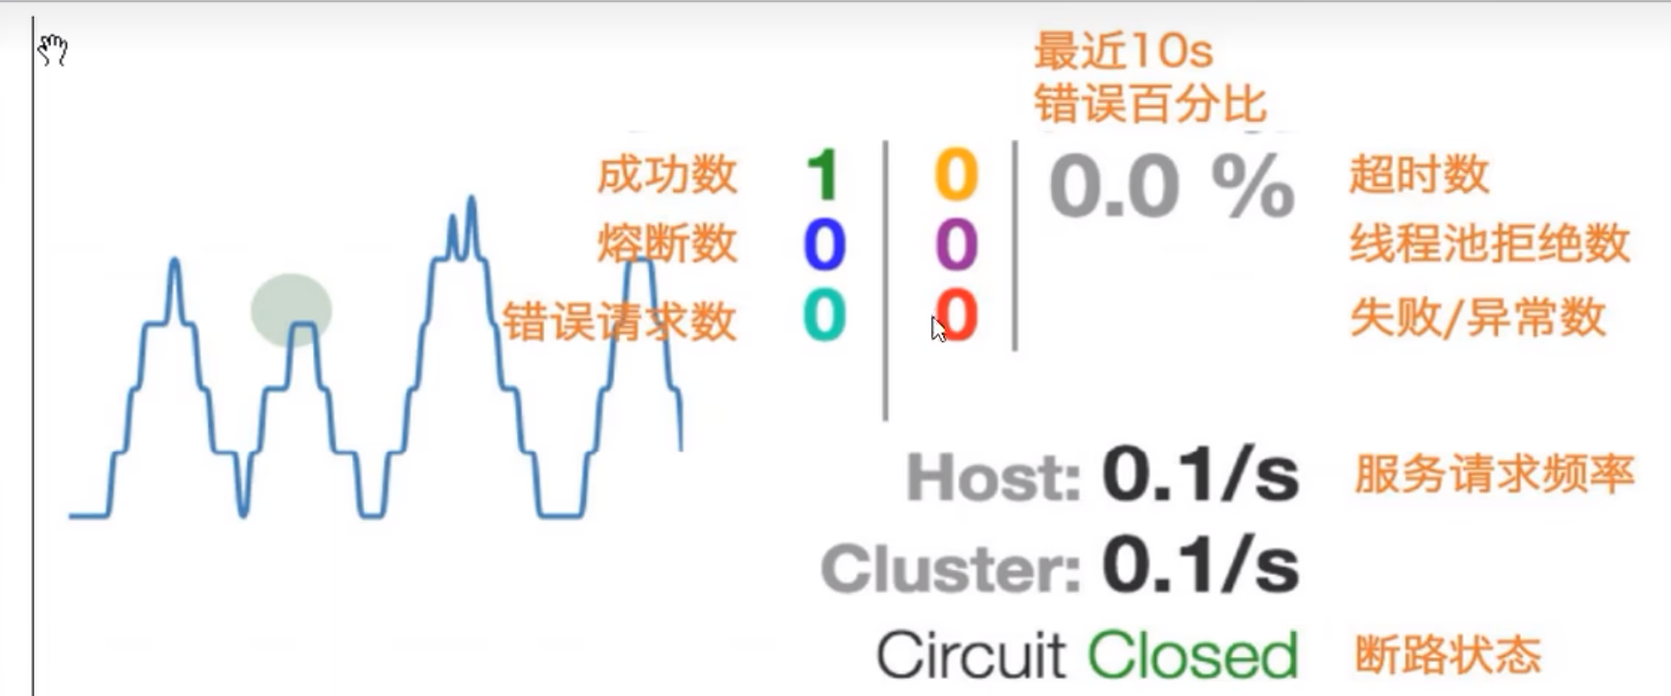
10.7 图形化监控

pom文件:
<dependency>
    <groupId>org.springframework.cloud</groupId>
    <artifactId>spring-cloud-starter-netflix-hystrix-dashboard</artifactId>
</dependency>主启动类注解:@EnableHystrixDashboard*
想要达到监控目的,所有provider微服务提供类的pom文件都必须配置好spring-boot-starter-actuator
<dependency>
    <groupId>org.springframework.boot</groupId>
    <artifactId>spring-boot-starter-actuator</artifactId>
</dependency>地址:http://localhost:9001/hystrix
版本原因的坑,如果无法正常使用监控,进行下面配置:
@SpringBootApplication
@EnableHystrix
public class PaymentHystrixMain8001 {

    public static void main(String[] args) {
        SpringApplication.run(PaymentHystrixMain8001.class, args);
    }

    /**
     * springcloud升级后,springboot默认路径不是"/hystrix.stream"
     */
    @Bean
    public ServletRegistrationBean getServlet(){
        HystrixMetricsStreamServlet streamServlet = new HystrixMetricsStreamServlet();
        ServletRegistrationBean registrationBean = new ServletRegistrationBean(streamServlet);
        registrationBean.setLoadOnStartup(1);
        registrationBean.addUrlMappings("/hystrix.stream");
        registrationBean.setName("HystrixMetricsStreamServlet");
        return registrationBean;
    }

}http://localhost:9001/hystrix页面下:
输入监控地址:http://localhost:8001/hystrix.stream
下面两个任填
监控页面的右边七种对应颜色代表,左边图的右上角数字统计
左边图的圆圈:


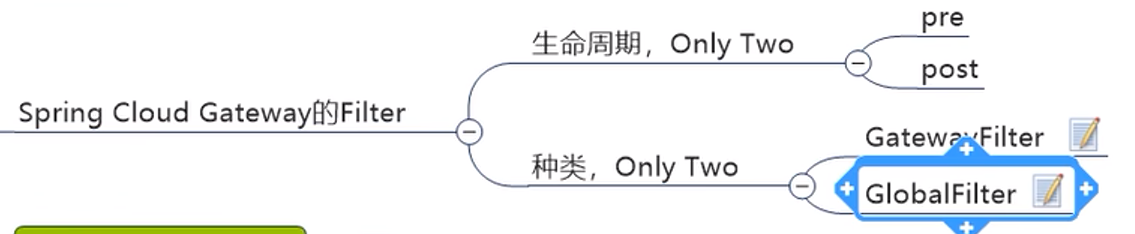
11. GateWay网关
11.1 是什么


11.2 为什么用
Zuul是Netflix的,而GateWay是springcloud自己研发,非阻塞异步模型
Zuul1.x基于servlet2.5的阻塞架构,而GateWay是基于响应式编程,异步非阻塞
Zuul1.x的模型:
GateWay模型:

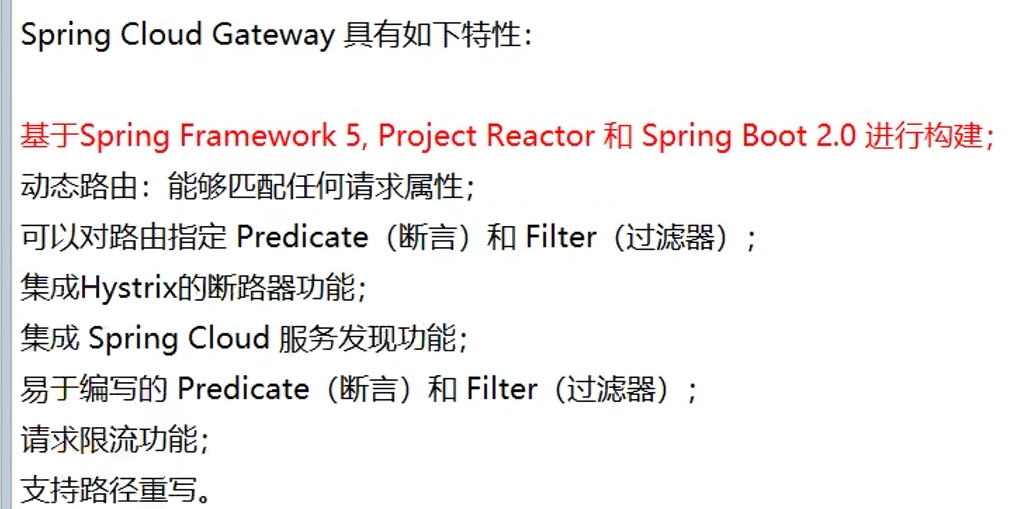
因此GateWay性能优于Zuul1.x,所以使用
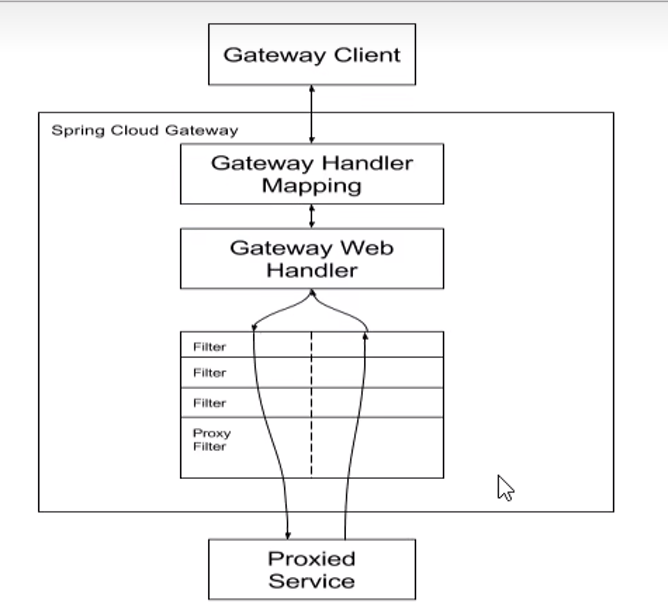
11.3 工作流程
Route(路由):由ID(路由唯一标识)、目标uri(路由目的地)、一系列的断言(是否符合)和过滤器组成,若断言为true则匹配该路由
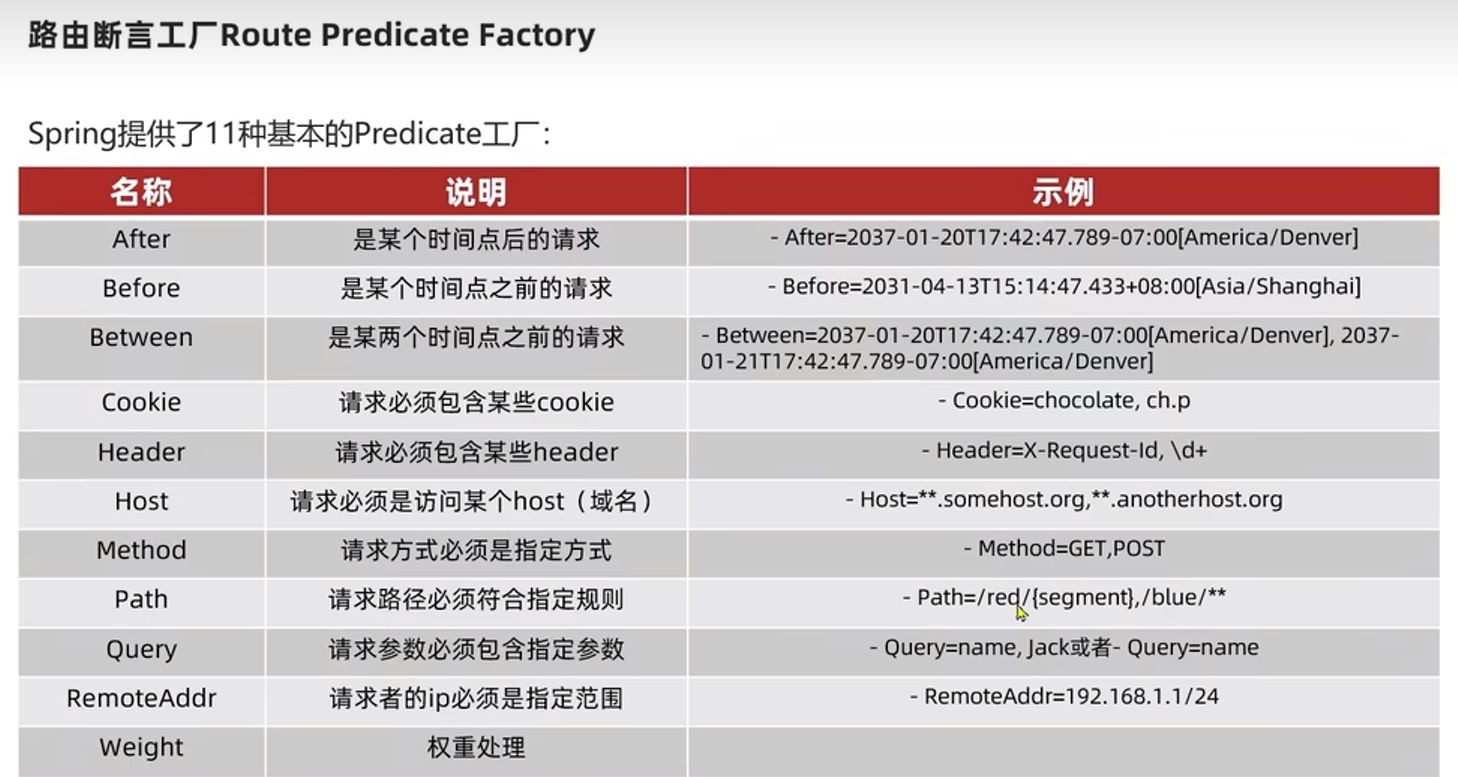
Predicate(断言):匹配条件
Filter(过滤):转发前后控制
核心流程:路由转发 + 执行过滤器链

11.4 使用
pom文件:(此处不要引入spring-boot-starter-web)
<dependencies>
    <dependency>
        <groupId>org.springframework.cloud</groupId>
        <artifactId>spring-cloud-starter-gateway</artifactId>
    </dependency>
    <dependency>
        <groupId>org.springframework.cloud</groupId>
        <artifactId>spring-cloud-starter-netflix-eureka-client</artifactId>
    </dependency>
    <dependency>
        <groupId>com.xxx</groupId>
        <artifactId>cloud-api-commons</artifactId>
    </dependency>
    <!--  基础配置  -->
    <dependency>
        <groupId>org.projectlombok</groupId>
        <artifactId>lombok</artifactId>
        <optional>true</optional>
    </dependency>
    <dependency>
        <groupId>org.springframework.boot</groupId>
        <artifactId>spring-boot-starter-test</artifactId>
        <scope>test</scope>
    </dependency>

</dependencies>
yml文件:
server:
port: 9527
spring:
application:
name: cloud-gateway
cloud:
gateway:
# discovery:
# locator:
#这个不用配置,也能实现负载均衡
# enabled: true
routes:
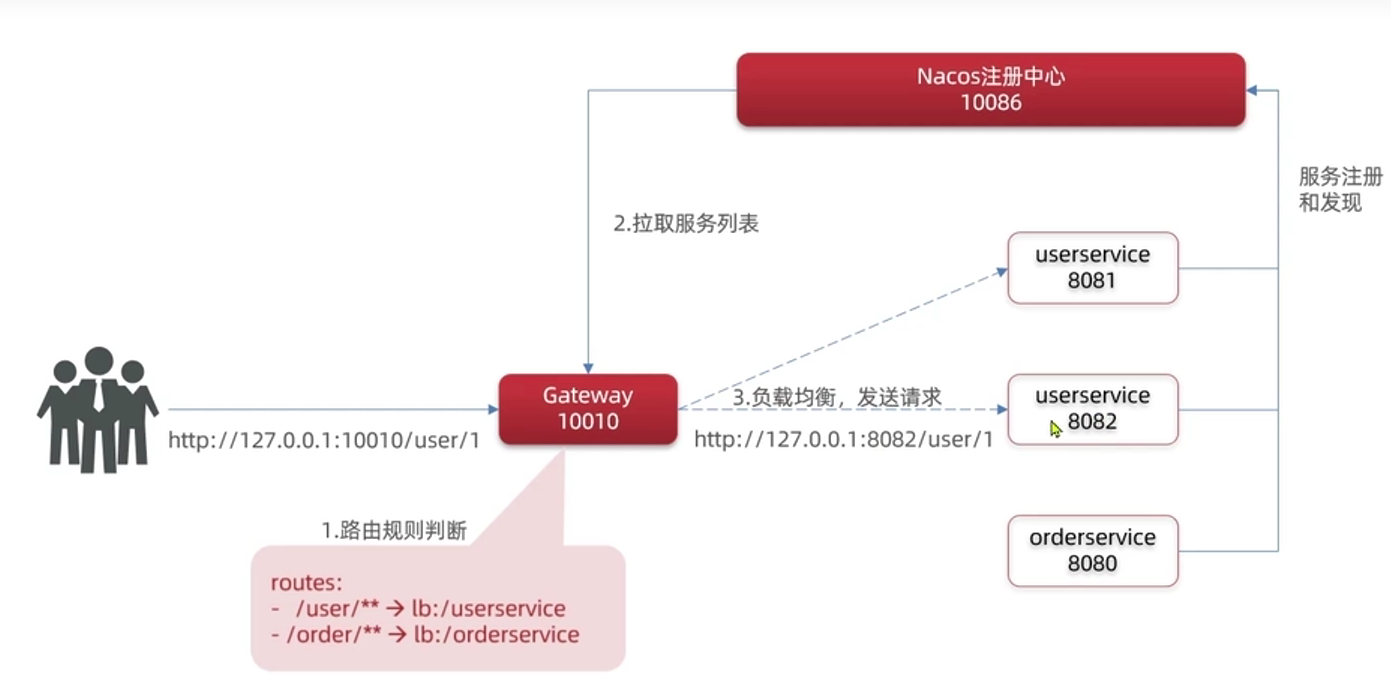
- id: payment_route #路由ID,无固定规则,但要求唯一,建议配合服务名
#uri: http://localhost:8001 #提供服务的路由地址
uri: lb://cloud-payment-service #提供服务的路由地址
predicates:
- Path=/payment/get/** #断言,路径相匹配的就路由
- id: payment_route2 #路由ID,无固定规则,但要求唯一,建议配合服务名
#uri: http://localhost:8001 #提供服务的路由地址
uri: lb://cloud-payment-service #提供服务的路由地址
predicates:
- Path=/payment/lb/** #断言,路径相匹配的就路由
eureka:
instance:
hostname: cloud-gateway-service
client:
#true表示在注册中心注册自己,默认为true
register-with-eureka: true
fetch-registry: true
service-url:
#设置与Eureka Server交互的地址,查询服务和注册服务都需要依赖这个地址
defaultZone: http://localhost:7001/eureka主启动类:
@SpringBootApplication
public class GateWayMain9527 {

    public static void main(String[] args) {
        SpringApplication.run(GateWayMain9527.class, args);
    }

}
访问http://localhost:9527/payment/lb和http://localhost:9527/payment/get/1
等效于访问端口8001的效果
网关配置的两种方式:
yml文件配置(详细见上面yml文件)
代码
@Configuration
public class GateWayConfig {

    @Bean
    public RouteLocator customerRouteLocator(RouteLocatorBuilder routeLocatorBuilder){
        RouteLocatorBuilder.Builder routes = routeLocatorBuilder.routes();
        //这两种等效,没出效果,最好清除缓存,网关实现的效果是转发
        //这里uri如果选择http,可能是因为它们服务器设置了重定向到https,所以看起来好像是重定向了
        //routes.route("path_route_xxx", r -> r.path("/finance").uri("https://news.baidu.com/finance"));
        routes.route("path_route_xxx", r -> r.path("/finance").uri("https://news.baidu.com"));

        routes.route("path_route_xxx", r -> r.path("/").uri("https://www.baidu.com"));
        return routes.build();
    }

}
11.5 负载均衡
spring:
  application:
    name: cloud-gateway
  cloud:
    gateway:
#      discovery:
#        locator:
           #这个不用配置,也能实现负载均衡
#          enabled: true
      routes:
        - id: payment_route  #路由ID,无固定规则,但要求唯一,建议配合服务名
          #uri: http://localhost:8001  #提供服务的路由地址
          uri: lb://cloud-payment-service  #提供服务的路由地址
          predicates:
            - Path=/payment/get/**  #断言,路径相匹配的就路由

        - id: payment_route2  #路由ID,无固定规则,但要求唯一,建议配合服务名
          #uri: http://localhost:8001  #提供服务的路由地址
          uri: lb://cloud-payment-service  #提供服务的路由地址
          predicates:
            - Path=/payment/lb/**  #断言,路径相匹配的就路由
11.6 断言
spring:
  application:
    name: cloud-gateway
  cloud:
    gateway:
      routes:
        - id: payment_route2  #路由ID,无固定规则,但要求唯一,建议配合服务名
          #uri: http://localhost:8001  #提供服务的路由地址
          uri: lb://cloud-payment-service  #提供服务的路由地址
          predicates:
            - Path=/payment/lb/**  #断言,路径相匹配的就路由
            - After=2023-07-26T22:52:36.472+08:00[Asia/Shanghai]
            - Cookie=username,assassin
            - Header=X-Request-Id, \d+  #请求头要有X-Request-Id属性,且值为非负整数
怎么生成这样2023-07-26T22:46:36.472+08:00[Asia/Shanghai]的时间:
public static void main(String[] args) {
    ZonedDateTime zdt = ZonedDateTime.now(); //默认时区
    System.out.println(zdt);
}
cmd命令(可以用来测试):
curl http://localhost:9527/payment/lb --cookie "username=assassin"
curl http://localhost:9527/payment/lb -H "X-Request-Id:0"
表示get请求,携带cookie:username=assassin键值对
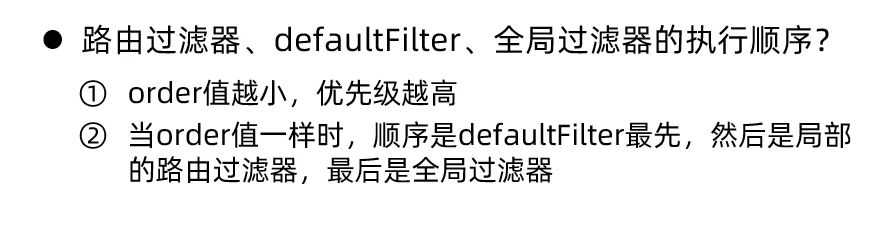
11.7 Filter
yml配置:
spring:
  application:
    name: cloud-gateway
  cloud:
    gateway:
      routes:
        - id: payment_route2  #路由ID,无固定规则,但要求唯一,建议配合服务名
          #uri: http://localhost:8001  #提供服务的路由地址
          uri: lb://cloud-payment-service  #提供服务的路由地址
          predicates:
            - Path=/payment/lb/**  #断言,路径相匹配的就路由
            - After=2023-07-26T22:52:36.472+08:00[Asia/Shanghai]
            #- Cookie=username,assassin
            - Header=X-Request-Id, \d+
          filters:
            #这里只针对了这个路由
            - AddRequestHeader=Truth, My name is L  #添加请求头(键值对)
      default-filters: #默认过滤器,对所有路由都生效
        - AddRequestHeader=Truth, My name is L  #添加请求头
自定义全局:
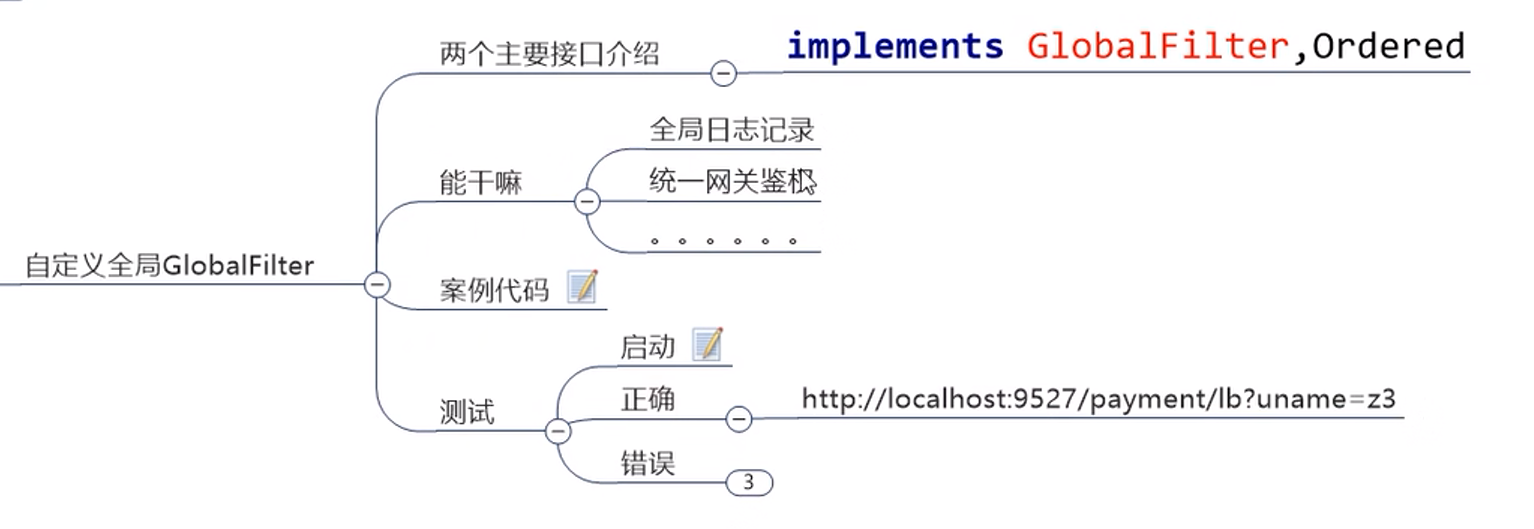
因为实现的GlobalFilter接口,所以默认针对全部请求(全局过滤器)
可以实现Ordered接口,也可直接注解@Order(-1)
//@Order(-1)
@Component
@Slf4j
public class MyLogGateWayFilter implements GlobalFilter, Ordered {
    @Override
    public Mono<Void> filter(ServerWebExchange exchange, GatewayFilterChain chain) {
        log.info("*********MyLogGateWayFilter: {}", new DateTime());
        String name = exchange.getRequest().getQueryParams().getFirst("name");
        if(name == null){
            log.info("******非法用户!!!");
            //设置状态码,更友好的结束
            exchange.getResponse().setStatusCode(HttpStatus.NOT_ACCEPTABLE);
            //结束处理
            return exchange.getResponse().setComplete();
        }
        //放行
        return chain.filter(exchange);
    }

    @Override
    public int getOrder() {
        return 0;
    }
}
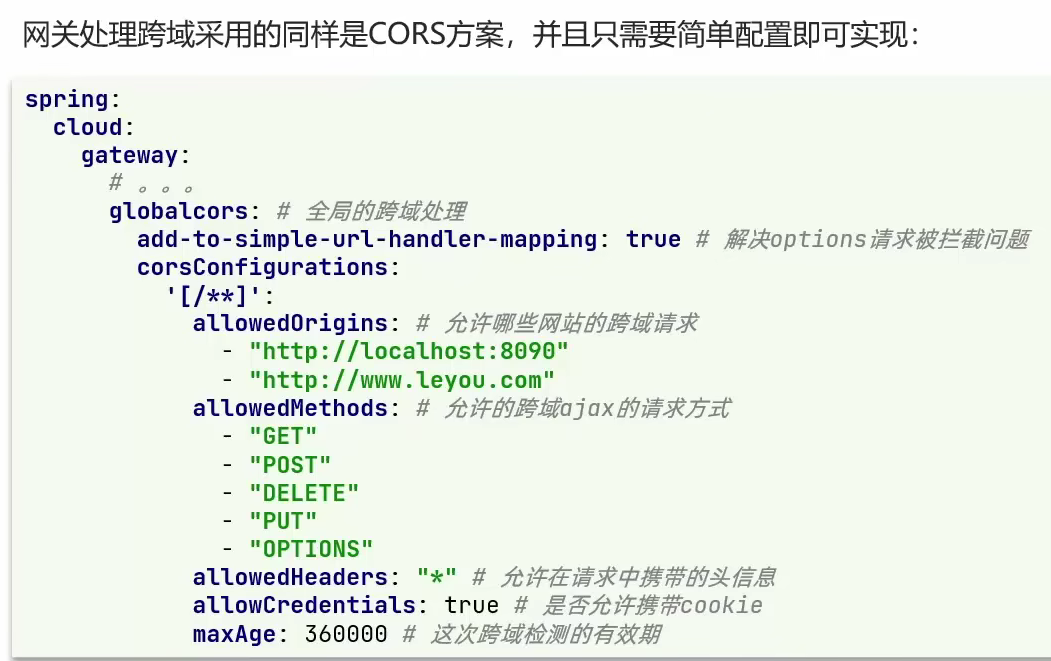
11.8 跨域
12. Config配置中心
每个微服务都有配置文件yml,可能出现大量重复,因此需要配置中心
提供中心化的外部配置


12.1 服务端配置
注意:仓库要公开
pom文件:
<dependencies>
    <dependency>
        <groupId>org.springframework.cloud</groupId>
        <artifactId>spring-cloud-config-server</artifactId>
    </dependency>
    <dependency>
        <groupId>org.springframework.cloud</groupId>
        <artifactId>spring-cloud-starter-netflix-eureka-client</artifactId>
    </dependency>
    <dependency>
        <groupId>org.springframework.boot</groupId>
        <artifactId>spring-boot-starter-web</artifactId>
    </dependency>
    <dependency>
        <groupId>org.springframework.boot</groupId>
        <artifactId>spring-boot-starter-actuator</artifactId>
    </dependency>
    <dependency>
        <groupId>com.xxx</groupId>
        <artifactId>cloud-api-commons</artifactId>
    </dependency>
    <!--  基础配置  -->
    <dependency>
        <groupId>org.projectlombok</groupId>
        <artifactId>lombok</artifactId>
        <optional>true</optional>
    </dependency>
    <dependency>
        <groupId>org.springframework.boot</groupId>
        <artifactId>spring-boot-starter-test</artifactId>
        <scope>test</scope>
    </dependency>
</dependencies>
yml文件
server:
  port: 3344

spring:
  application:
    name: cloud-config-center
  cloud:
    config:
      server:
        git:
          #GitHub上面的git仓库名
          uri: https://github.com/Assassinsfan7/springcloud-config.git
          username: Assassinsfan7
          password: 密码
          #搜索目录
          search-paths:
            - springcloud-config
      #读取分支branch
      label: main

eureka:
  client:
    service-url:
      #设置与Eureka Server交互的地址,查询服务和注册服务都需要依赖这个地址
      defaultZone: http://localhost:7001/eureka
主启动类:
@SpringBootApplication
@EnableConfigServer
public class ConfigCenterMain3344 {

    public static void main(String[] args) {
        SpringApplication.run(ConfigCenterMain3344.class, args);
    }

}问题:
1.配置时候,yml叶子显示不出来
2.主启动类上面有一绿条,显示更改配置文件
解决:
1.项目模块添加spring,再添加yml文件即可,但是无法保存,发现是payment8002模块源根嵌套,删掉8002后重新建一个,发现该名称还是不行,换一个名字就可以保存了,8002是之前通过8001在idea界面复制的,因此以后复制不要直接复制模块,否则会出问题
2.经过测试发现,绿条是因为config这个dependency的原因,去掉该依赖就没绿条了
关于使用ssh登录github,官方只让使用RSA密钥,而且官方的库版本太老,只能使用之前旧的rsa密钥,但是这个旧版本的密钥又被禁用掉了,因此需要繁琐的操作实现,参考如下:
https://blog.csdn.net/Learning_xzj/article/details/124472210
因此,这里为了简便,使用https
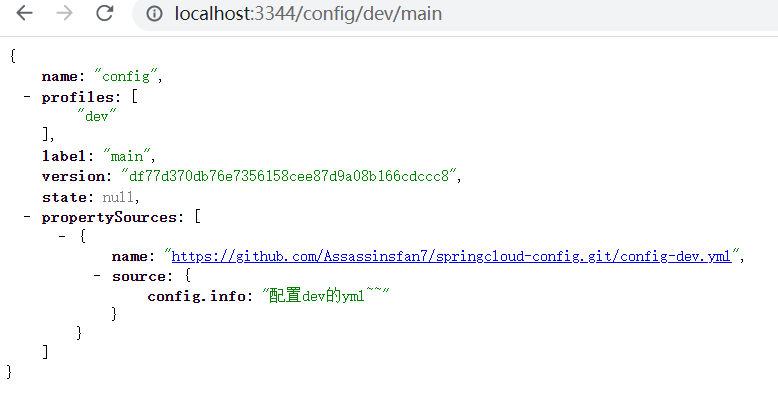
12.2 服务端使用
配置好后:
常用的三种方式:(推荐一和三)
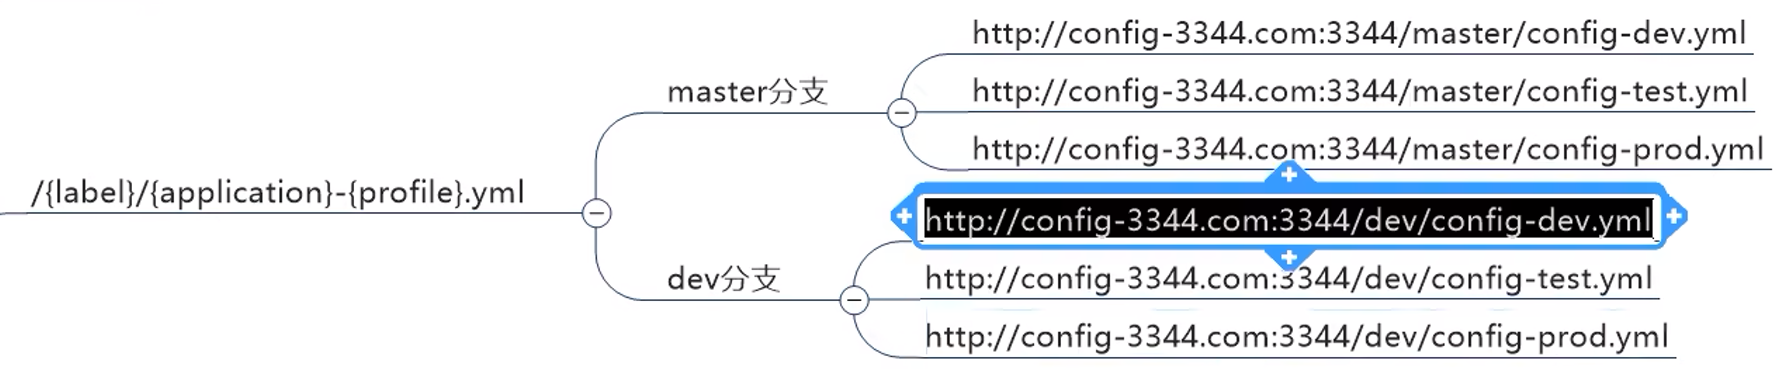
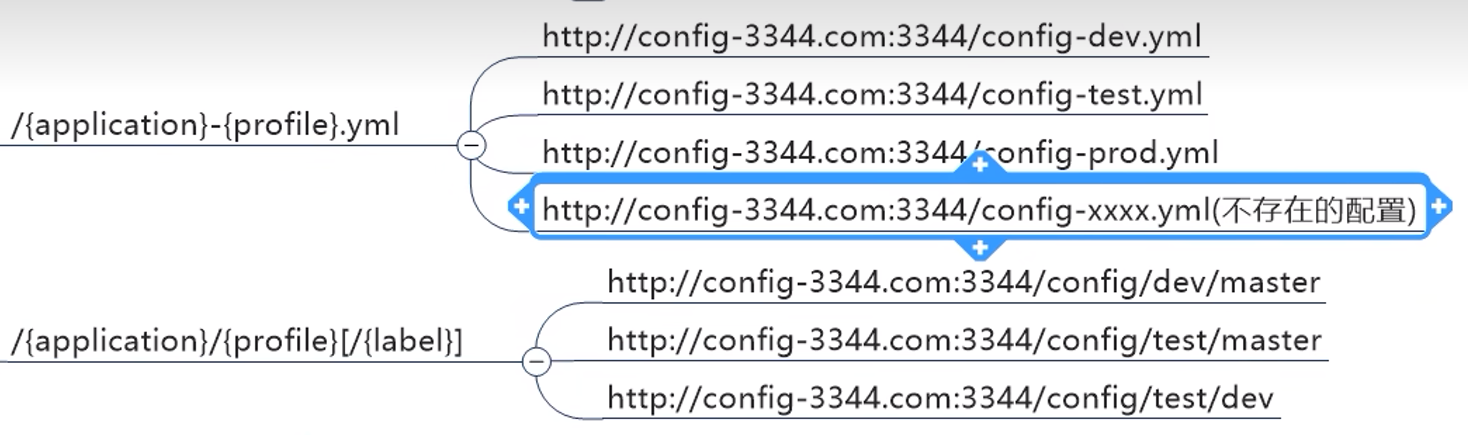
第一、二种直接显示内容,第二种相当于默认main分支,不存在返回{}
第三种显示详细:
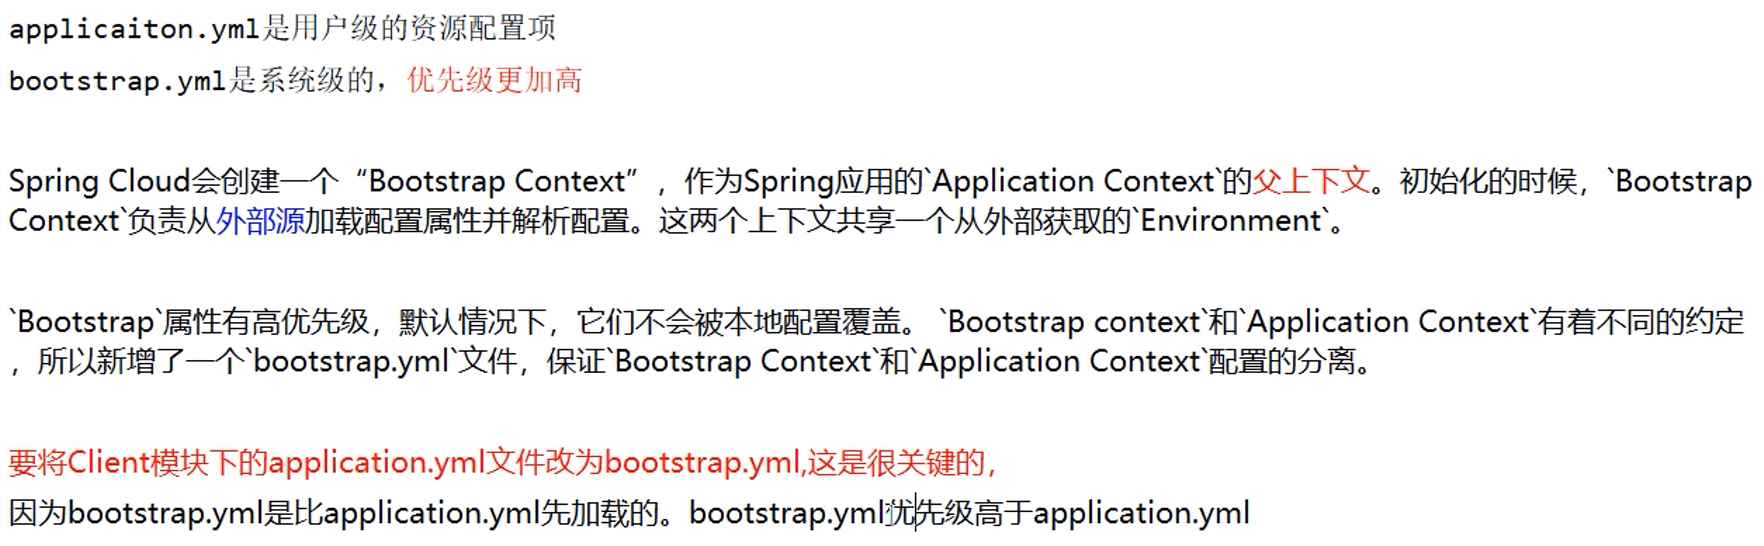
12.3 bootstrap.yml
和application.yml相似的,只是boostrap优先级更高,不会被本地覆盖,优先加载
12.4 客户端配置
pom文件:
<dependencies>
    <dependency>
        <groupId>org.springframework.cloud</groupId>
        <artifactId>spring-cloud-starter-config</artifactId>
    </dependency>
    <dependency>
        <groupId>org.springframework.cloud</groupId>
        <artifactId>spring-cloud-starter-netflix-eureka-client</artifactId>
    </dependency>
    <dependency>
        <groupId>org.springframework.boot</groupId>
        <artifactId>spring-boot-starter-web</artifactId>
    </dependency>
    <dependency>
        <groupId>org.springframework.boot</groupId>
        <artifactId>spring-boot-starter-actuator</artifactId>
    </dependency>
    <dependency>
        <groupId>com.xxx</groupId>
        <artifactId>cloud-api-commons</artifactId>
    </dependency>
    <!--  基础配置  -->
    <dependency>
        <groupId>org.projectlombok</groupId>
        <artifactId>lombok</artifactId>
        <optional>true</optional>
    </dependency>
    <dependency>
        <groupId>org.springframework.boot</groupId>
        <artifactId>spring-boot-starter-test</artifactId>
        <scope>test</scope>
    </dependency>
</dependencies>
bootstrap.yml
server:
  port: 3355

spring:
  application:
    name: config-client
  cloud:
    #config客户端配置
    config:
      #以下相当于 uri/label/name-profile.yml
      #例如 http://localhost:3344/main/config-dev.yml
      label: main #分支名称
      name: config #配置文件名称
      profile: dev #读取后缀名称, 相当于具体环境,如dev,prod
      uri: http://localhost:3344 #配置中心地址

eureka:
  client:
    service-url:
      #设置与Eureka Server交互的地址,查询服务和注册服务都需要依赖这个地址
      defaultZone: http://localhost:7001/eureka

#暴露监控端点
management:
  endpoints:
    web:
      exposure:
        include: "*"
启动类无额外内容
12.5 客户端使用
配置好客户端后,bootstrap.yml配置的服务端地址,然后现在,服务端的配置文件自动加载到该客户端
问题:
动态刷新的问题:修改github的yml文件,3344服务端立刻更新,3355客户端没有变更,只能重启3355
解决:
- pom保证有spring-boot-starter-actuator
- yml添加(前面yml已添加),暴露监控端点
- controller上加入@RefreshScope,动态刷新配置(属性改变后,获取时会清理缓存,然后创建新对象并缓存)
- 发送post请求:http://localhost:3355/actuator/refresh
比如cmd发送
curl -X POST http://localhost:3355/actuator/refresh13. Bus消息总线
为什么用:配合Config实现配置的动态刷新,因为前面需要手动发送post请求,微服务一多起来,就要发送很多,太麻烦了
是什么:将分布式系统的节点与轻量级消息系统链接起来的一个框架,整合了java的事件处理机制和消息中间件的功能
springcloud目前支持RabbitMQ和Kafka

为什么让server来通知,而不是client端?

13.1 服务端配置
3344 config配置中心的server端 :
pom文件:引入rabbitmq,保证要有rabbitmq和actuator
<dependencies>
    <dependency>
        <groupId>org.springframework.cloud</groupId>
        <artifactId>spring-cloud-starter-bus-amqp</artifactId>
    </dependency>
    <dependency>
        <groupId>org.springframework.cloud</groupId>
        <artifactId>spring-cloud-config-server</artifactId>
    </dependency>
    <dependency>
        <groupId>org.springframework.cloud</groupId>
        <artifactId>spring-cloud-starter-netflix-eureka-client</artifactId>
    </dependency>
    <dependency>
        <groupId>org.springframework.boot</groupId>
        <artifactId>spring-boot-starter-web</artifactId>
    </dependency>
    <dependency>
        <groupId>org.springframework.boot</groupId>
        <artifactId>spring-boot-starter-actuator</artifactId>
    </dependency>
    <dependency>
        <groupId>com.xxx</groupId>
        <artifactId>cloud-api-commons</artifactId>
    </dependency>
    <!--  基础配置  -->
    <dependency>
        <groupId>org.projectlombok</groupId>
        <artifactId>lombok</artifactId>
        <optional>true</optional>
    </dependency>
    <dependency>
        <groupId>org.springframework.boot</groupId>
        <artifactId>spring-boot-starter-test</artifactId>
        <scope>test</scope>
    </dependency>
</dependencies>
yml文件:
server:
  port: 3344

spring:
  application:
    name: cloud-config-center
  cloud:
    config:
      server:
        git:
          #GitHub上面的git仓库名
          uri: https://github.com/Assassinsfan7/springcloud-config.git
          username: Assassinsfan7
          password: lijun794613
          #搜索目录
          search-paths:
            - springcloud-config
      #读取分支
      label: main
  #rabbitmq相关配置
  rabbitmq:
    host: 192.168.198.107
    port: 5672
    username: admin
    password: 123

#rabbitmq相关配置,暴露bus刷新配置的端点
management:
  endpoints:  #暴露bus刷新配置的端点
    web:
      exposure:
        include: 'bus-refresh'

eureka:
  client:
    service-url:
      #设置与Eureka Server交互的地址,查询服务和注册服务都需要依赖这个地址
      defaultZone: http://localhost:7001/eureka
13.2 客户端配置
3355和3366 config配置中心的client端,保证要有rabbitmq和actuator
<dependencies>
    <dependency>
        <groupId>org.springframework.cloud</groupId>
        <artifactId>spring-cloud-starter-bus-amqp</artifactId>
    </dependency>
    <dependency>
        <groupId>org.springframework.cloud</groupId>
        <artifactId>spring-cloud-starter-config</artifactId>
    </dependency>
    <dependency>
        <groupId>org.springframework.cloud</groupId>
        <artifactId>spring-cloud-starter-netflix-eureka-client</artifactId>
    </dependency>
    <dependency>
        <groupId>org.springframework.boot</groupId>
        <artifactId>spring-boot-starter-web</artifactId>
    </dependency>
    <dependency>
        <groupId>org.springframework.boot</groupId>
        <artifactId>spring-boot-starter-actuator</artifactId>
    </dependency>
    <dependency>
        <groupId>com.xxx</groupId>
        <artifactId>cloud-api-commons</artifactId>
    </dependency>
    <!--  基础配置  -->
    <dependency>
        <groupId>org.projectlombok</groupId>
        <artifactId>lombok</artifactId>
        <optional>true</optional>
    </dependency>
    <dependency>
        <groupId>org.springframework.boot</groupId>
        <artifactId>spring-boot-starter-test</artifactId>
        <scope>test</scope>
    </dependency>
</dependencies>
yml文件:
server:
  port: 3355

spring:
  application:
    name: config-client
  cloud:
    #config客户端配置
    config:
      #以下相当于 uri/label/name-profile.yml
      #例如 http://localhost:3344/main/config-dev.yml
      label: main #分支名称
      name: config #配置文件名称
      profile: dev #读取后缀名称, 相当于具体环境,如dev,prod
      uri: http://localhost:3344 #配置中心地址
  #rabbitmq相关配置
  rabbitmq:
    host: 192.168.198.107
    port: 5672
    username: admin
    password: 123

eureka:
  client:
    service-url:
      #设置与Eureka Server交互的地址,查询服务和注册服务都需要依赖这个地址
      defaultZone: http://localhost:7001/eureka

#暴露监控端点
management:
  endpoints:
    web:
      exposure:
        include: "*"
13.3使用
全局广播通知:
post请求发到服务端,一次请求,所有client端都会更新配置
curl -X POST "http://localhost:3344/actuator/bus-refresh"对于某单个实例:
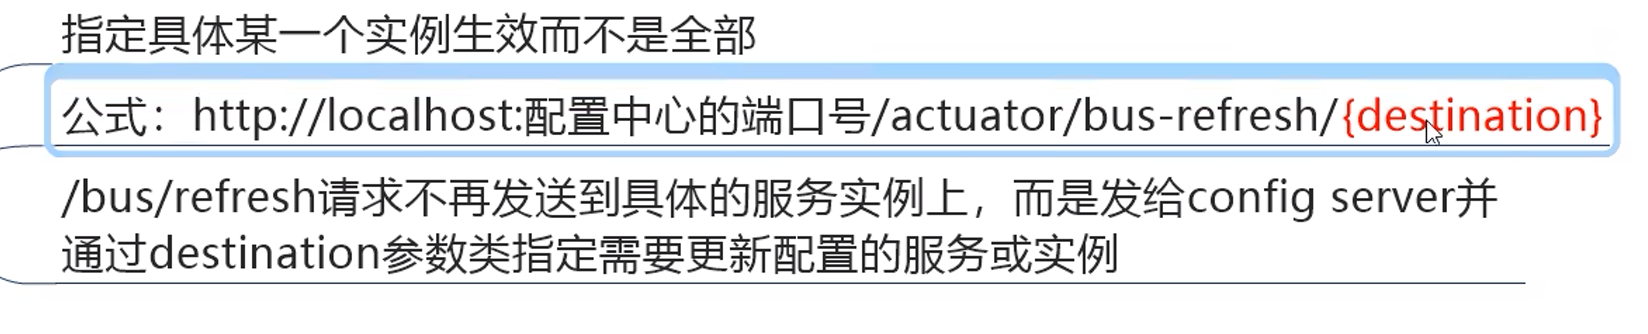
destination就是{spring.application.name}:{server.port}
curl -X POST "http://localhost:3344/actuator/bus-refresh/config-client:3366"下面两个可以针对一个name下的所有端口
curl -X POST "http://localhost:3344/actuator/bus-refresh/config-client:*"
curl -X POST "http://localhost:3344/actuator/bus-refresh/config-client"
14. Stream消息驱动
引入原因:屏蔽底层消息中间件的差异,降低切换的成本,统一消息的编程模型
14.1 是什么
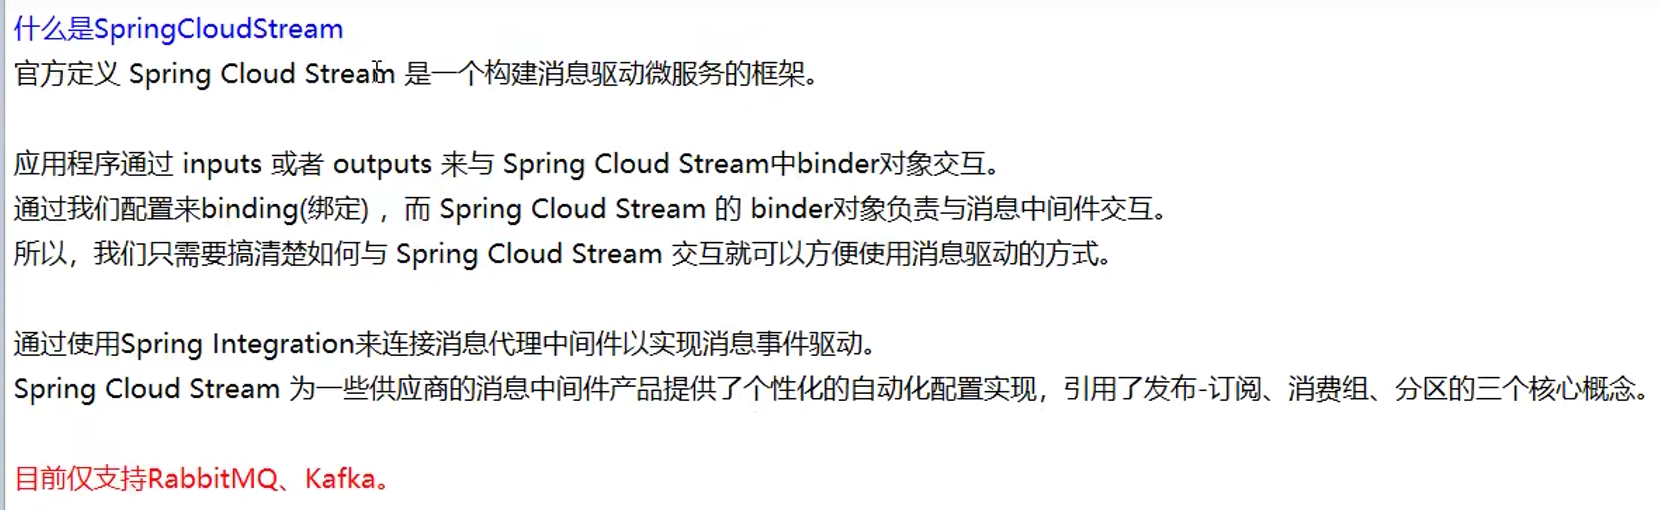
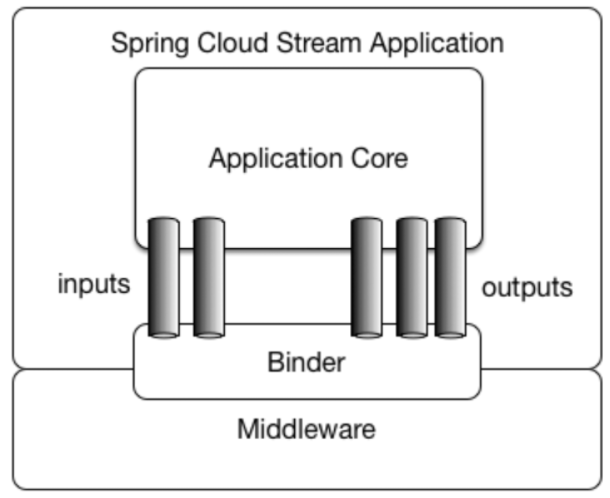
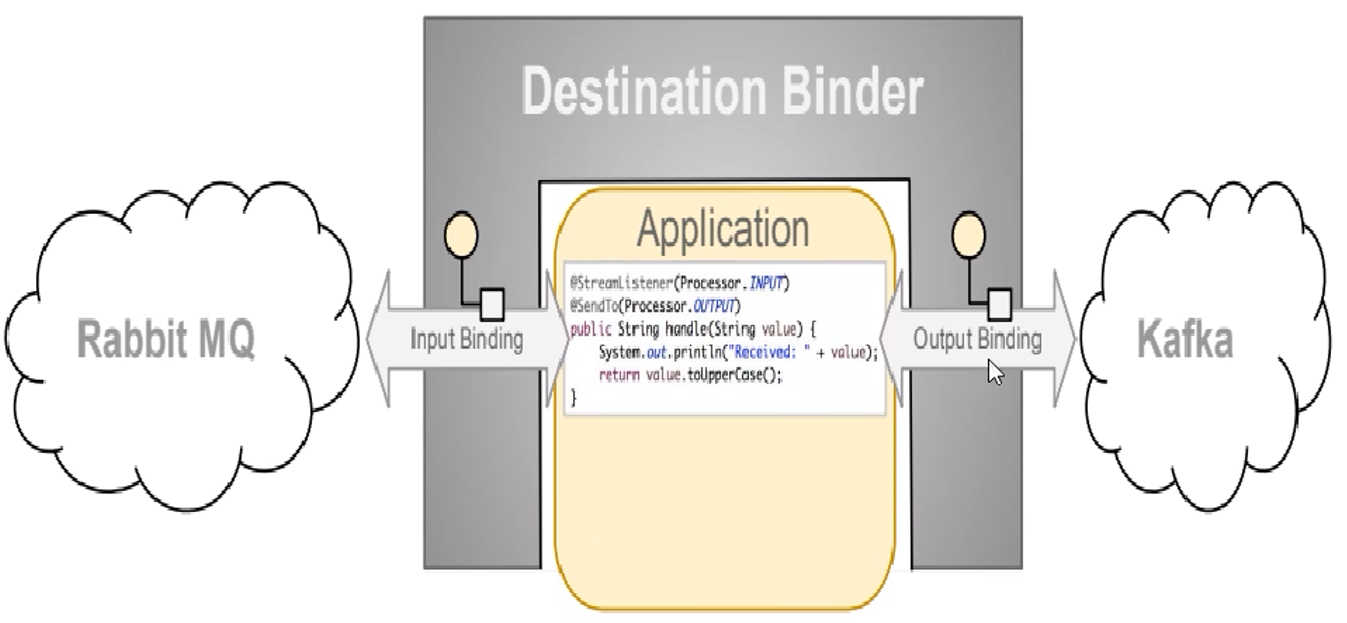
14.2 注解
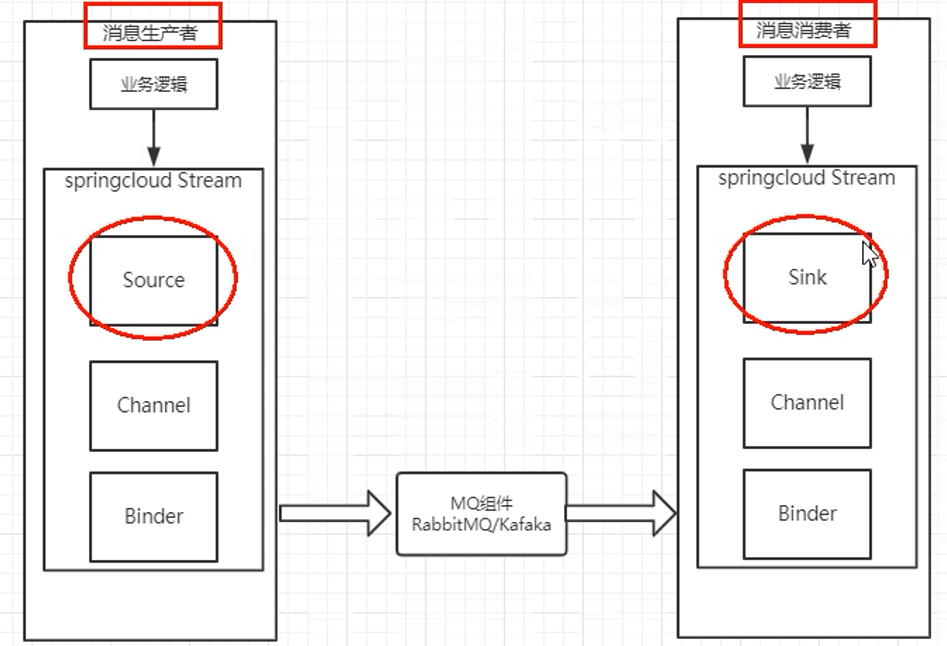

14.3 生产者使用
<dependencies>
    <dependency>
        <groupId>org.springframework.cloud</groupId>
        <artifactId>spring-cloud-starter-stream-rabbit</artifactId>
    </dependency>
    <dependency>
        <groupId>org.springframework.cloud</groupId>
        <artifactId>spring-cloud-starter-netflix-eureka-client</artifactId>
    </dependency>
    <dependency>
        <groupId>org.springframework.boot</groupId>
        <artifactId>spring-boot-starter-web</artifactId>
    </dependency>
    <dependency>
        <groupId>org.springframework.boot</groupId>
        <artifactId>spring-boot-starter-actuator</artifactId>
    </dependency>
    <!--  基础配置  -->
    <dependency>
        <groupId>org.projectlombok</groupId>
        <artifactId>lombok</artifactId>
        <optional>true</optional>
    </dependency>
    <dependency>
        <groupId>org.springframework.boot</groupId>
        <artifactId>spring-boot-starter-test</artifactId>
        <scope>test</scope>
    </dependency>
</dependencies>
server:
port: 8801
spring:
application:
name: cloud-stream-provider
rabbitmq: #设置rabbitmq的相关环境配置
host: 192.168.198.107
port: 5672
username: admin
password: 123
cloud:
stream:
binders: #配置要绑定的rabbitmq的服务信息
defaultRabbit: #用于binding整合
type: rabbit #消息组件类型
bindings: #服务整合
output: #通道名称
destination: studyExchange #Exchange名称
content-type: application/json #消息类型,application/json为json,text/plain为文本
binder: defaultRabbit #设置要绑定的消息服务的具体设置
eureka:
client:
service-url:
#设置与Eureka Server交互的地址,查询服务和注册服务都需要依赖这个地址
defaultZone: http://localhost:7001/eurekaIMessageProvider接口
public interface IMessageProvider {
    String send();
}
MessageProviderImpl实现类
@EnableBinding(Source.class) //消息的推送管道
public class MessageProviderImpl implements IMessageProvider {

    @Resource
    private MessageChannel output;

    @Override
    public String send() {
        String serial = UUID.randomUUID().toString();
        output.send(MessageBuilder.withPayload(serial).build());
        System.out.println("************serial:" + serial);
        return null;
    }

}
14.4 消费者使用
<dependencies>
    <dependency>
        <groupId>org.springframework.cloud</groupId>
        <artifactId>spring-cloud-starter-stream-rabbit</artifactId>
    </dependency>
    <dependency>
        <groupId>org.springframework.cloud</groupId>
        <artifactId>spring-cloud-starter-netflix-eureka-client</artifactId>
    </dependency>
    <dependency>
        <groupId>org.springframework.boot</groupId>
        <artifactId>spring-boot-starter-web</artifactId>
    </dependency>
    <dependency>
        <groupId>org.springframework.boot</groupId>
        <artifactId>spring-boot-starter-actuator</artifactId>
    </dependency>
    <!--  基础配置  -->
    <dependency>
        <groupId>org.projectlombok</groupId>
        <artifactId>lombok</artifactId>
        <optional>true</optional>
    </dependency>
    <dependency>
        <groupId>org.springframework.boot</groupId>
        <artifactId>spring-boot-starter-test</artifactId>
        <scope>test</scope>
    </dependency>
</dependencies>
server:
port: 8802
spring:
application:
name: cloud-stream-provider
rabbitmq: #设置rabbitmq的相关环境配置
host: 192.168.198.107
port: 5672
username: admin
password: 123
cloud:
stream:
binders: #配置要绑定的rabbitmq的服务信息
defaultRabbit: #用于binding整合
type: rabbit #消息组件类型
bindings: #服务整合
input: #通道名称
destination: studyExchange #Exchange名称
content-type: application/json #消息类型,application/json为json,text/plain为文本
binder: defaultRabbit #设置要绑定的消息服务的具体设置
eureka:
client:
service-url:
#设置与Eureka Server交互的地址,查询服务和注册服务都需要依赖这个地址
defaultZone: http://localhost:7001/eurekacontroller:
@EnableBinding(Sink.class)
public class ReceiveMessageListenerController {

    @Value("${server.port}")
    private String serverPort;

    @StreamListener(Sink.INPUT)
    public void input(Message<String> message){
        System.out.println("消费者1号, 收到: " + message.getPayload() + "\t, port: " + serverPort);
    }

}
14.5 多个消费者以及持久化
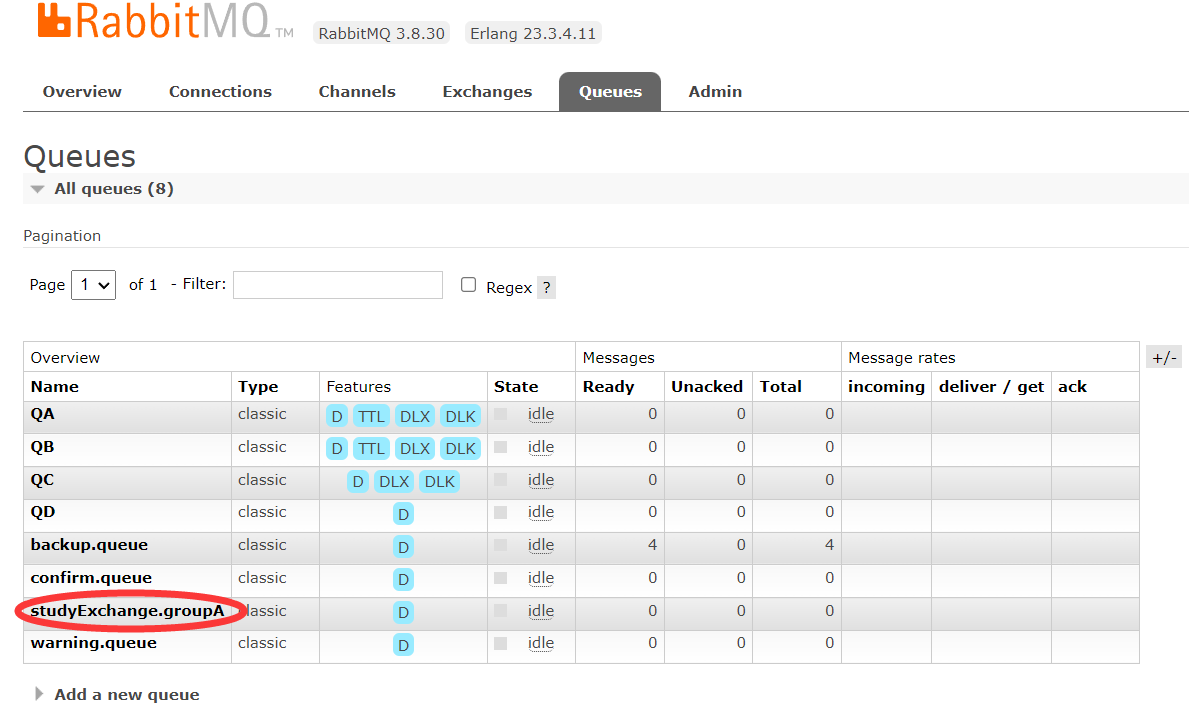
默认情况下,类似于发布订阅,所有消费组都收到
rabbitmq客户端中的Queues可以看到
studyExchange.anonymous.ZYT5LyYLTw22i9gvkdADSQ
studyExchange.anonymous.sEMRBRCnQtWjU30r6uL0wQ
这两个消费者的队列是不同的组,而Stream是一个组内保证被消费一次,
因此这两个都会收到消息,如果两个成了同一个组,那么才会只被它们其一消费
分组,只需要在yml中配置group
spring:
  application:
    name: cloud-stream-provider
  cloud:
    stream:
      binders: #配置要绑定的rabbitmq的服务信息
        defaultRabbit: #用于binding整合
          type: rabbit #消息组件类型
      bindings: #服务整合
        input: #通道名称
          destination: studyExchange #Exchange名称
          content-type: application/json #消息类型,application/json为json,text/plain为文本
          binder: defaultRabbit #设置要绑定的消息服务的具体设置
          group: groupA
现在就只有一个组了:
持久化:
就是必须要设置group
这样当生产者发送了消息,而消费者宕机了的情况下,
消费者重启还能收到消息,保证了消息的不丢失,若不设置group,重启将收不到消息
验证:
消费者1和2都设置groupA,两个都挂掉,而生产者开始发多条消息,
消费者1重启,消费者2去掉group配置后再重启
发现消费者1能接收到之前的消息,2不能
说明2消息丢失了
假设默认有持久化,那么当2去掉后,应该是随机生成一个组,对于发的消息,都会收到才对
结果2没有收到,说明2不是默认持久化
15. Sleuth链路跟踪
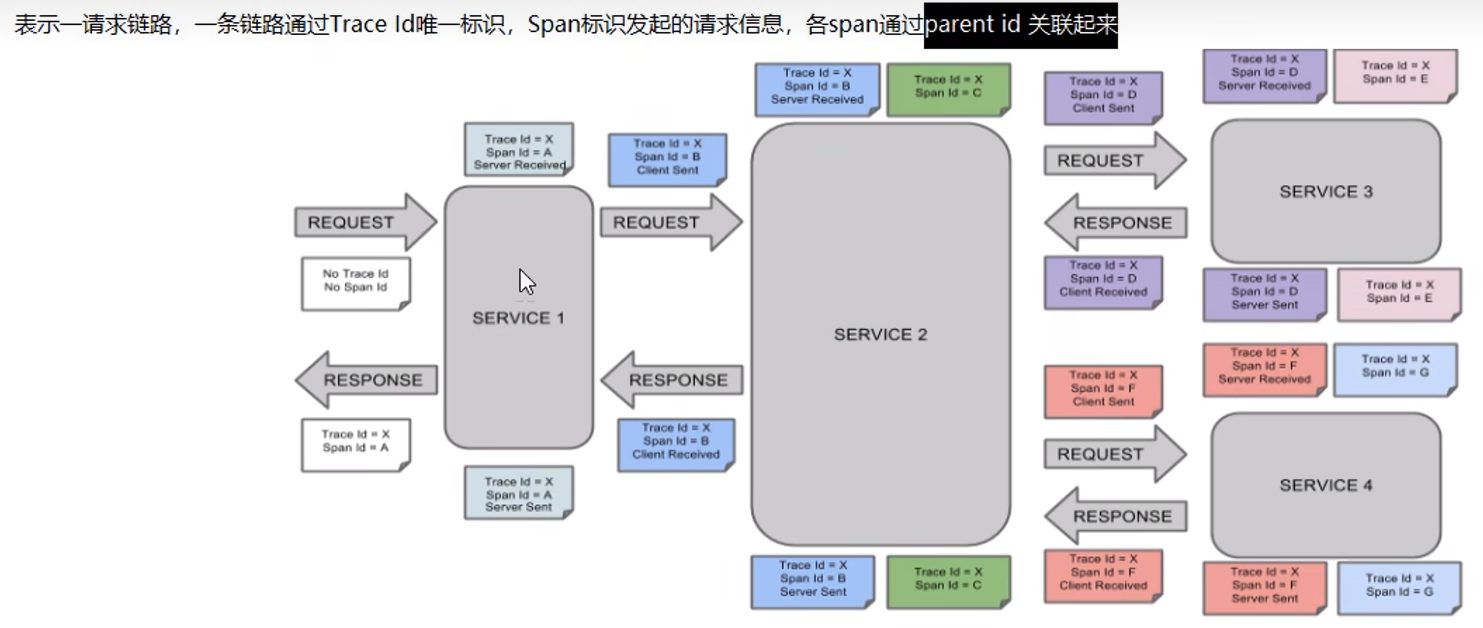
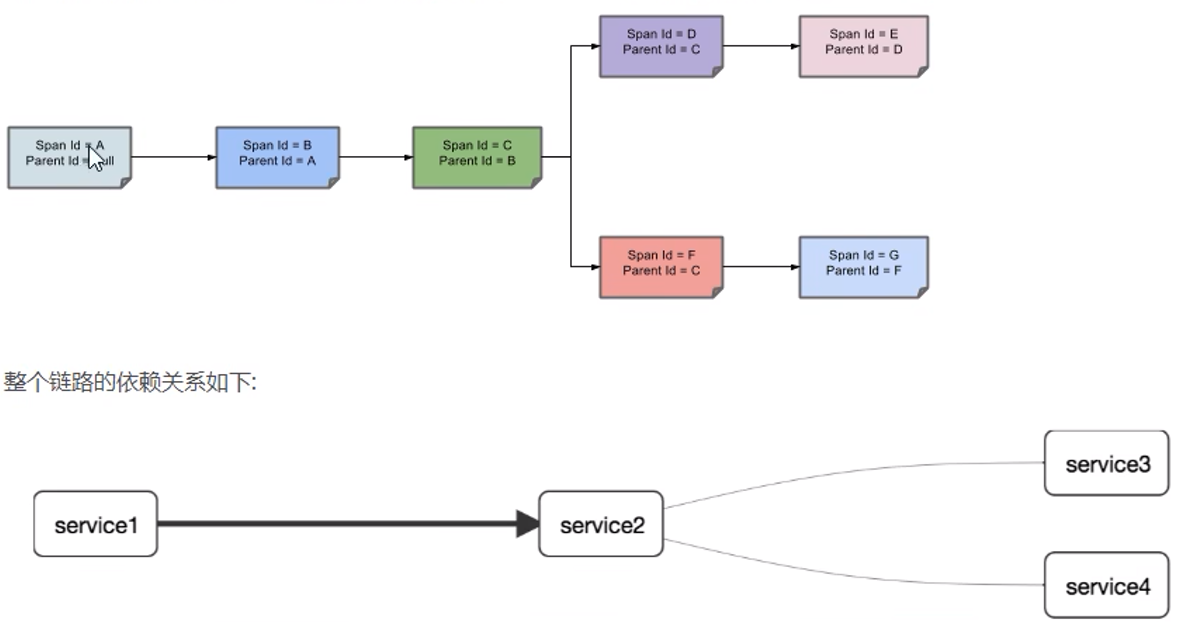
15.1 概念
解决的问题:微服务中,可能出现复杂的调用链路,链路中的任何一环出现高延时或错误都会引起整个请求失败。
Sleuth作用:提供服务跟踪的解决方案,并且兼容支持zipkin(用于展现)

15.2 使用
<!-- sleuth+zipkin -->
<dependency>
    <groupId>org.springframework.cloud</groupId>
    <artifactId>spring-cloud-starter-zipkin</artifactId>
</dependency>
server:
port: 8001
spring:
application:
name: cloud-payment-service
zipkin:
base-url: http://localhost:9411
sleuth:
sampler:
#采样率,其值范围:0~1,1表示全部采集
probability: 116. Nacos服务注册和配置中心
16.1 介绍
Naming Configuration Service
替代Eureka + Config + Bus
Nacos可以切换AP和CP
16.2 注册中心使用
服务端直接用startup.cmd启动即可
注意:自动集成了ribbon依赖
<dependencies>
    <dependency>
        <groupId>com.alibaba.cloud</groupId>
        <artifactId>spring-cloud-starter-alibaba-nacos-discovery</artifactId>
    </dependency>
    <dependency>
        <groupId>org.springframework.boot</groupId>
        <artifactId>spring-boot-starter-web</artifactId>
    </dependency>
    <dependency>
        <groupId>org.springframework.boot</groupId>
        <artifactId>spring-boot-starter-actuator</artifactId>
    </dependency>
    <!--  基础配置  -->
    <dependency>
        <groupId>org.projectlombok</groupId>
        <artifactId>lombok</artifactId>
        <optional>true</optional>
    </dependency>
    <dependency>
        <groupId>org.springframework.boot</groupId>
        <artifactId>spring-boot-starter-test</artifactId>
        <scope>test</scope>
    </dependency>
</dependencies>
server:
port: 9001
spring:
application:
name: nacos-payment-provider
cloud:
nacos:
discovery:
server-addr: localhost:8848 #nacos地址
management:
endpoints:
web:
exposure:
include: '*'主启动:
@SpringBootApplication
public class PaymentMain9001 {

    public static void main(String[] args) {
        SpringApplication.run(PaymentMain9001.class, args);
    }

}
16.3 AP和CP切换

curl -X PUT "http://localhost:8848/nacos/v1/ns/operator/switches?entry=serverMode&value=CP"
curl -X PUT "http://localhost:8848/nacos/v1/ns/operator/switches?entry=serverMode&value=AP"
16.4 配置中心使用
注意:不需要任何配置,直接修改界面的yml文件,微服务就会重新读取配置(会有较短的延迟)
<dependencies>
    <dependency>
        <groupId>com.alibaba.cloud</groupId>
        <artifactId>spring-cloud-starter-alibaba-nacos-config</artifactId>
    </dependency>
    <dependency>
        <groupId>com.alibaba.cloud</groupId>
        <artifactId>spring-cloud-starter-alibaba-nacos-discovery</artifactId>
    </dependency>
    <dependency>
        <groupId>org.springframework.boot</groupId>
        <artifactId>spring-boot-starter-web</artifactId>
    </dependency>
    <dependency>
        <groupId>org.springframework.boot</groupId>
        <artifactId>spring-boot-starter-actuator</artifactId>
    </dependency>
    <!--  基础配置  -->
    <dependency>
        <groupId>org.projectlombok</groupId>
        <artifactId>lombok</artifactId>
        <optional>true</optional>
    </dependency>
    <dependency>
        <groupId>org.springframework.boot</groupId>
        <artifactId>spring-boot-starter-test</artifactId>
        <scope>test</scope>
    </dependency>
</dependencies>
bootstrap.yml文件:
server:
  port: 3377

spring:
  application:
    name: nacos-config-client
  cloud:
    nacos:
      discovery:
        server-addr: localhost:8848 #Nacos注册中心地址
      config:
        server-addr: localhost:8848 #Nacos配置中心地址
        # ${spring.application.name}-${spring.profile.active}.${spring.cloud.nacos.config.file-extension}
        # nacos-config-client-dev.yaml
        # 这里也可以是yml,服务端的是nacos-config-client-dev.yml就可以
        file-extension: yaml #指定yaml格式配置
application.yml文件:
spring:
  profiles:
    active: dev #开发环境
controller文件:
@RestController
@RefreshScope //动态刷新配置(属性改变后,获取时会清理缓存,然后创建新对象并缓存)
public class ConfigClientController {

    @Value("${config.info}")
    private String configInfo;

    @GetMapping("/config/info")
    public String getPayment(){
        return configInfo;
    }

}
16.5 分类配置
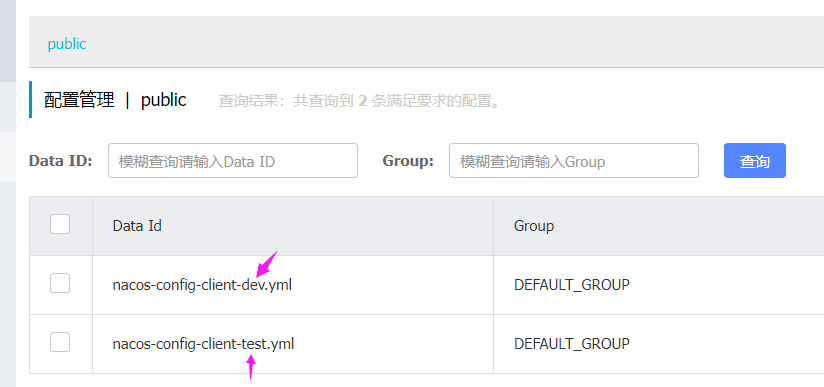
Namespace+Group+Data ID
Namespace 的常用场景之一是不同环境的配置的区分隔离
Group 的常见场景:不同的应用或组件使用了相同的配置类型,如 database_url 配置和 MQ_topic 配置。
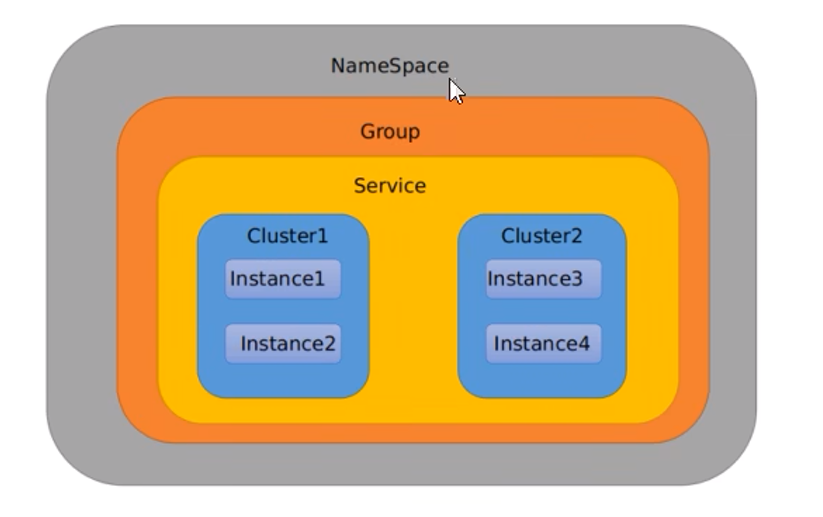
1.Data ID层级:
2.Group层级:
spring:
  application:
    name: nacos-config-client
  cloud:
    nacos:
      discovery:
        server-addr: localhost:8848 #Nacos注册中心地址
      config:
        server-addr: localhost:8848 #Nacos配置中心地址
        # ${spring.application.name}-${spring.profile.active}.${spring.cloud.nacos.config.file-extension}
        # nacos-config-client-dev.yml
        file-extension: yml #指定yml格式配置
        # 分组,默认DEFAULT_GROUP
        group: TEST_GROUP
3.Namespace层级:
spring:
  application:
    name: nacos-config-client
  cloud:
    nacos:
      discovery:
        server-addr: localhost:8848 #Nacos注册中心地址
      config:
        server-addr: localhost:8848 #Nacos配置中心地址
        # ${spring.application.name}-${spring.profile.active}.${spring.cloud.nacos.config.file-extension}
        # nacos-config-client-dev.yml
        file-extension: yml #指定yml格式配置
        # 分组,默认DEFAULT_GROUP
        group: TEST_GROUP
        # 命名空间ID,默认public
        namespace: 536eb7bb-02b3-4806-be2b-497432685f1f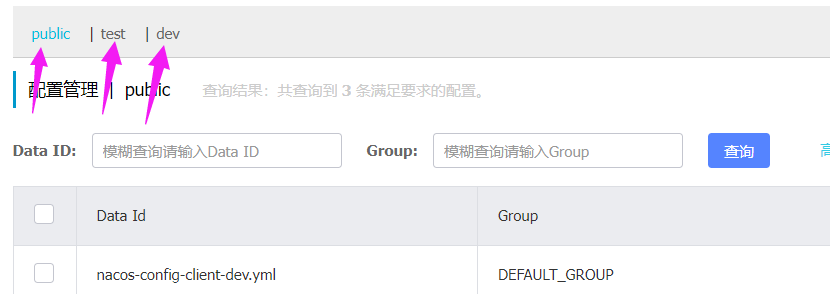
16.6 Nacos集群
迁移默认数据库derby到mysql
建立数据库
修改application.properties 配置,使其连接到mysql数据库
注意:nacos版本低(如1.1.4)的时候,mysql如果使用8.0以上,可能无法启动,需要在bin同级目录创建plugins/mysql文件夹,在其中放入mysql-connector-j-8.0.33.jar,就可以(虽然我是8.0.34)
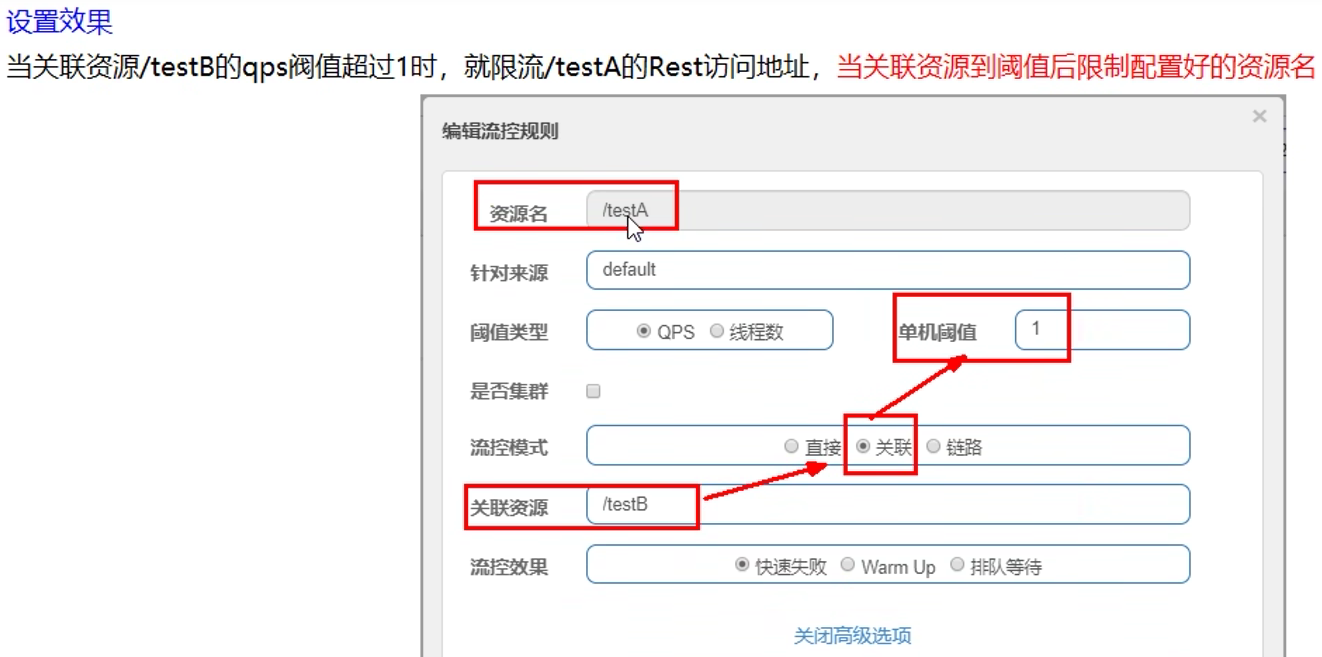
17. Sentinel
和Hystrix差不多
17.1 使用
<dependencies>
    <!-- 用于持久化 -->
    <dependency>
        <groupId>com.alibaba.csp</groupId>
        <artifactId>sentinel-datasource-nacos</artifactId>
    </dependency>
    <dependency>
        <groupId>com.alibaba.cloud</groupId>
        <artifactId>spring-cloud-starter-alibaba-sentinel</artifactId>
    </dependency>
    <dependency>
        <groupId>com.alibaba.cloud</groupId>
        <artifactId>spring-cloud-starter-alibaba-nacos-discovery</artifactId>
    </dependency>
    <dependency>
        <groupId>org.springframework.cloud</groupId>
        <artifactId>spring-cloud-starter-openfeign</artifactId>
    </dependency>
    <dependency>
        <groupId>org.springframework.boot</groupId>
        <artifactId>spring-boot-starter-web</artifactId>
    </dependency>
    <dependency>
        <groupId>org.springframework.boot</groupId>
        <artifactId>spring-boot-starter-actuator</artifactId>
    </dependency>
    <!--  基础配置  -->
    <dependency>
        <groupId>org.projectlombok</groupId>
        <artifactId>lombok</artifactId>
        <optional>true</optional>
    </dependency>
    <dependency>
        <groupId>org.springframework.boot</groupId>
        <artifactId>spring-boot-starter-test</artifactId>
        <scope>test</scope>
    </dependency>
</dependencies>
server:
port: 8401
spring:
application:
name: cloud-alibaba-sentinel-service
cloud:
nacos:
discovery:
server-addr: localhost:8848 #nacos地址
sentinel:
transport:
#Sentinel dashboard地址
dashboard: localhost:8080
#默认8719,被占用后会依次+1
port: 8719
management:
endpoints:
web:
exposure:
include: '*'17.2 界面
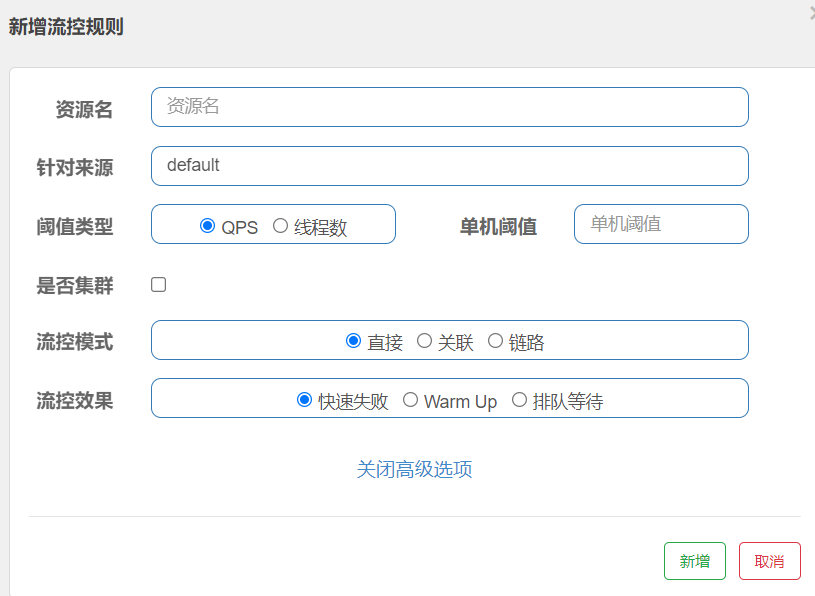
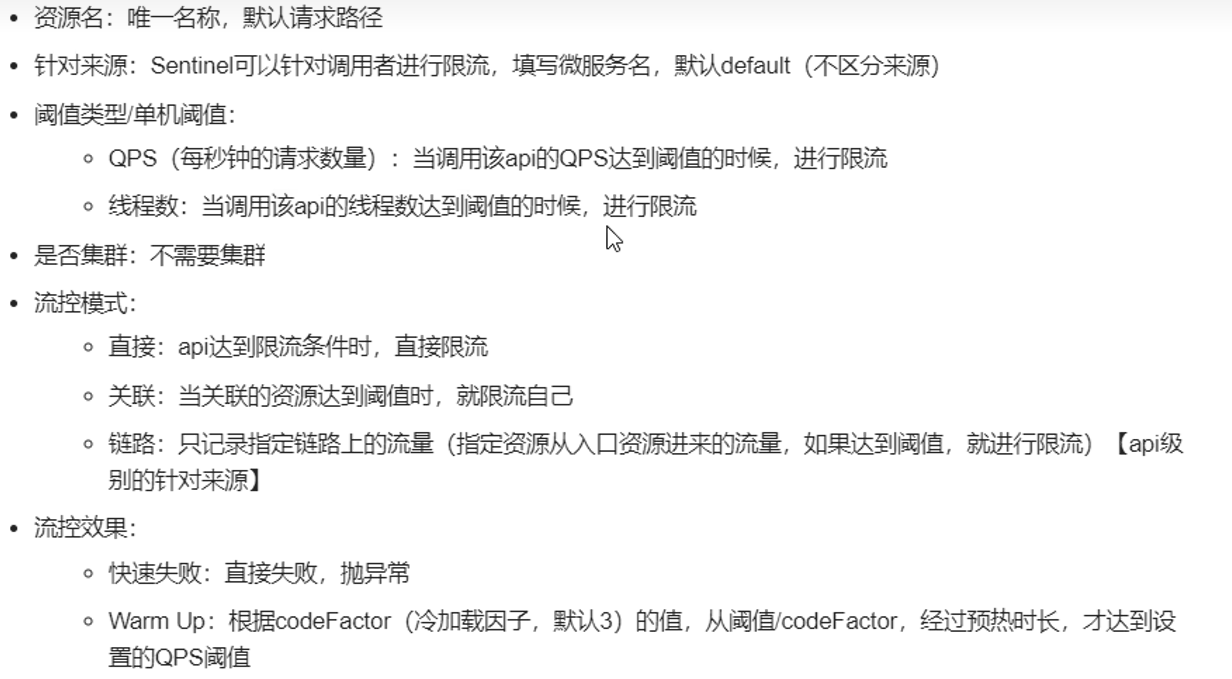
warm up就是更改阈值,经过设定时间后才达到所设的最大阈值
17.3 熔断策略
1.8.0版本后:
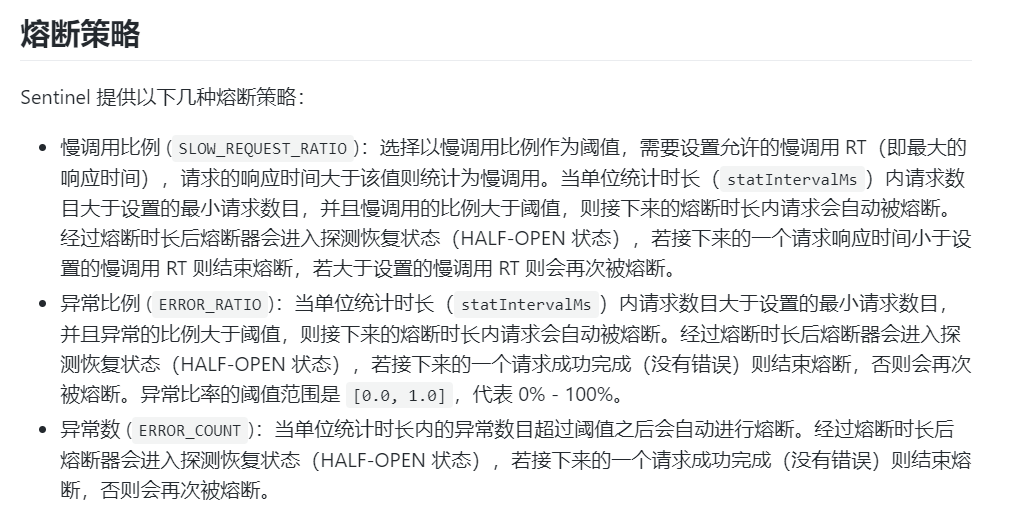
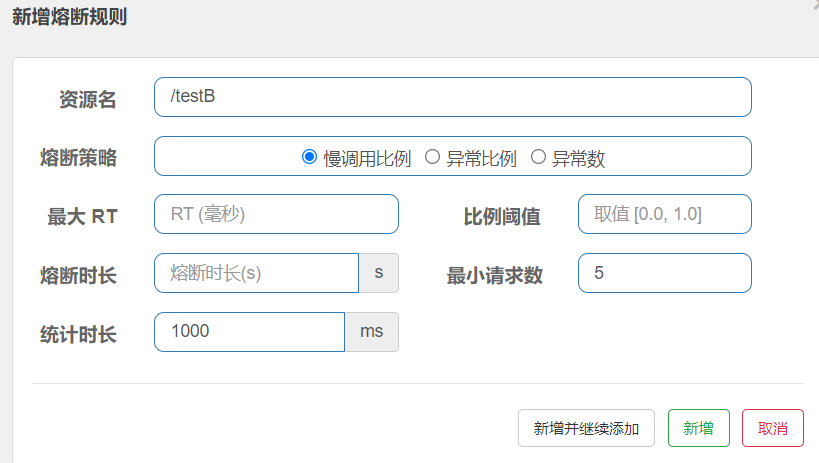
对于异常数,经测试与最小请求数无关(虽然面板上有),上图的官方说明才是对的,没有提及最小请求数
17.4 热点参数限流
QPS一旦满足条件,就执行blockHandler所指定方法
注意:QPS统计的是同一个值的次数,即使我阈值设为1,但是访问p1=1,p1=2,也不会执行blockHandler所指定方法
只有p1=x,对x值访问超过了阈值,才会执行
若不指定blockHandler,那么QPS满足后,前台会看到500错误页面
blockHandler只针对QPS,如果是方法里面出现异常,不走blockHandler指定方法
@GetMapping("/testHotKey")
@SentinelResource(value = "aaa",blockHandler = "blockHandlerTestHotKey")
public String testHotKey(@RequestParam(value = "p1",required = false) String p1,
                         @RequestParam(value = "p2",required = false) String p2){
    return "hotKey~~~~";
}

//与@SentinelResource的blockHandler值一致
public String blockHandlerTestHotKey(String p1, String p2, BlockException blockException){
    return "!!!!!!!!!!";
}@SentinelResource的value值指的是资源名,对/testHotKey进行限制不能达到效果,只能对aaa限制
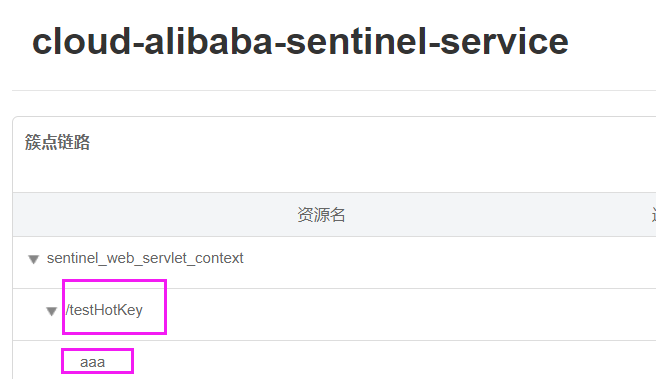
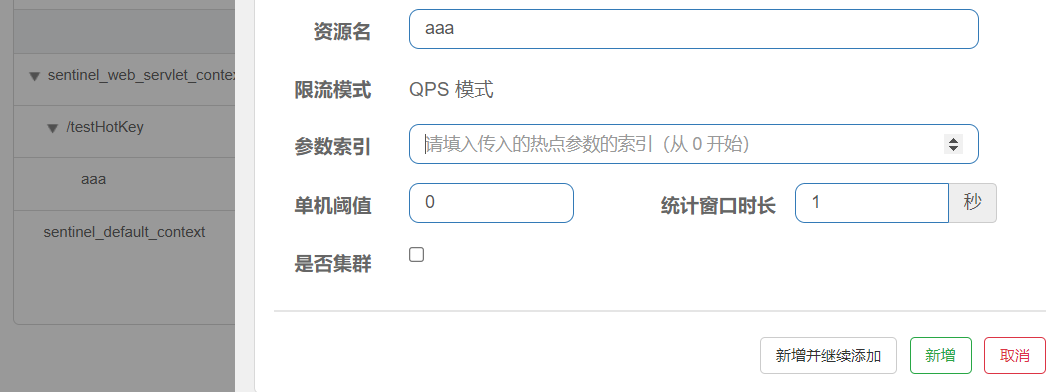
这里的参数索引指的是java代码中方法的参数索引(与输入在浏览器上的顺序无关)
高级选项:
对于指定参数索引,可对于单个值就行特定处理,其他值限流阈值为上方的1,
而特定的值5,则可达到200(即p1 = 5的访问)

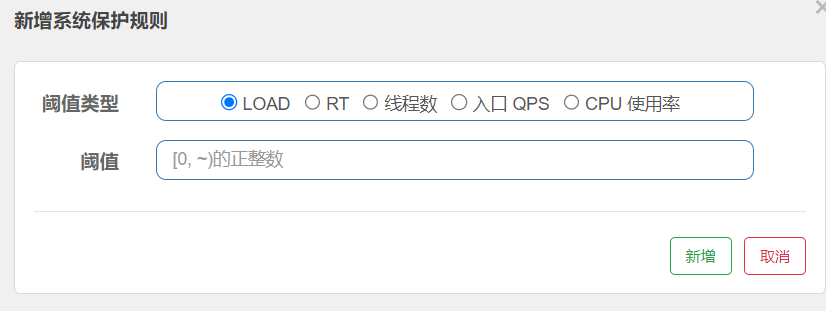
17.5 系统规则
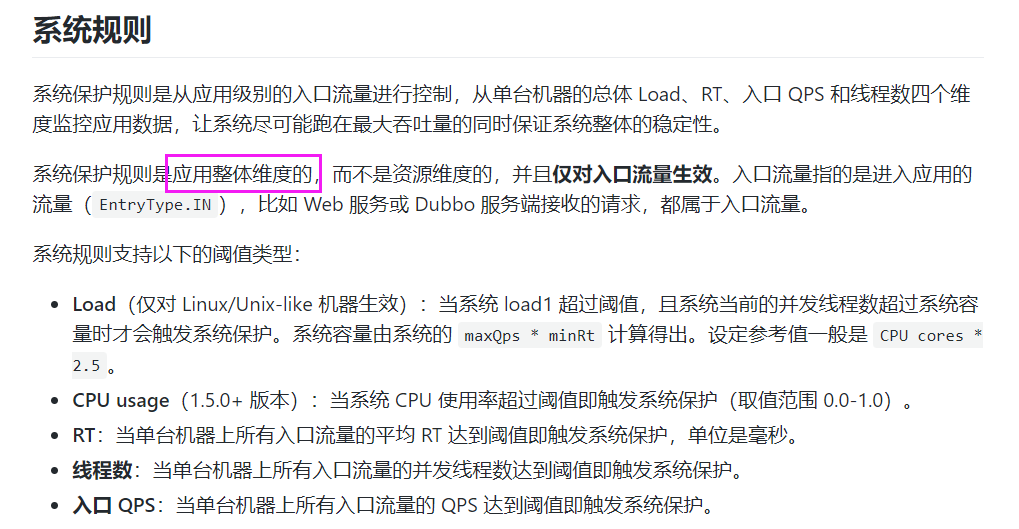
17.6 SentinelResource配置
不支持private方法
@RestController
public class RateLimitController {

    @GetMapping("/byResource")
    @SentinelResource(value = "byResource",blockHandler = "handleException")
    public CommonResult byResource(){
        return new CommonResult(200,"按资源名限流测试ok~~",new Payment(2023L,"serial001"));
    }

    public CommonResult handleException(BlockException blockException){
        return new CommonResult(444,blockException.getClass().getCanonicalName()+"\t 服务不可用");
    }

}1.使用byResource来配置流控(即资源名)
和前面热点参数限流一样,设置流控和热点是差不多的,一旦QPS达到条件,就执行blockHandler方法
2.使用/byResource来配置流控(即请求路径)
那么一旦QPS达到要求,返回的是Blocked by Sentinel (flow limiting),而不是blockHandler方法
每个方法都要有一个blockHandler方法,为避免代码膨胀,建立全局处理
@GetMapping("/rateLimit/customerBlockHandler")
@SentinelResource(
    value = "customerBlockHandler",
    blockHandler = "customerBlockHandler2",
    blockHandlerClass = CustomerBlockHandler.class
)
public CommonResult customerBlockHandler(){
    return new CommonResult(200,"按客户自定义限流测试ok~~",new Payment(2023L,"serial001"));
}
public class CustomerBlockHandler {
//必须是public static
public static CommonResult customerBlockHandler(BlockException blockException){
return new CommonResult(4444,"按客户自定义,global handlerException----1");
}
public static CommonResult customerBlockHandler2(BlockException blockException){
return new CommonResult(4444,"按客户自定义,global handlerException----2");
}
}注意:是对资源名customerBlockHandler进行流控
17.7 fallback
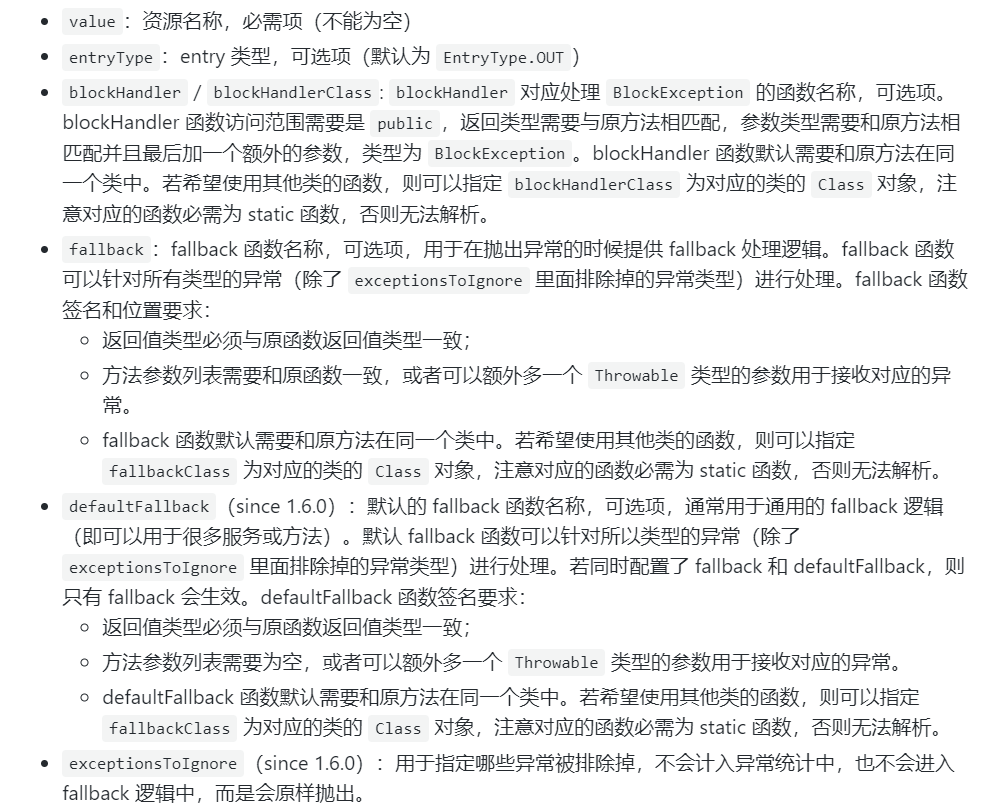
前面SentinelResource配置有详细说明,编写fallback的要求
注意:fallback和defaultFallback,一个是参数必须一致,一个是为空或者可以额外多一个
Throwable 类型的参数
客户端(调用服务者,用户)代码
1.无多余配置
像这样配置,那么如果抛出异常,用户直接就看见了
@RestController
public class CircleBreakerController {

    @Resource
    private PaymentFeignClient paymentFeignClient;

    @GetMapping("/consumer/fallback/{id}")
    @SentinelResource(value = "fallback")
    public CommonResult<Payment> fallback(@PathVariable("id") Long id){
        CommonResult<Payment> result = paymentFeignClient.payment();
        if(id == 4){
            throw new IllegalArgumentException("非法参数异常...");
        }else if(result.getData() == null){
            throw new NullPointerException("该id无对应记录...");
        }

        return result;
    }

}
2.只配置fallback
不抛出异常,而是执行fallback方法
fallback管运行异常,而blockHandler管配置违规(如设置的QPS条件)
@GetMapping("/consumer/fallback/{id}")
@SentinelResource(value = "fallback",fallback = "handlerFallback")
public CommonResult<Payment> fallback(@PathVariable("id") Long id){
    CommonResult<Payment> result = paymentFeignClient.payment();
    if(id == 4){
        throw new IllegalArgumentException("非法参数异常...");
    }else if(result.getData() == null){
        throw new NullPointerException("该id无对应记录...");
    }

    return result;
}

public CommonResult handlerFallback(@PathVariable("id") Long id,Throwable e){
    return new CommonResult(444,"fallback!!!"+e.getMessage(),new Payment(id,null));
}
3.只配置blockHandler
前面热点参数限流写过,没有用,直接报错
如果配置了流控,先错误页面,到达要求后,报Blocked by Sentinel (flow limiting)
4.都配置
如果同时运行异常+流控异常,优先执行blockHandler,因为流控异常后直接进不去方法*,所以更不会执行fallback
@RestController
public class CircleBreakerController {

    @Resource
    private PaymentFeignClient paymentFeignClient;

    @GetMapping("/consumer/fallback/{id}")
    @SentinelResource(value = "fallback",fallback = "handlerFallback",blockHandler = "blockHandler")
    public CommonResult<Payment> fallback(@PathVariable("id") Long id){
        CommonResult<Payment> result = paymentFeignClient.payment();
        if(id == 4){
            throw new IllegalArgumentException("非法参数异常...");
        }else if(result.getData() == null){
            throw new NullPointerException("该id无对应记录...");
        }

        return result;
    }

    public CommonResult handlerFallback(@PathVariable("id") Long id,Throwable e){
        return new CommonResult(444,"fallback!!!"+e.getMessage(),new Payment(id,null));
    }

    public CommonResult blockHandler(@PathVariable("id") Long id,BlockException blockException){
        return new CommonResult(444,"blockHandler!!!",new Payment(id,null));
    }

}
对于exceptionsToIgnore参数,是排除所写异常,让他们正常报错

客户端降级(和前面Hystrix降级那里讲的一样,靠的是openfeign的@FeignClient)
@FeignClient(value = "nacos-payment-provider",fallback = MyPaymentFallback.class)
public interface PaymentFeignClient {

    @GetMapping("/payment/id")
    CommonResult<Payment> payment();
}
注意实现接口,也就是每个方法都要有降级方法
//注意这里必须要有component
@Component
public class MyPaymentFallback implements PaymentFeignClient {

    @Override
    public CommonResult<Payment> payment() {
        return new CommonResult<>(444,"openfeign服务降级~~~",null);
    }

}
这个可以实现:服务端down了,客户端可获得信息而不会挂起耗死服务器
和Hystrix一样:
默认服务器down了
1.不写openfeign这个,会调用@SentinelResource的fallback
2.都写,controller方法内有异常(无论在调用openfeign前还是后)会调用@SentinelResource的fallback
3.都写,controller方法内无异常,才会调用openfeign的fallback
17.8 持久化,动态规则扩展
重启微服务后,其在控制台配的相关配置就会消失,因此要持久化
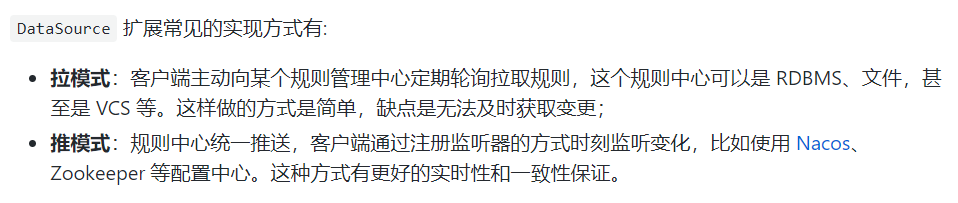
解决:依靠Nacos(推模式),本地文件、数据库(拉模式)
现在采用Nacos,Nacos的配置一旦改变发布后,Sentinel就会加载其配置
服务重启后,会自动读取配置,实现持久化
<!-- 用于持久化 -->
<dependency>
    <groupId>com.alibaba.csp</groupId>
    <artifactId>sentinel-datasource-nacos</artifactId>
</dependency>
server:
port: 8401
spring:
application:
name: cloud-alibaba-sentinel-service
cloud:
nacos:
discovery:
server-addr: localhost:8848 #nacos地址
sentinel:
transport:
#Sentinel dashboard地址
dashboard: localhost:8080
#默认8719,被占用后会依次+1
port: 8719
#持久化
datasource:
ds1:
nacos:
server-addr: localhost:8848 #nacos地址
dataId: ${spring.application.name}
groupId: DEFAULT_GROUP
data-type: json
rule-type: flow
management:
endpoints:
web:
exposure:
include: '*'然后根据配置在Nacos进行编写
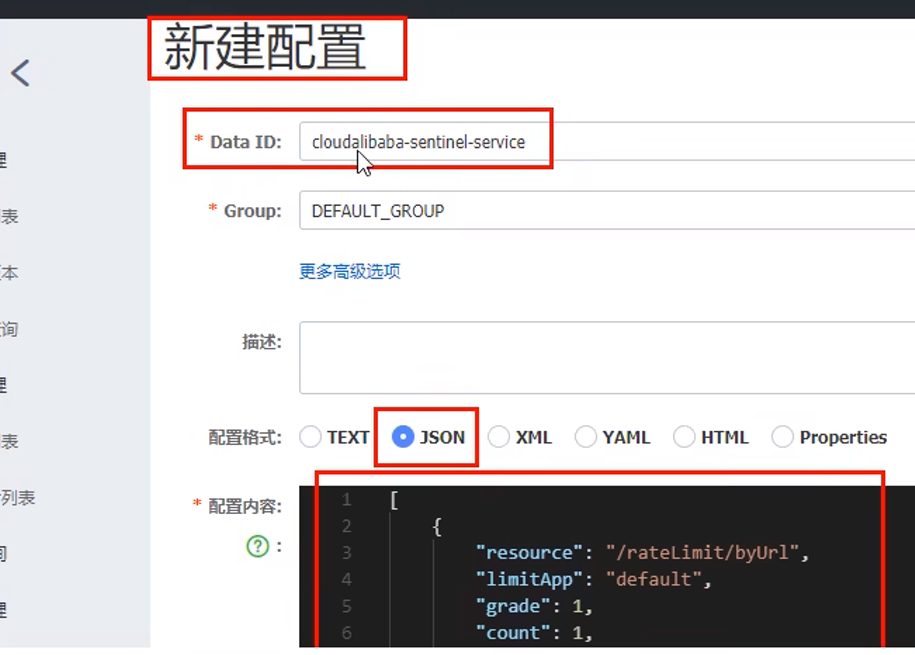

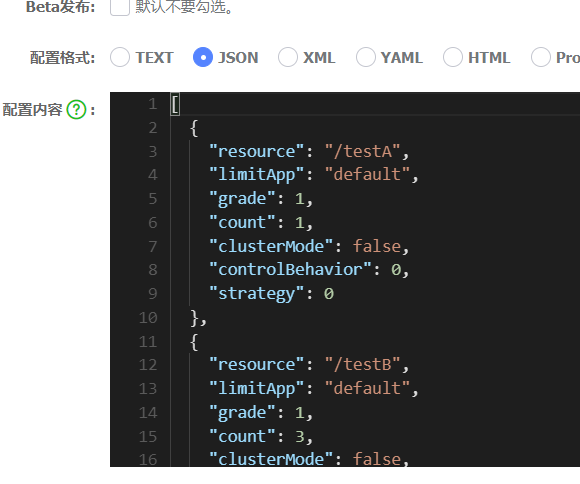
这些规则可以知道怎么写json参数
比如:(注意写进nacos时不要带上注释)
[
{
// 资源名
"resource": "/test",
// 针对来源,若为 default 则不区分调用来源
"limitApp": "default",
// 限流阈值类型(0:并发线程数 1:QPS)
"grade": 1,
// 单机阈值
"count": 1,
// 是否是集群模式
"clusterMode": false,
// 流控效果(0:快速失败;1:Warm Up(预热模式);2:排队等待)
"controlBehavior": 0,
// 流控模式(0:直接;1:关联;2:链路)
"strategy": 0,
// 预热时间(秒,预热模式需要此参数)
"warmUpPeriodSec": 10,
// 超时时间(排队等待模式需要此参数)
"maxQueueingTimeMs": 500,
// 关联资源、入口资源(关联、链路模式)
"refResource": "rrr"
}
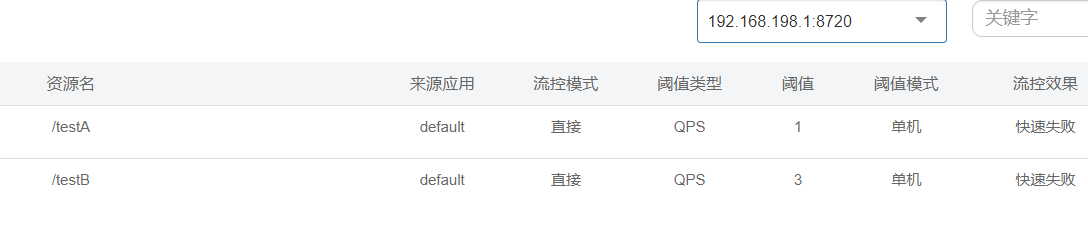
]https://blog.csdn.net/qq_36763419/article/details/121560105可以看到参数的解析
效果:
18. Seata解决分布式事务
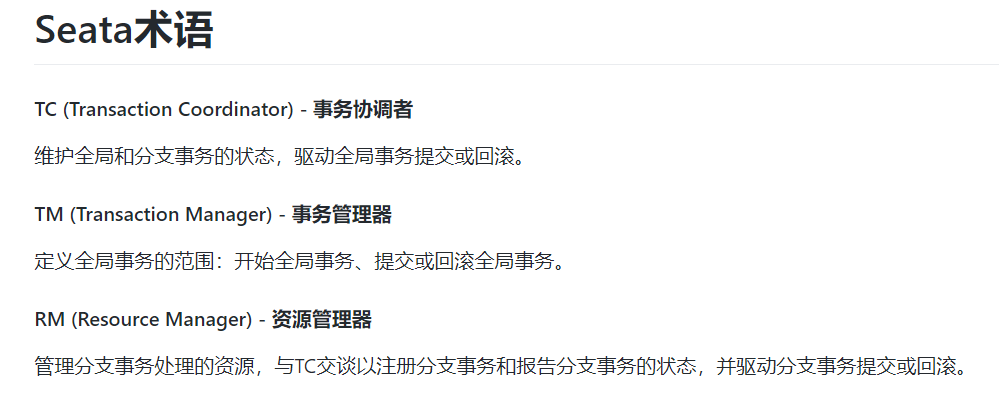
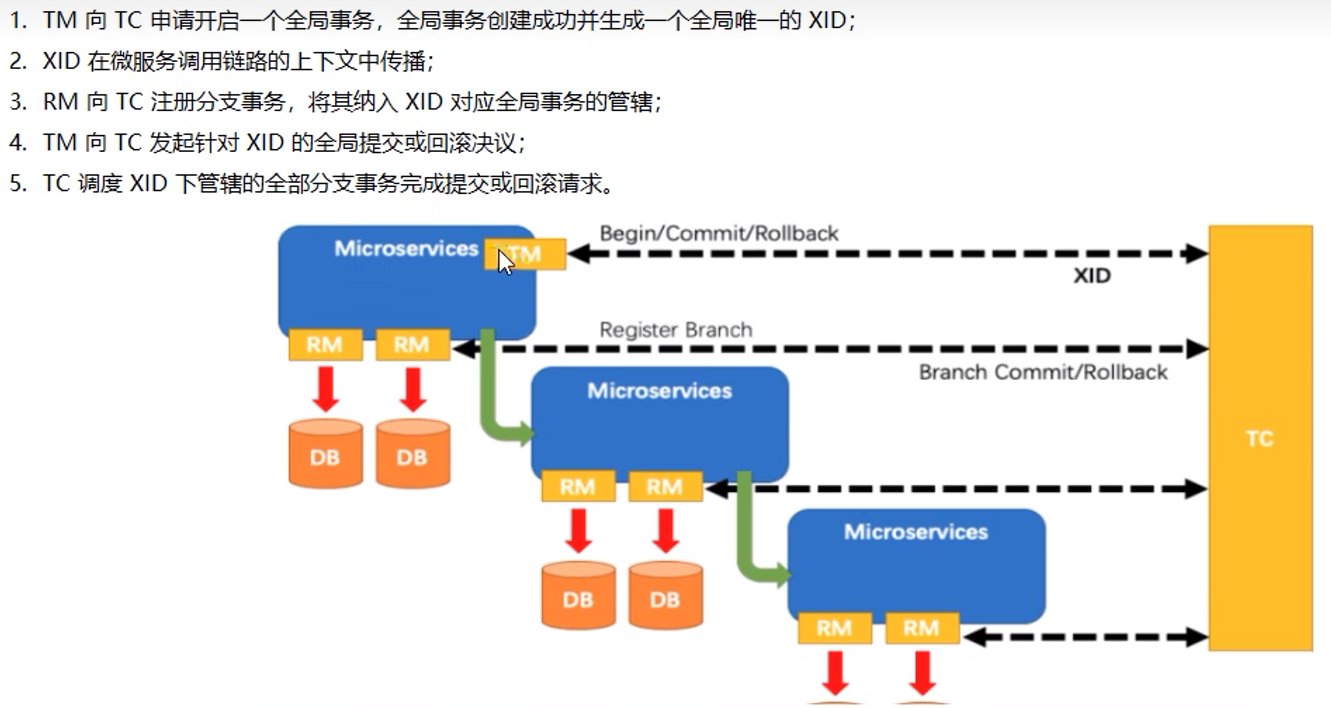
18.1 术语

18.2 使用
1.4.2版本
1.修改conf目录下的registry.conf文件
registry {
# tc服务的注册中心类,这里选择nacos,也可以是eureka、zookeeper等
type = "nacos"
nacos {
# seata tc 服务注册到 nacos的服务名称,可以自定义
application = "seata-tc-server"
serverAddr = "127.0.0.1:8848"
group = "DEFAULT_GROUP"
namespace = ""
cluster = "SH"
username = "nacos"
password = "nacos"
}
}
config {
# 读取tc服务端的配置文件的方式,这里是从nacos配置中心读取,这样如果tc是集群,可以共享配置
type = "nacos"
# 配置nacos地址等信息
nacos {
serverAddr = "127.0.0.1:8848"
namespace = ""
group = "SEATA_GROUP"
username = "nacos"
password = "nacos"
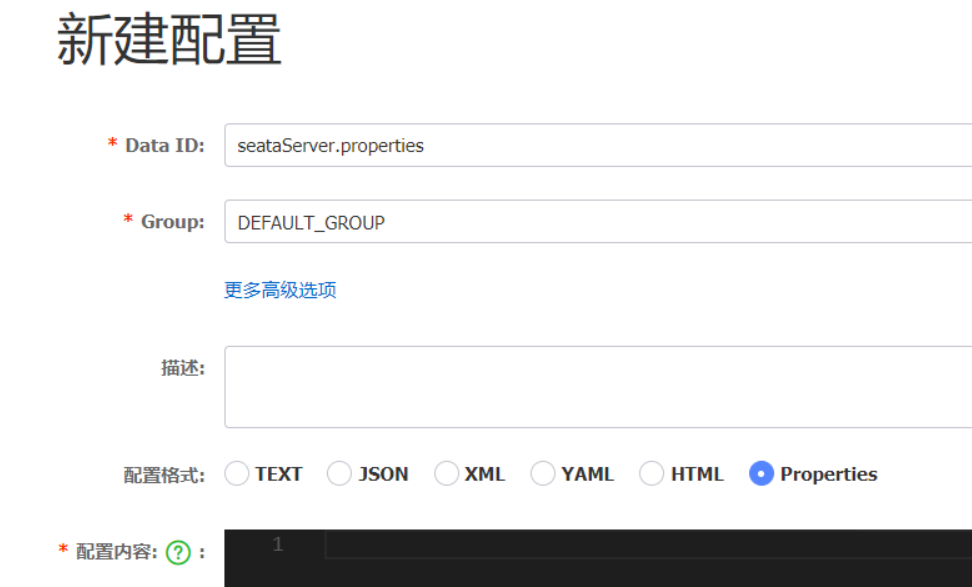
dataId = "seataServer.properties"
}
}2.在nacos添加配置
# 数据存储方式,db代表数据库
store.mode=db
store.db.datasource=druid
store.db.dbType=mysql
store.db.driverClassName=com.mysql.jdbc.Driver
store.db.url=jdbc:mysql://127.0.0.1:3306/seata?useUnicode=true&rewriteBatchedStatements=true
store.db.user=root
store.db.password=123
store.db.minConn=5
store.db.maxConn=30
store.db.globalTable=global_table
store.db.branchTable=branch_table
store.db.queryLimit=100
store.db.lockTable=lock_table
store.db.maxWait=5000
# 事务、日志等配置
server.recovery.committingRetryPeriod=1000
server.recovery.asynCommittingRetryPeriod=1000
server.recovery.rollbackingRetryPeriod=1000
server.recovery.timeoutRetryPeriod=1000
server.maxCommitRetryTimeout=-1
server.maxRollbackRetryTimeout=-1
server.rollbackRetryTimeoutUnlockEnable=false
server.undo.logSaveDays=7
server.undo.logDeletePeriod=86400000

# 客户端与服务端传输方式
transport.serialization=seata
transport.compressor=none
# 关闭metrics功能,提高性能
metrics.enabled=false
metrics.registryType=compact
metrics.exporterList=prometheus
metrics.exporterPrometheusPort=9898
3.创建数据库表
特别注意:tc服务在管理分布式事务时,需要记录事务相关数据到数据库中,你需要提前创建好这些表。
这些表主要记录全局事务、分支事务、全局锁信息:
SET NAMES utf8mb4;
SET FOREIGN_KEY_CHECKS = 0;

-- ----------------------------
-- 分支事务表
-- ----------------------------
DROP TABLE IF EXISTS `branch_table`;
CREATE TABLE `branch_table`  (
  `branch_id` bigint(20) NOT NULL,
  `xid` varchar(128) CHARACTER SET utf8 COLLATE utf8_general_ci NOT NULL,
  `transaction_id` bigint(20) NULL DEFAULT NULL,
  `resource_group_id` varchar(32) CHARACTER SET utf8 COLLATE utf8_general_ci NULL DEFAULT NULL,
  `resource_id` varchar(256) CHARACTER SET utf8 COLLATE utf8_general_ci NULL DEFAULT NULL,
  `branch_type` varchar(8) CHARACTER SET utf8 COLLATE utf8_general_ci NULL DEFAULT NULL,
  `status` tinyint(4) NULL DEFAULT NULL,
  `client_id` varchar(64) CHARACTER SET utf8 COLLATE utf8_general_ci NULL DEFAULT NULL,
  `application_data` varchar(2000) CHARACTER SET utf8 COLLATE utf8_general_ci NULL DEFAULT NULL,
  `gmt_create` datetime(6) NULL DEFAULT NULL,
  `gmt_modified` datetime(6) NULL DEFAULT NULL,
  PRIMARY KEY (`branch_id`) USING BTREE,
  INDEX `idx_xid`(`xid`) USING BTREE
) ENGINE = InnoDB CHARACTER SET = utf8 COLLATE = utf8_general_ci ROW_FORMAT = Compact;

-- ----------------------------
-- 全局事务表
-- ----------------------------
DROP TABLE IF EXISTS `global_table`;
CREATE TABLE `global_table`  (
  `xid` varchar(128) CHARACTER SET utf8 COLLATE utf8_general_ci NOT NULL,
  `transaction_id` bigint(20) NULL DEFAULT NULL,
  `status` tinyint(4) NOT NULL,
  `application_id` varchar(32) CHARACTER SET utf8 COLLATE utf8_general_ci NULL DEFAULT NULL,
  `transaction_service_group` varchar(32) CHARACTER SET utf8 COLLATE utf8_general_ci NULL DEFAULT NULL,
  `transaction_name` varchar(128) CHARACTER SET utf8 COLLATE utf8_general_ci NULL DEFAULT NULL,
  `timeout` int(11) NULL DEFAULT NULL,
  `begin_time` bigint(20) NULL DEFAULT NULL,
  `application_data` varchar(2000) CHARACTER SET utf8 COLLATE utf8_general_ci NULL DEFAULT NULL,
  `gmt_create` datetime NULL DEFAULT NULL,
  `gmt_modified` datetime NULL DEFAULT NULL,
  PRIMARY KEY (`xid`) USING BTREE,
  INDEX `idx_gmt_modified_status`(`gmt_modified`, `status`) USING BTREE,
  INDEX `idx_transaction_id`(`transaction_id`) USING BTREE
) ENGINE = InnoDB CHARACTER SET = utf8 COLLATE = utf8_general_ci ROW_FORMAT = Compact;

SET FOREIGN_KEY_CHECKS = 1;
使用AT模式时候,要使用全局锁还要导入seata-at.sql,即导入lock_table(放到seata)和undo_log(放到微服务):
/*
 Navicat Premium Data Transfer

 Source Server         : local
 Source Server Type    : MySQL
 Source Server Version : 50622
 Source Host           : localhost:3306
 Source Schema         : seata_demo

 Target Server Type    : MySQL
 Target Server Version : 50622
 File Encoding         : 65001

 Date: 20/06/2021 12:39:03
*/

SET NAMES utf8mb4;
SET FOREIGN_KEY_CHECKS = 0;

-- ----------------------------
-- Table structure for undo_log
-- ----------------------------
DROP TABLE IF EXISTS `undo_log`;
CREATE TABLE `undo_log`  (
  `branch_id` bigint(20) NOT NULL COMMENT 'branch transaction id',
  `xid` varchar(100) CHARACTER SET utf8 COLLATE utf8_general_ci NOT NULL COMMENT 'global transaction id',
  `context` varchar(128) CHARACTER SET utf8 COLLATE utf8_general_ci NOT NULL COMMENT 'undo_log context,such as serialization',
  `rollback_info` longblob NOT NULL COMMENT 'rollback info',
  `log_status` int(11) NOT NULL COMMENT '0:normal status,1:defense status',
  `log_created` datetime(6) NOT NULL COMMENT 'create datetime',
  `log_modified` datetime(6) NOT NULL COMMENT 'modify datetime',
  UNIQUE INDEX `ux_undo_log`(`xid`, `branch_id`) USING BTREE
) ENGINE = InnoDB CHARACTER SET = utf8 COLLATE = utf8_general_ci COMMENT = 'AT transaction mode undo table' ROW_FORMAT = Compact;

-- ----------------------------
-- Records of undo_log
-- ----------------------------


-- ----------------------------
-- Table structure for lock_table
-- ----------------------------
DROP TABLE IF EXISTS `lock_table`;
CREATE TABLE `lock_table`  (
  `row_key` varchar(128) CHARACTER SET utf8 COLLATE utf8_general_ci NOT NULL,
  `xid` varchar(96) CHARACTER SET utf8 COLLATE utf8_general_ci NULL DEFAULT NULL,
  `transaction_id` bigint(20) NULL DEFAULT NULL,
  `branch_id` bigint(20) NOT NULL,
  `resource_id` varchar(256) CHARACTER SET utf8 COLLATE utf8_general_ci NULL DEFAULT NULL,
  `table_name` varchar(32) CHARACTER SET utf8 COLLATE utf8_general_ci NULL DEFAULT NULL,
  `pk` varchar(36) CHARACTER SET utf8 COLLATE utf8_general_ci NULL DEFAULT NULL,
  `gmt_create` datetime NULL DEFAULT NULL,
  `gmt_modified` datetime NULL DEFAULT NULL,
  PRIMARY KEY (`row_key`) USING BTREE,
  INDEX `idx_branch_id`(`branch_id`) USING BTREE
) ENGINE = InnoDB CHARACTER SET = utf8 COLLATE = utf8_general_ci ROW_FORMAT = Compact;


SET FOREIGN_KEY_CHECKS = 1;
18.3 微服务引入seata
注意:这里为了使用1.4.2版本Seata,把父pom的cloud-alibaba改了版本(2.1.0)到(2.2.5)
<dependencies>
        <dependency>
            <groupId>com.alibaba.cloud</groupId>
            <artifactId>spring-cloud-starter-alibaba-seata</artifactId>
        </dependency>
        <!--seata starter 采用1.4.2版本-->
        <dependency>
            <groupId>io.seata</groupId>
            <artifactId>seata-spring-boot-starter</artifactId>
            <version>1.4.2</version>
        </dependency>
        <dependency>
            <groupId>com.alibaba.cloud</groupId>
            <artifactId>spring-cloud-starter-alibaba-nacos-discovery</artifactId>
        </dependency>
        <dependency>
            <groupId>org.springframework.cloud</groupId>
            <artifactId>spring-cloud-starter-openfeign</artifactId>
        </dependency>
        <dependency>
            <groupId>org.springframework.boot</groupId>
            <artifactId>spring-boot-starter-web</artifactId>
        </dependency>
        <dependency>
            <groupId>org.springframework.boot</groupId>
            <artifactId>spring-boot-starter-actuator</artifactId>
        </dependency>
        <!--  基础配置  -->
        <dependency>
            <groupId>org.projectlombok</groupId>
            <artifactId>lombok</artifactId>
            <optional>true</optional>
        </dependency>
        <dependency>
            <groupId>org.springframework.boot</groupId>
            <artifactId>spring-boot-starter-test</artifactId>
            <scope>test</scope>
        </dependency>
    </dependencies>
server:
port: 2001
spring:
application:
name: seata-order-service
cloud:
nacos:
discovery:
server-addr: localhost:8848 #nacos地址
logging:
level:
org.springframework.cloud.alibaba.seata.web: debug
cn.itcast: debug
pattern:
dateformat: MM-dd HH:mm:ss:SSS
seata:
registry: # TC服务注册中心的配置,微服务根据这些信息去注册中心获取tc服务地址
# 参考tc服务自己的registry.conf中的配置
type: nacos
nacos: # tc
server-addr: 127.0.0.1:8848
namespace: ""
group: DEFAULT_GROUP
application: seata-server # tc服务在nacos中的服务名称
cluster: default
username: nacos
password: nacos
tx-service-group: seata-demo # 事务组,根据这个获取tc服务的cluster名称
service:
vgroup-mapping: # 事务组与TC服务cluster的映射关系
seata-demo: default
data-source-proxy-mode: AT
management:
endpoints:
web:
exposure:
include: '*'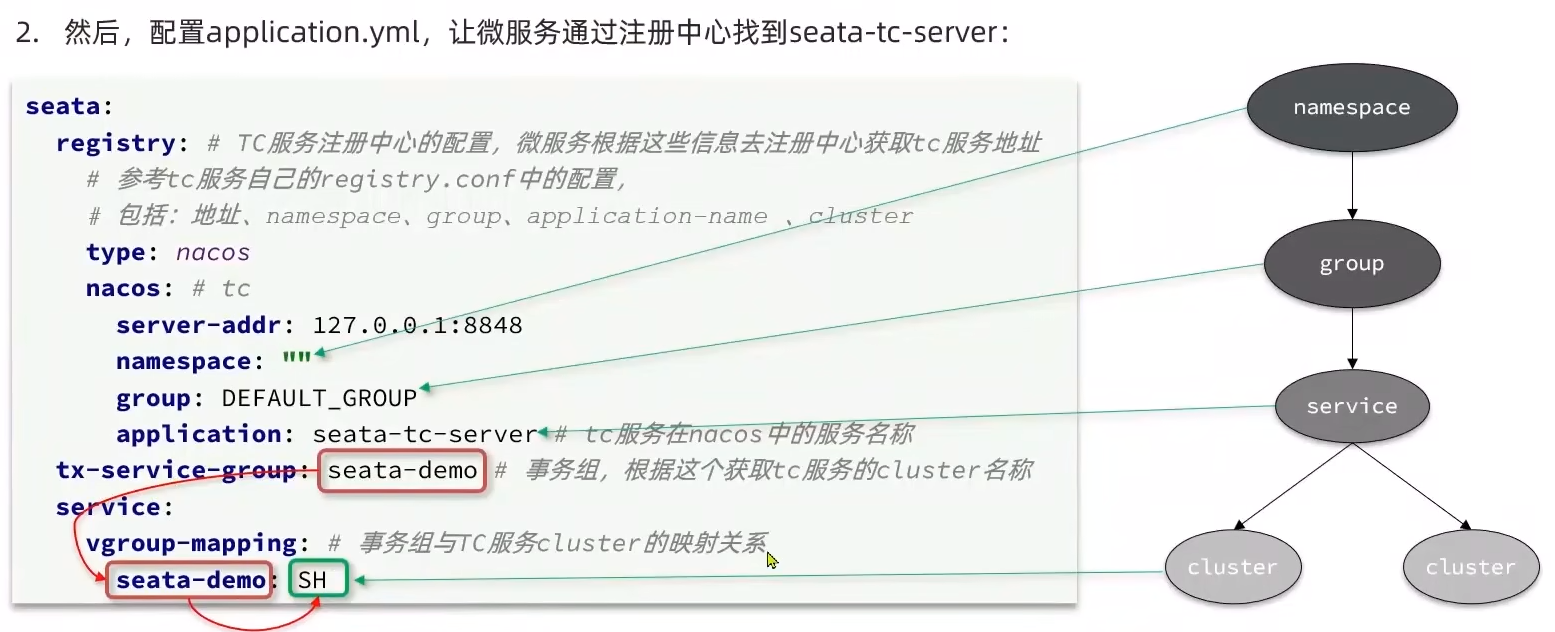
18.4 四个模式
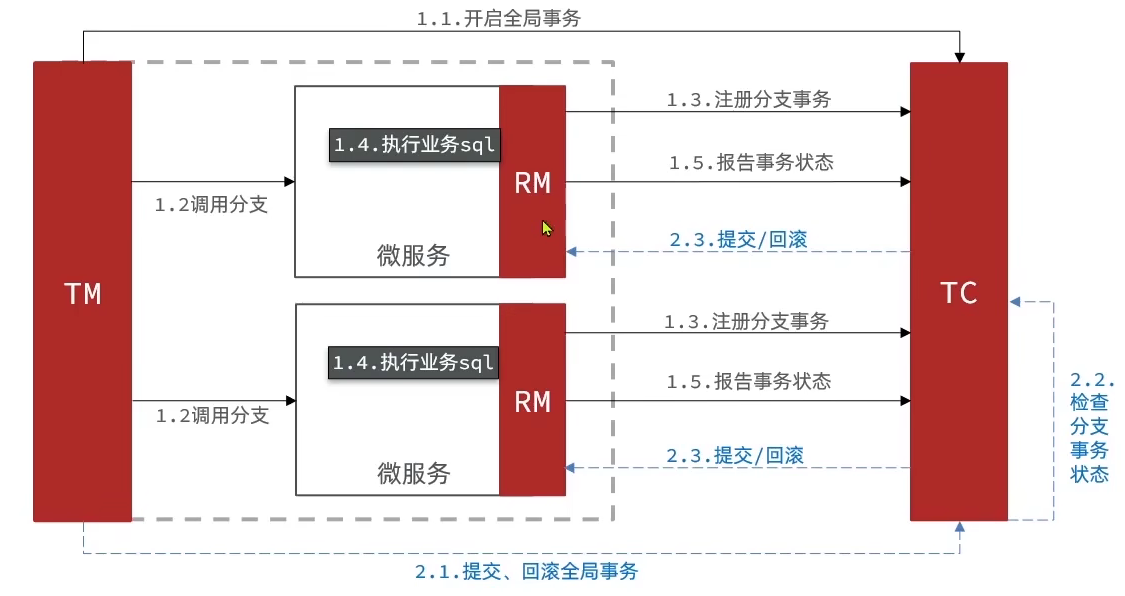
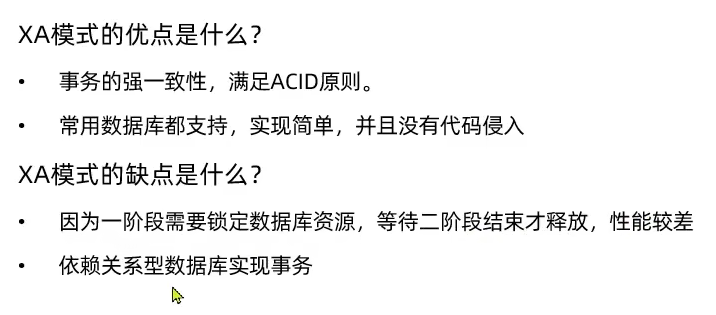
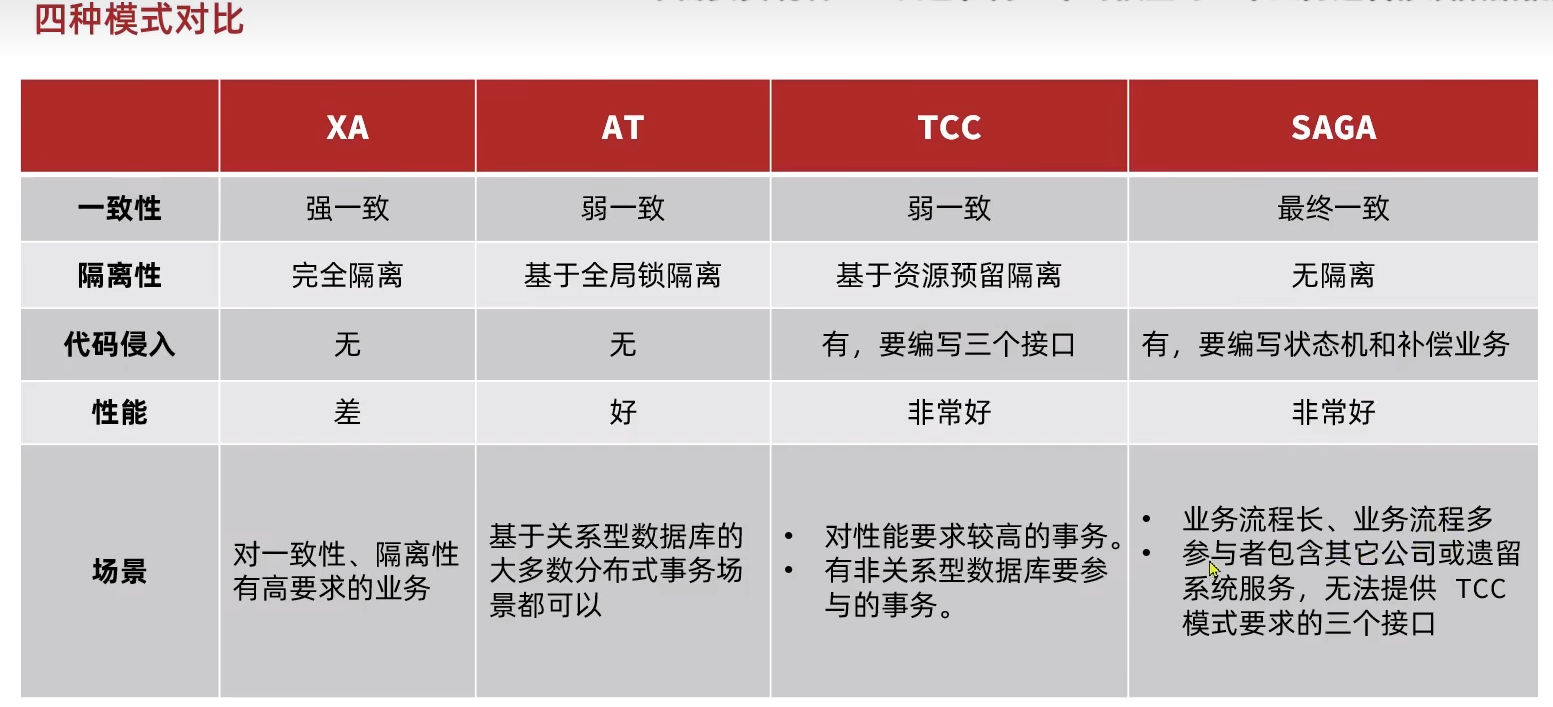
18.4.1 XA模式
性能差,但强一致
在入口的impl类上标注@GlobalTransactional即可
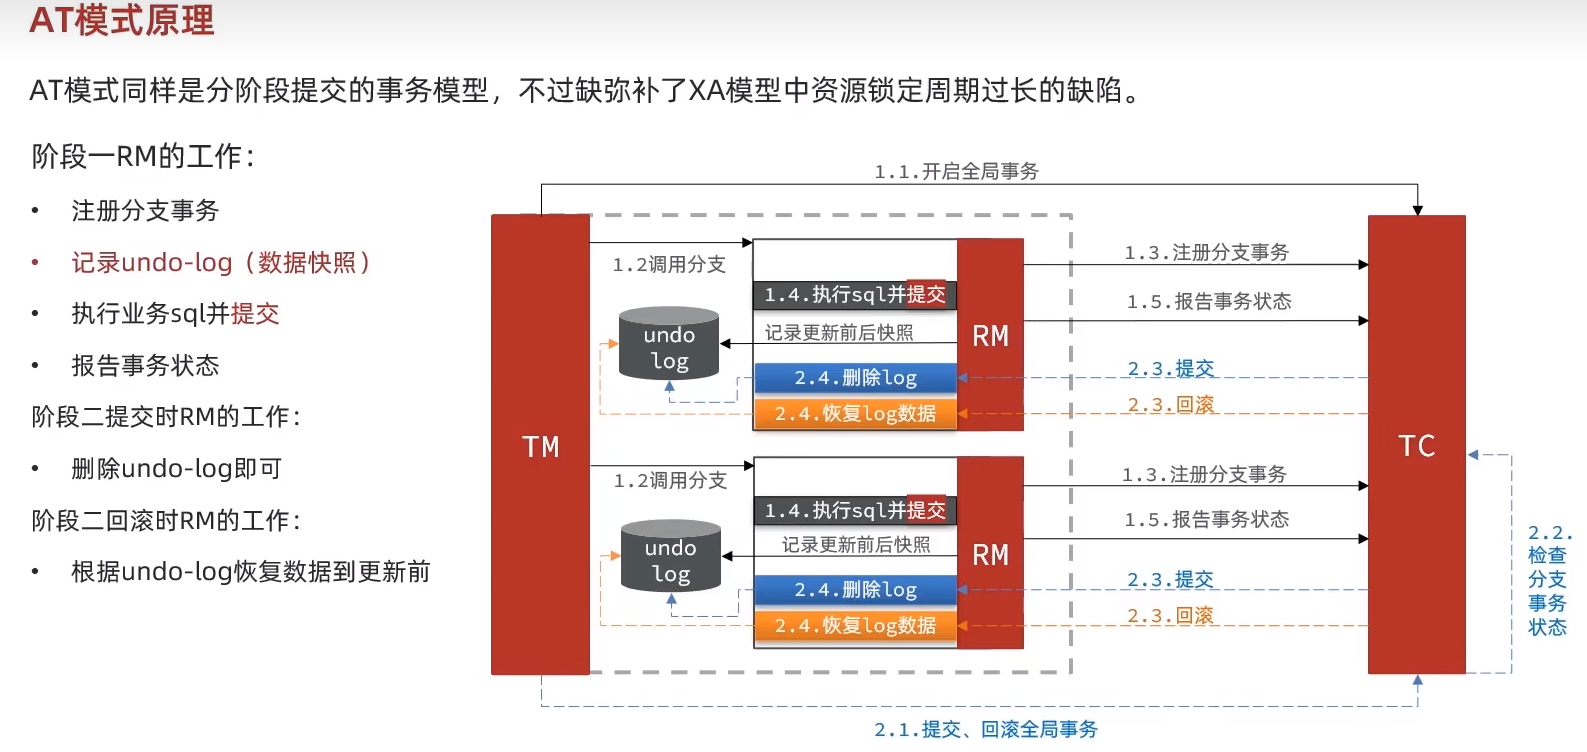
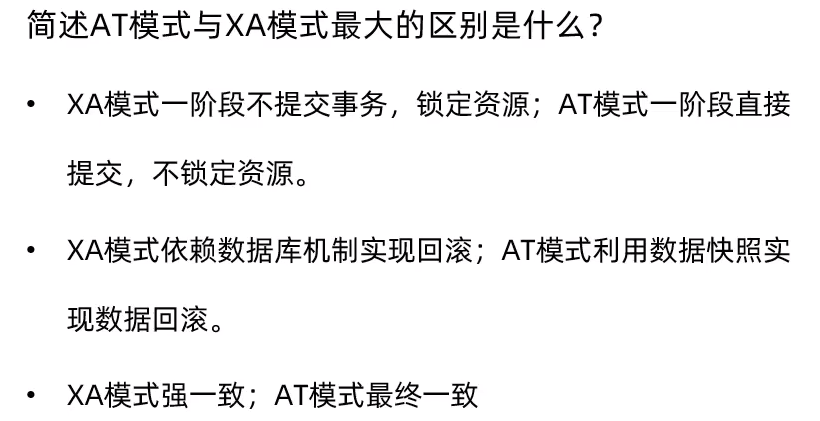
18.4.2 AT模式(默认)
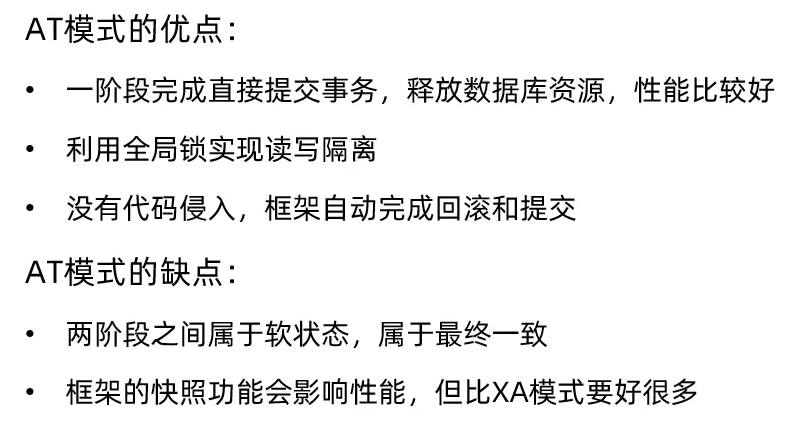
前面XA执行sql后不提交,而AT会提交,所以性能更高,保证最终一致
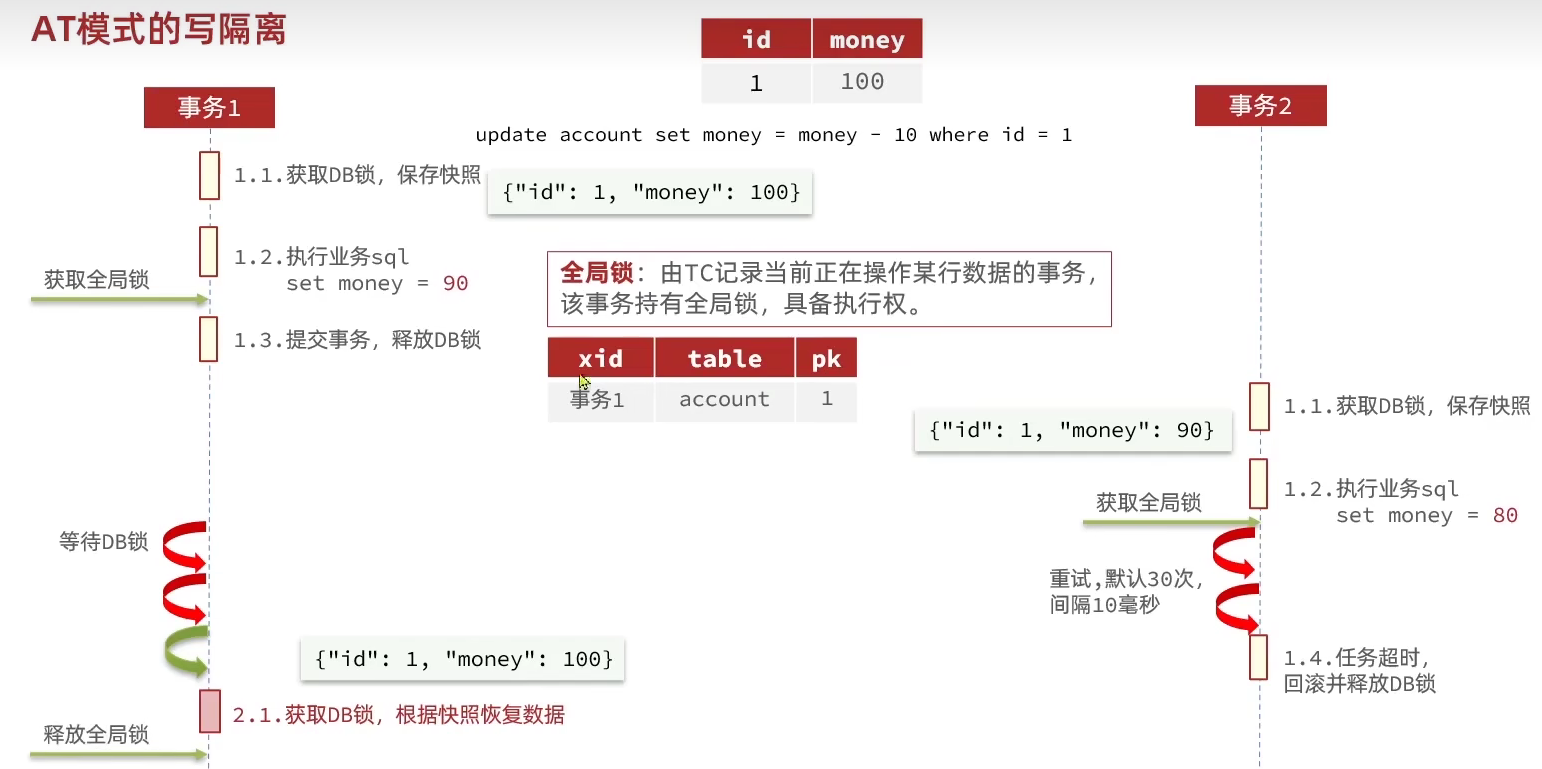
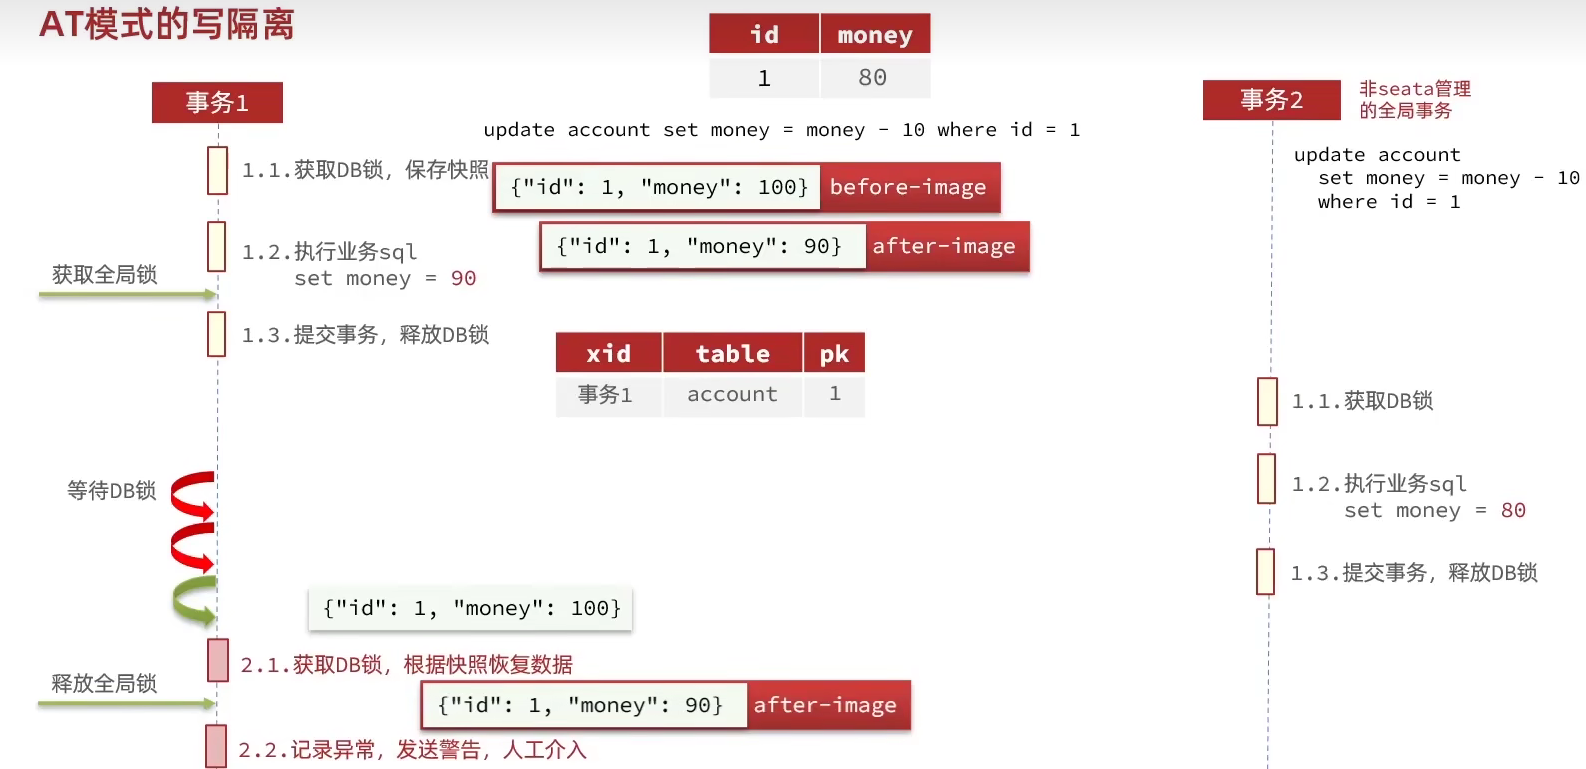
脏写问题:
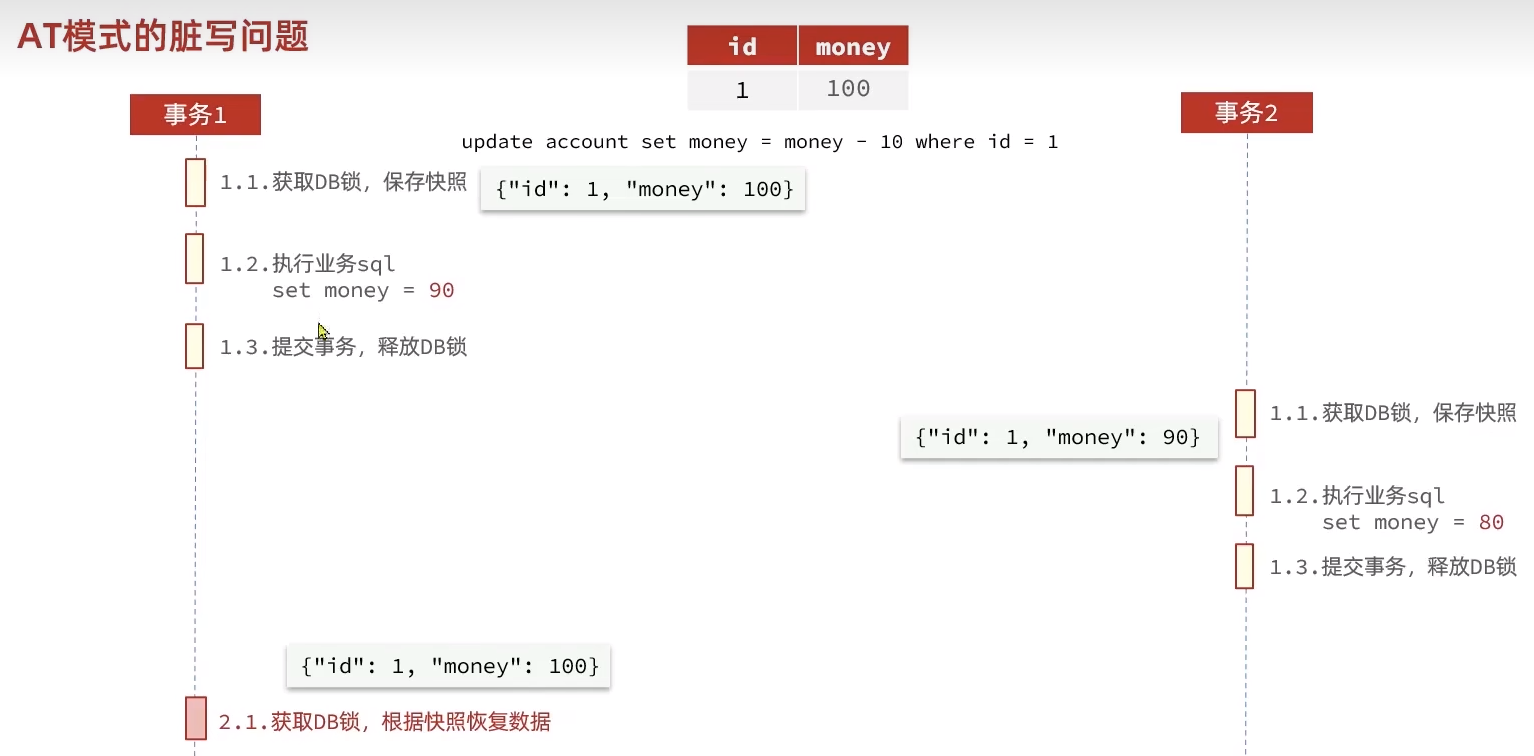
解决:全局锁
非seata管理的事务:
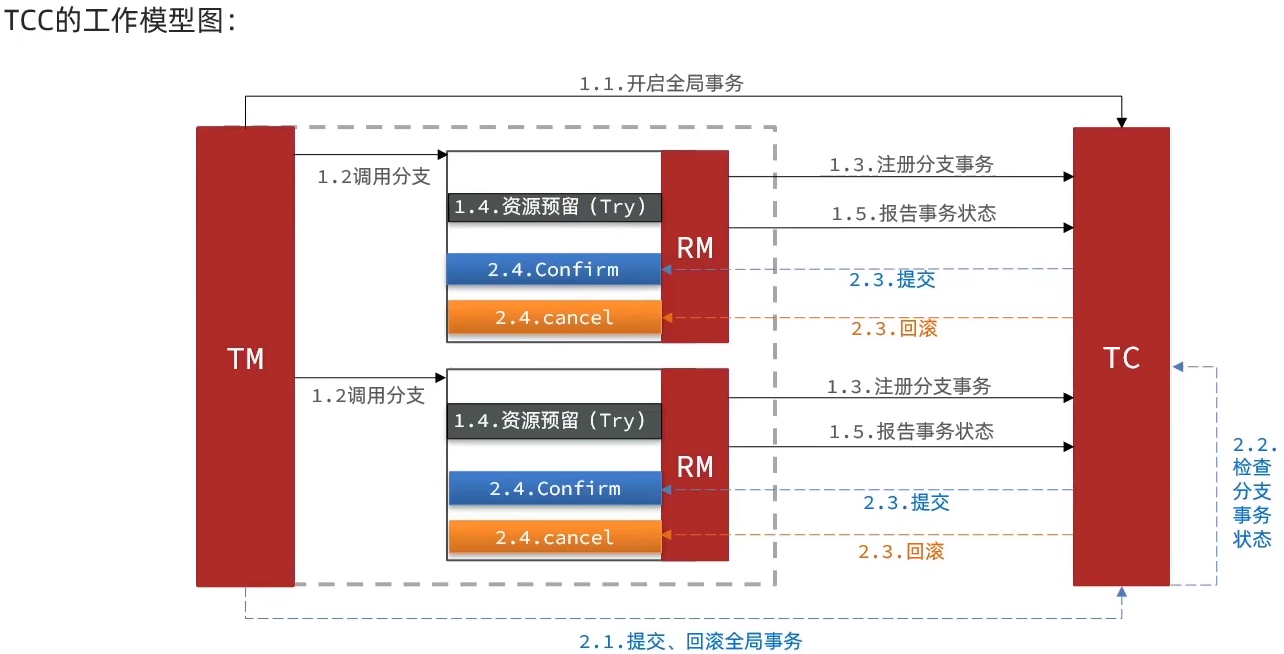
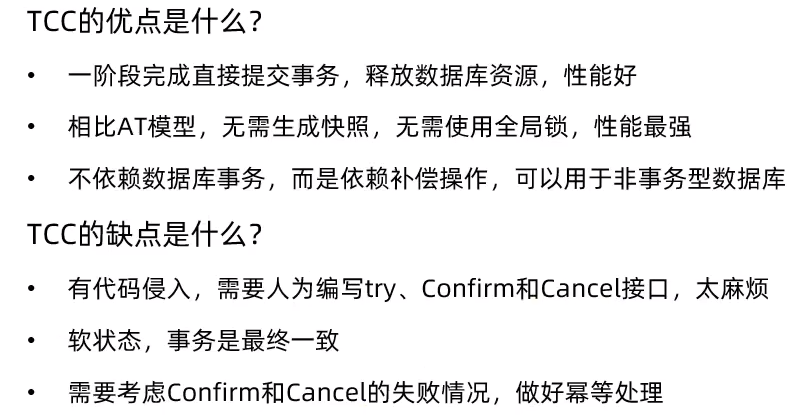
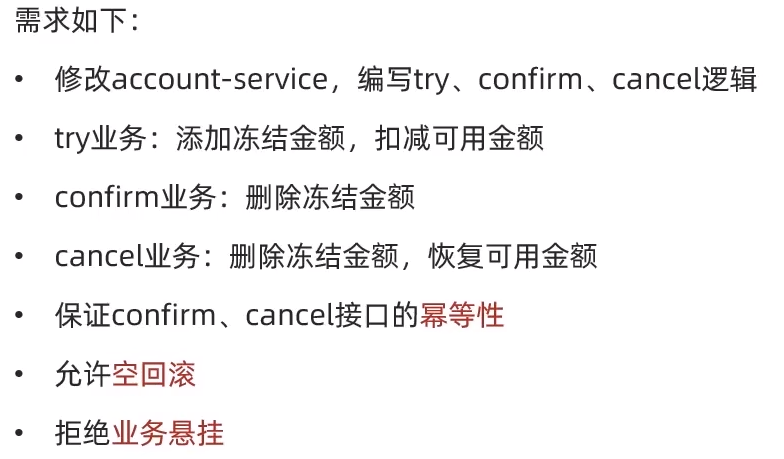
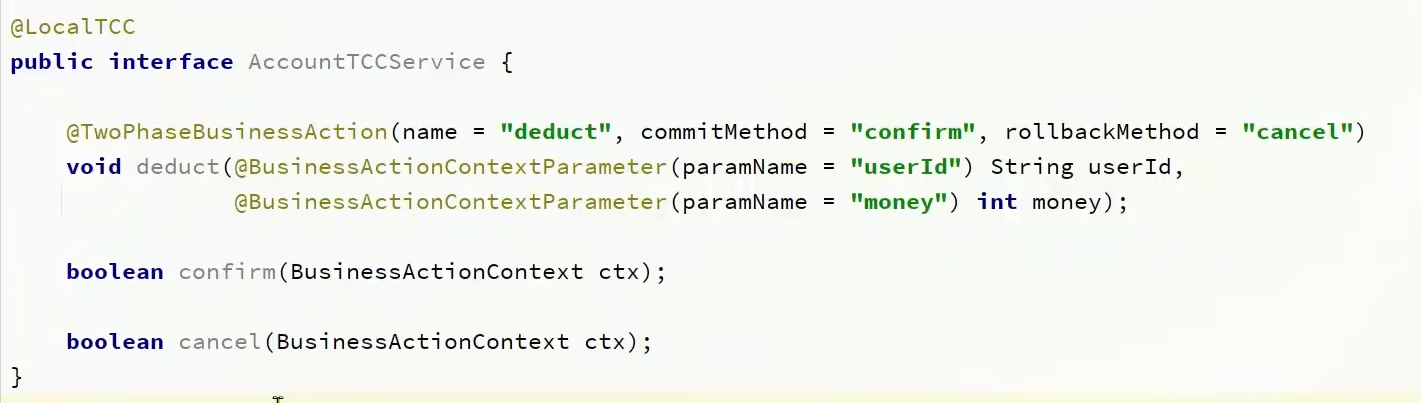
18.4.3 TCC模式
人工编码,不用加锁

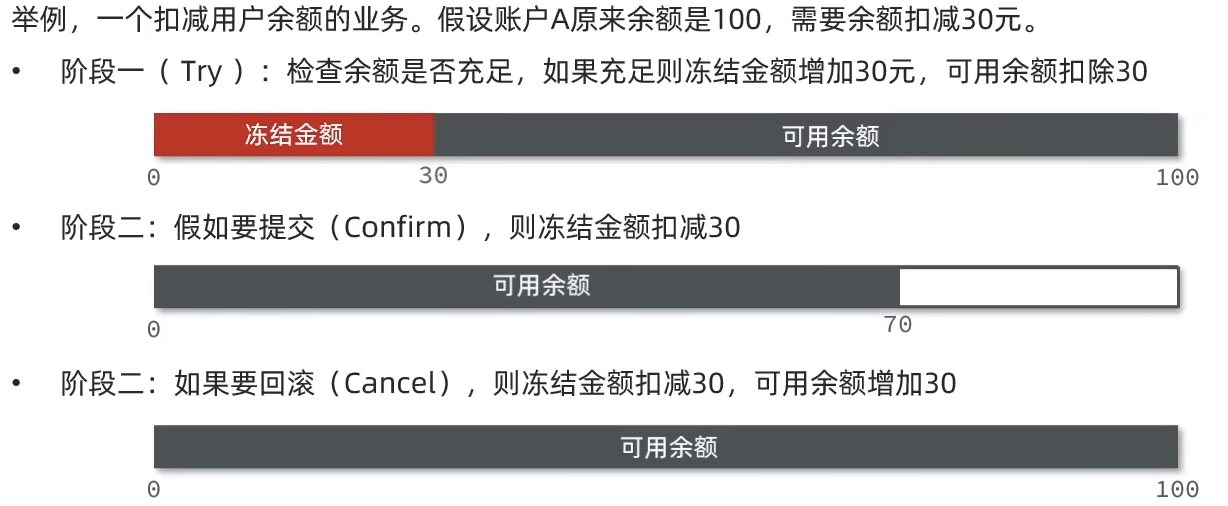
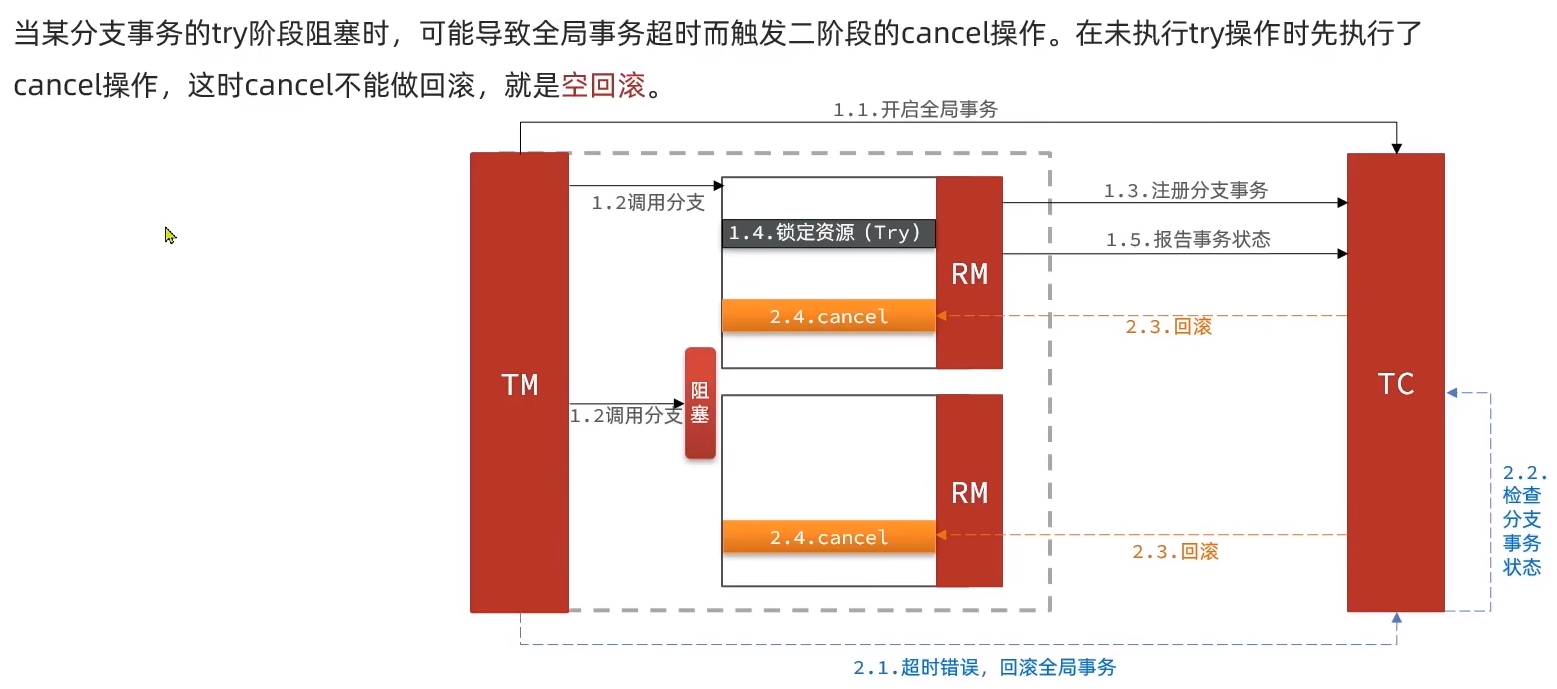
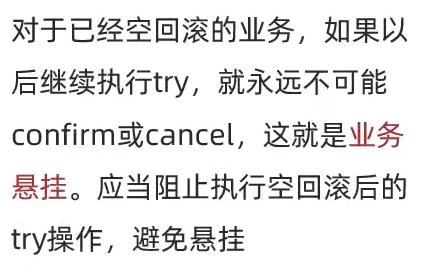
如果此时,try又成功执行了(网络通畅了),即业务悬挂:
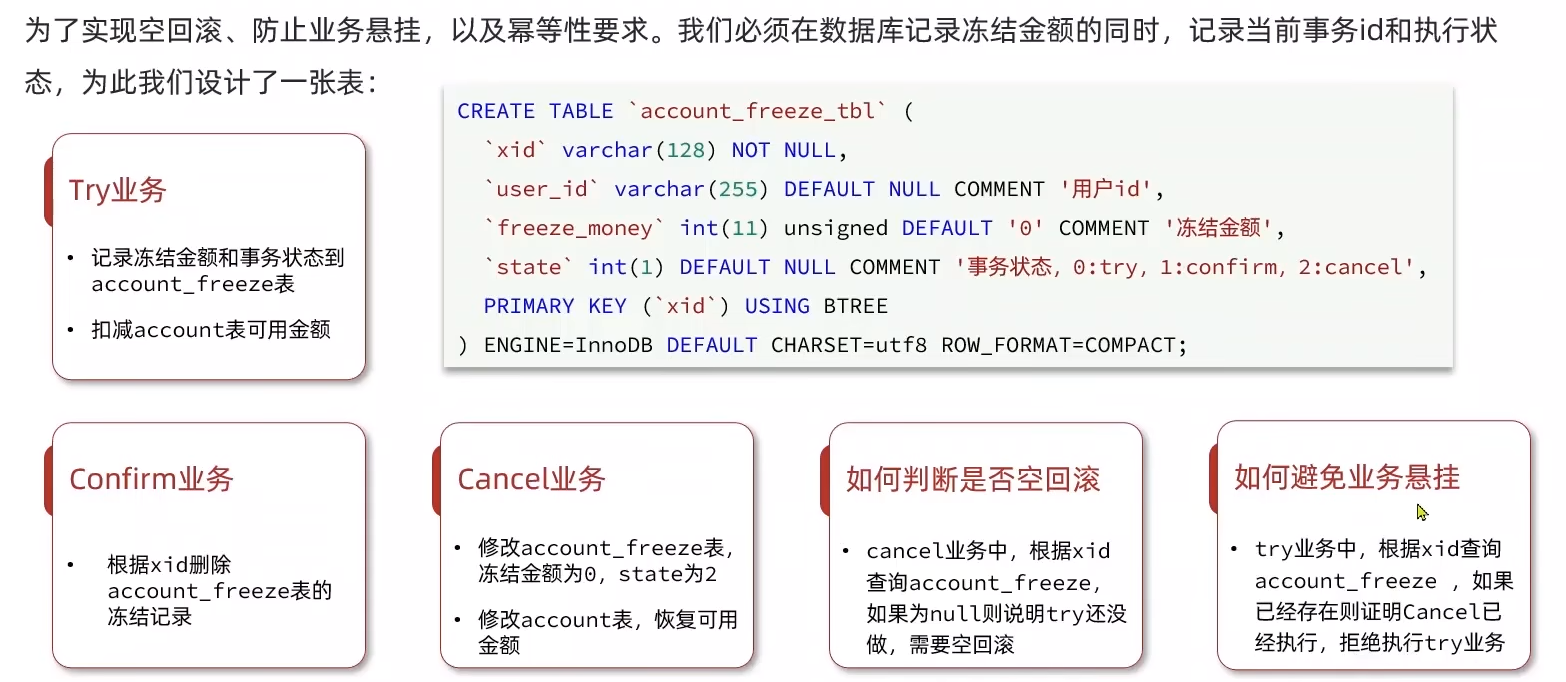
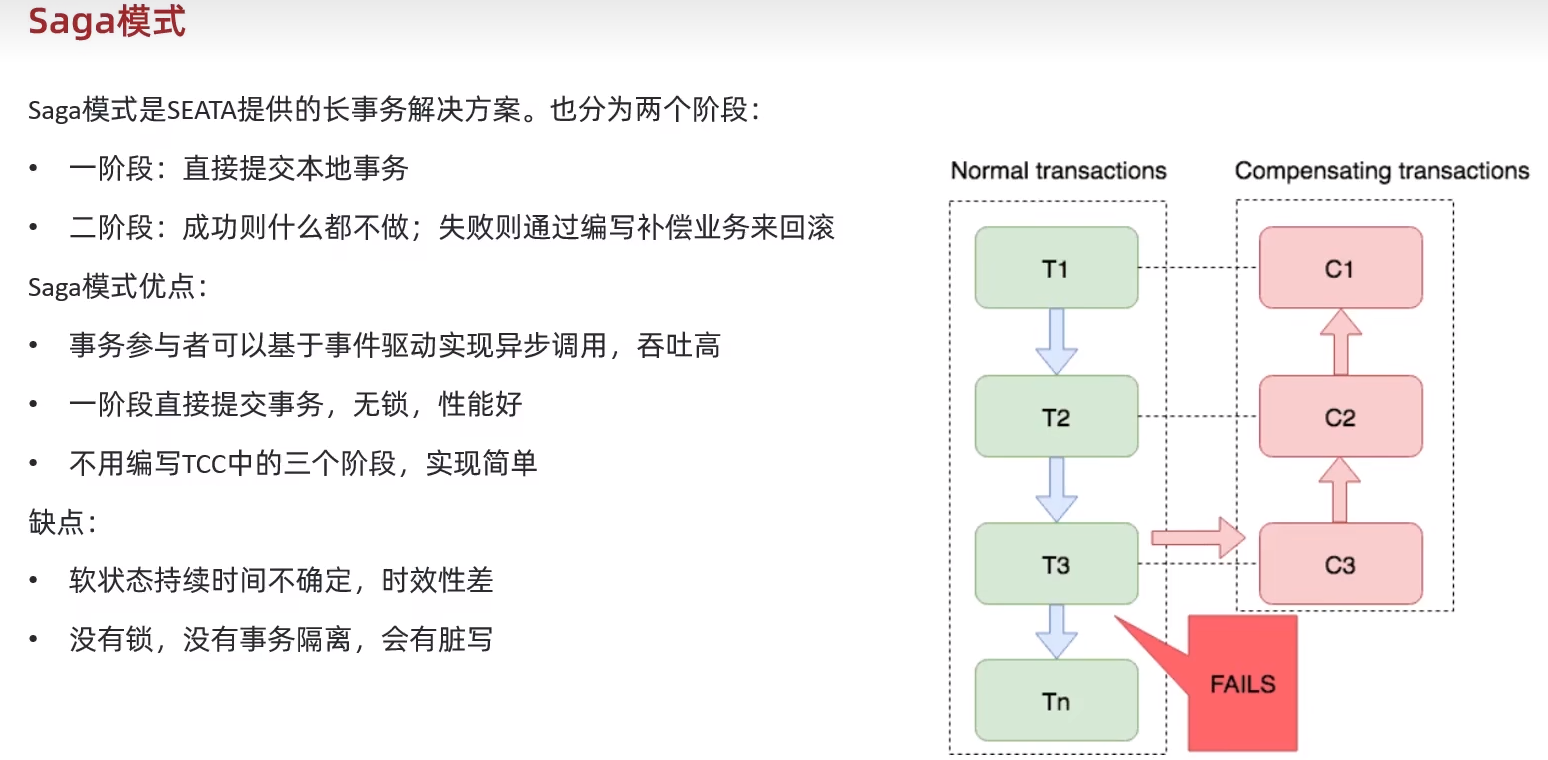
18.4.4 SAGA模式
通过补偿业务
18.4.5 总结
18.5 使用注意
A -> B & A -> C 或者 A -> B -> C -> D 都是可以完成回滚的(版本1.4.2)
必须出现了异常,才会回滚